A wearable is a wrist-worn device that provides communication capabilities and data interaction with mobile devices. It includes both adult smartwatches and children's smartwatches. Wearables have the following key characteristics:
- Small watch display available in two form factors: circular and square. Circular displays provide a circular display area, while square displays provide a rounded-rectangle display area.
- Convenient to view because they are worn on the wrist.
- Small battery capacity, typically less than 1000 mAh.
- Support for a richer set of sensors.
Currently, the main wearable products include WATCH 5, WATCH Ultimate 2, and the HUAWEI WATCH KIDS X series.
Product Name | Illustration |
|---|---|
WATCH 5 |
|
WATCH Ultimate 2 |
|
HUAWEI WATCH KIDS X series |
|


- This guide focuses on development guidance for improving user experience of wearable apps. For general guidance on the fundamental capabilities for developing apps across multiple device types, see One-Time Development for Multi-Device Deployment.
- In addition to the general requirements for wearable apps, children's smartwatch apps are subject to additional review requirements and submission materials during app release. Before development, refer to Child Smartwatch App Release Precautions.
[h2]Display Specifications
Wearables do not support screen rotation. The screen rotation angle is fixed at 0°, and the default screen orientation is portrait. The following table uses WATCH 5 and HUAWEI WATCH KIDS X1 Pro as examples to show their display specifications.
Product Name | Display Specifications (Width × Height) | Illustration |
|---|---|---|
WATCH 5 | Resolution (vp, rounded down): 233 × 233 |
|
Resolution (px): 466 × 466 | ||
HUAWEI WATCH KIDS X1 Pro | Resolution (vp, rounded down): 240 × 204 |
|
Resolution (px): 480 × 408 |


For other wearable products, you can obtain the display resolution (in pixels) by calling getDefaultDisplaySync() in the display module, and then convert it to vp using px2vp().
[h2]Camera Hardware Information
Some wearable products (such as HUAWEI WATCH KIDS X series) are equipped with both front and rear cameras. When developing camera-related features, pay attention to the camera mounting angle and the preview stream rotation angle. For details, see Camera Lens Installation Angle and Preview Rotation Angle. The camera parameters are listed in the following tables.
Screen rotation (rotation) | 0 (0°) | 1 (90°) | 2 (180°) | 3 (270°) |
|---|---|---|---|---|
Front camera illustration |
| Not supported | Not supported | Not supported |
Front camera lens angle | 0° | Not supported | Not supported | Not supported |
Preview stream rotation angle of the front camera | 0° | Not supported | Not supported | Not supported |

Screen rotation (rotation) | 0 (0°) | 1 (90°) | 2 (180°) | 3 (270°) |
|---|---|---|---|---|
Rear camera illustration |
| Not supported | Not supported | Not supported |
Rear camera lens angle | 0° | Not supported | Not supported | Not supported |
Preview stream rotation angle of the rear camera | 0° | Not supported | Not supported | Not supported |

[h2]Rotating Crown Interaction
The crown (upper button) on a wearable supports both press and rotation interactions. Rotating the crown provides real-time interaction feedback. The system handles crown rotation events through the onDigitalCrown() callback and provides built-in crown interaction support for commonly used components.
Key features:
- Event handling: Rotating the crown triggers the onDigitalCrown() callback in real time.
Text(this.count.toString()) // ... .onDigitalCrown((event: CrownEvent) => { event.stopPropagation(); this.count += event.degree; }) - System integration: Components such as scrollable components automatically respond to the crown rotation direction.
The following components support crown interaction by default:
- Scrollable components: Slider, Scroll, ArcSwiper, and Refresh
- Collection components: List, Grid, WaterFlow, and ArcList
- Date and time components: DatePicker and TimePicker
- Text selection component: TextPicker
You can customize crown event handling through the provided APIs to deliver richer interaction experiences. For details about developing crown interactions on wearables, see Crown Event.

- The crown feature depends on hardware support. Make sure that the target wearable is equipped with a crown. Otherwise, crown interaction events are not generated.
- For wearables that do not support a crown, avoid designing core interactions that depend on crown rotation. Instead, use touch interactions, such as tapping, swiping, or standard list operations.
[h2]Smart Gestures
Smart gestures are a unique interaction method available on wearables in addition to touchscreen, crown, and button interactions. In situations where one-handed operation is required, users can control the wearable and switch selections by tapping their fingers or sliding their knuckles.

- Make sure that the target wearable supports smart gestures. You can check whether the smart gestures option is available under Settings > Hand gestures. If the wearable does not support smart gestures, gesture events are not generated.
- To use smart gestures, ensure that the feature is enabled on the wearable.
Interaction scenarios
- Time-sensitive controls that require immediate user action, such as answering phone calls or dismissing alarms.
- Convenient control for frequently used features, such as switching to the next track in the media control center.
- Scenarios where two-handed touch interaction is inconvenient, such as remote photography.
Gesture types
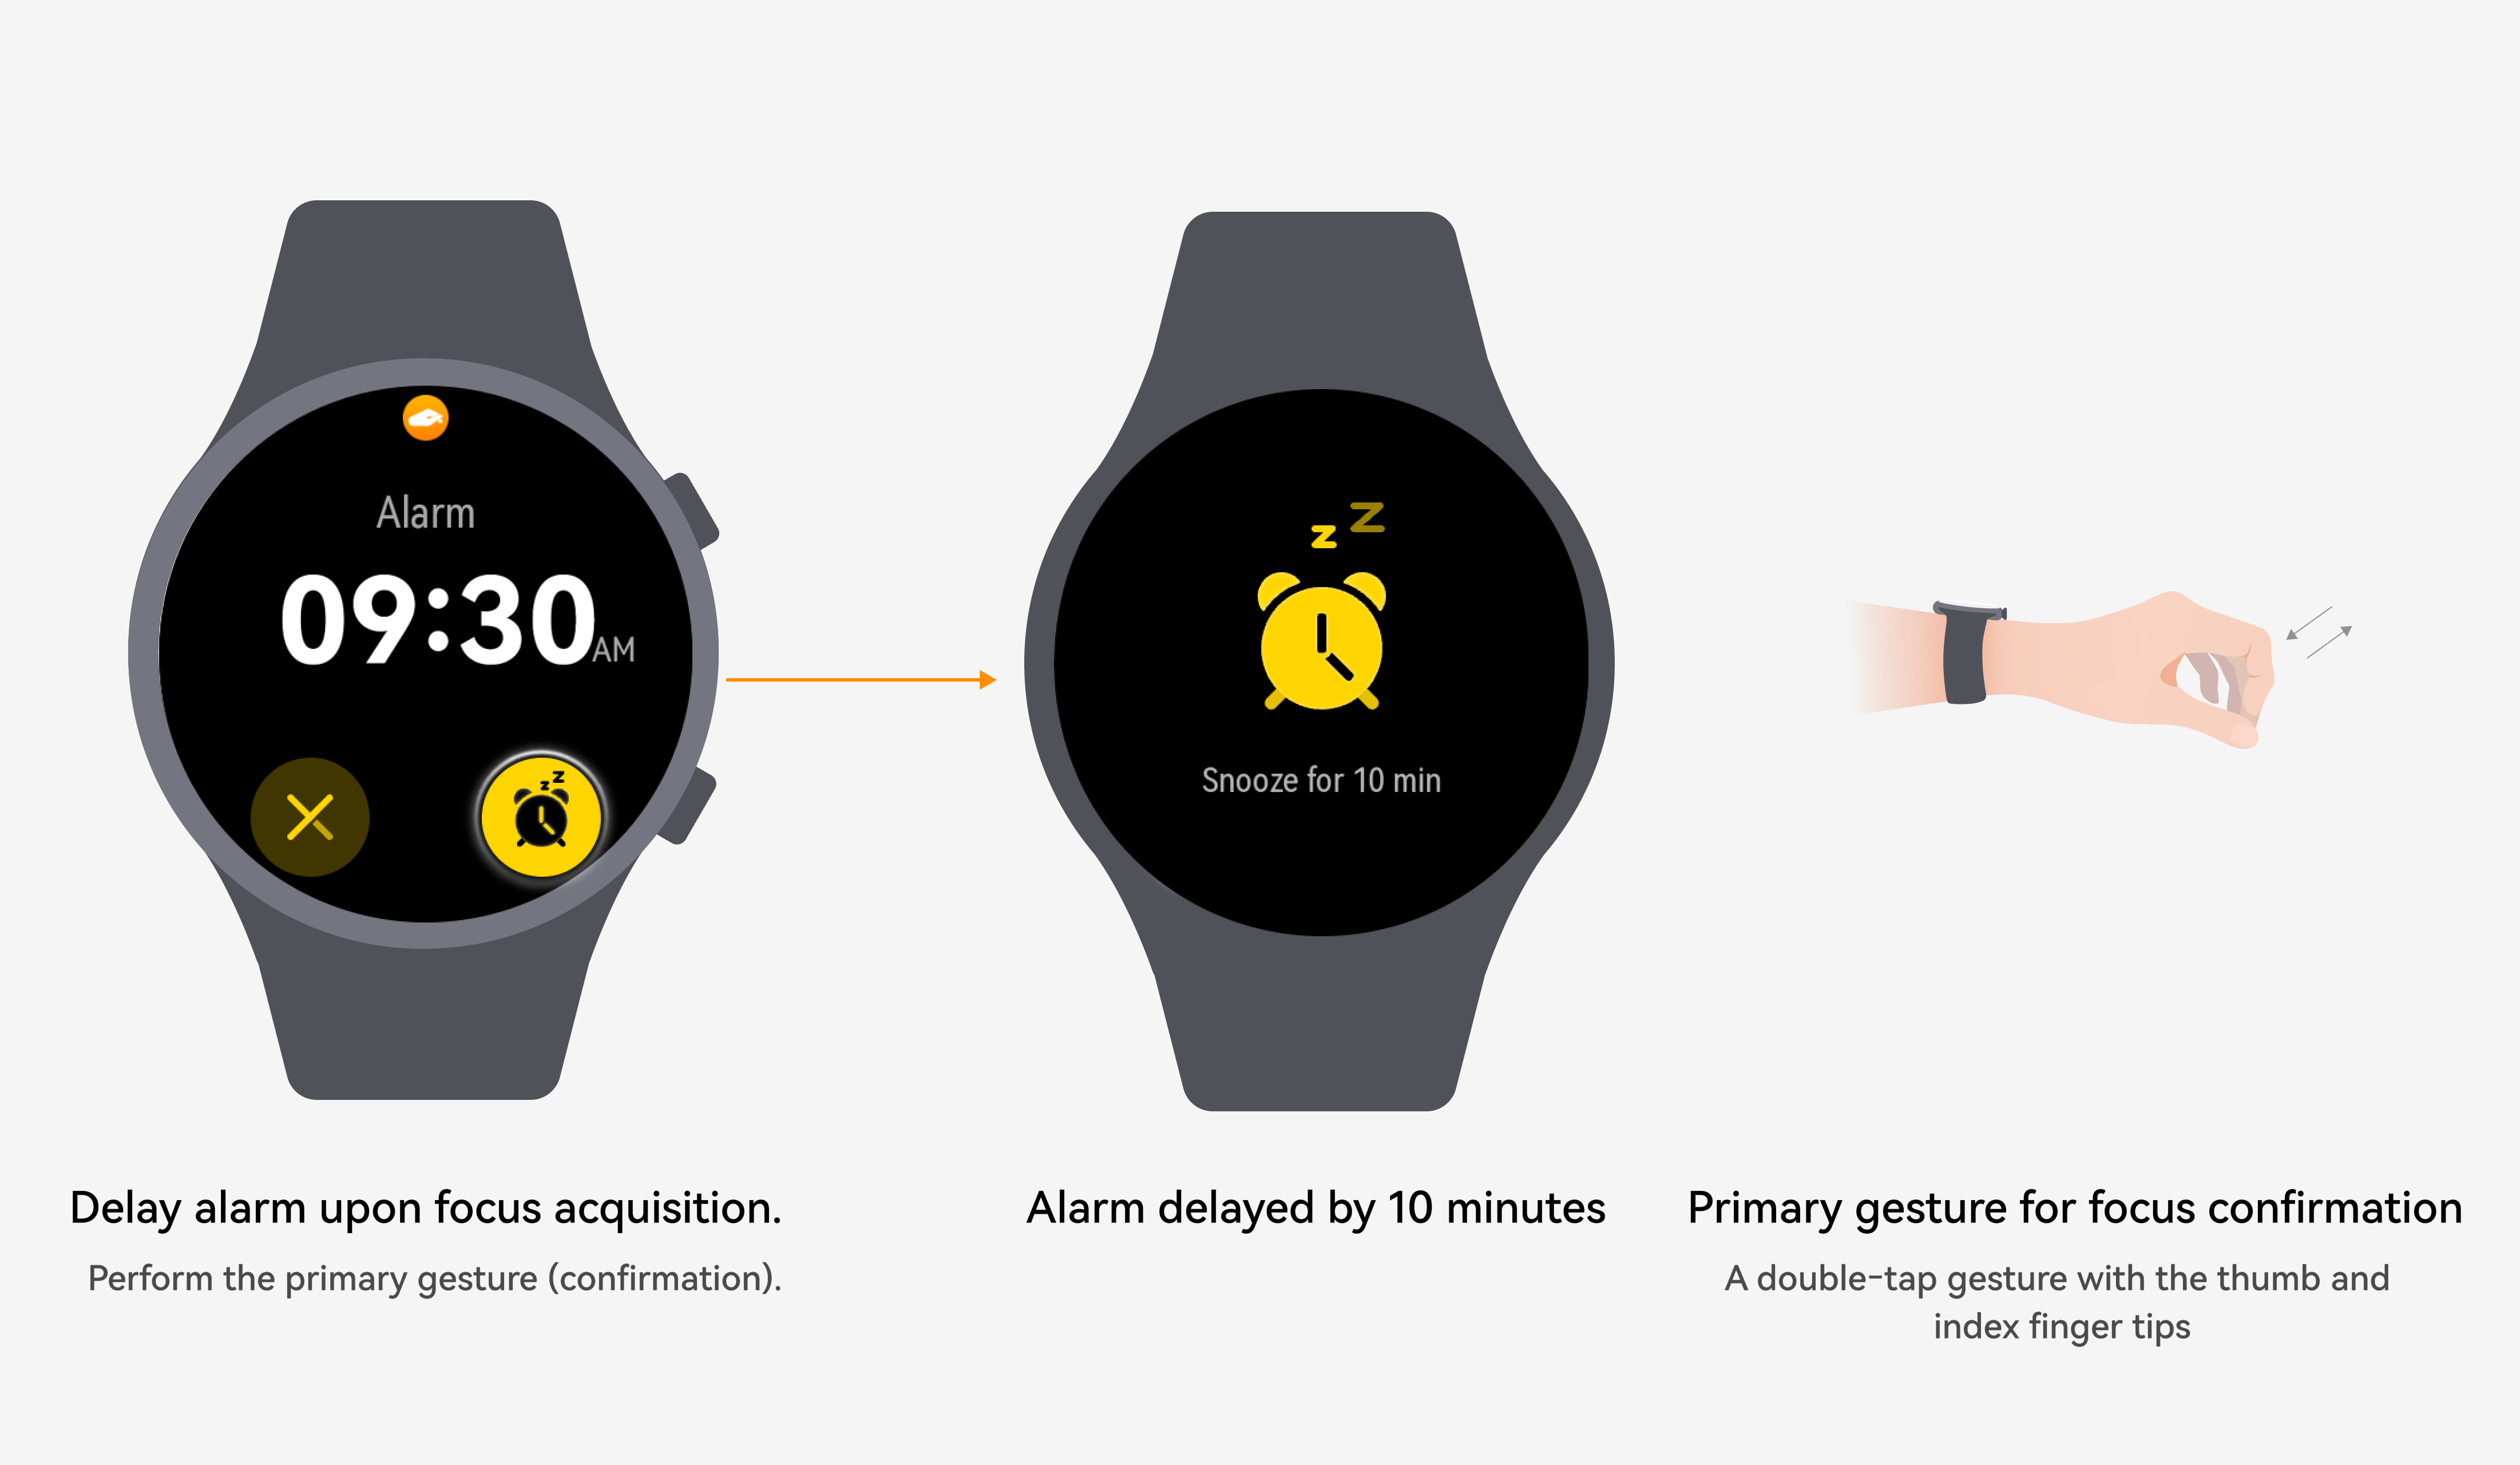
- Pinch to confirm: Quickly touch the thumb and index finger together twice to confirm the operation associated with the current focus. This gesture is commonly used to confirm buttons or pause and resume music playback.
How it works: After the system recognizes the gesture, it triggers the component's onKeyEvent event with KeyCode.KEYCODE_ENTER as the key code and KeyType.Down as the event type. The app can perform the corresponding action when these conditions are met, such as pausing music.
Sample code:
.onKeyEvent((event: KeyEvent) => {
  if (event.keyCode === KeyCode.KEYCODE_ENTER && event.type === KeyType.Down) {
    // Trigger the pinching gesture
    this.oneButton1Color = '#ffe3ba51';
    this.oneButton1Text = 'Confirm';
  }
}) 
- Swipe to switch focus: Quickly slide your thumb from the second joint of the index finger toward the fingertip twice to switch the current focus and prepare for the next action. After switching the focus, perform a confirmation gesture to complete the operation. This gesture can be used to switch the focus to a cancel button or a next track button for scenarios such as dismissing messages or switching songs.
How it works: After the system recognizes the gesture, it triggers the onBlur event on the component losing focus and the onFocus event on the component gaining focus. The app can perform the corresponding actions when these events are triggered, such as highlighting the focused component by changing its style.
Sample code:
.onFocus(() => {
  this.oneButton1Color = '#ff57c853';
  this.oneButton1Text = 'Hover';
  this.oneButton2Text = 'Two';
})
.onBlur(() => {
  this.oneButton1Color = '';
  this.oneButton1Text = 'One';
}) 
Smart gesture interactions require the target component to have focus. First, call activate to activate the focus state for the current page.
this.getUIContext().getFocusController().activate(true, false);
After the focus state is activated, call requestFocus() to assign focus to the target component. Smart gesture interactions are then enabled. The following example sets the button whose ID is btn1 to receive focus by default after the page is rendered.
// register a button to get focus by default.
this.getUIContext().getFocusController().requestFocus('btn1');
When the page is exited, set the focus activation state of the current page to false.
aboutToDisappear(): void {
  this.getUIContext().getFocusController().activate(false);
}
[h2]Power Consumption Optimization
To extend the battery life of wearables and provide users with a longer-lasting and smoother experience, follow these recommendations.
- Display optimization
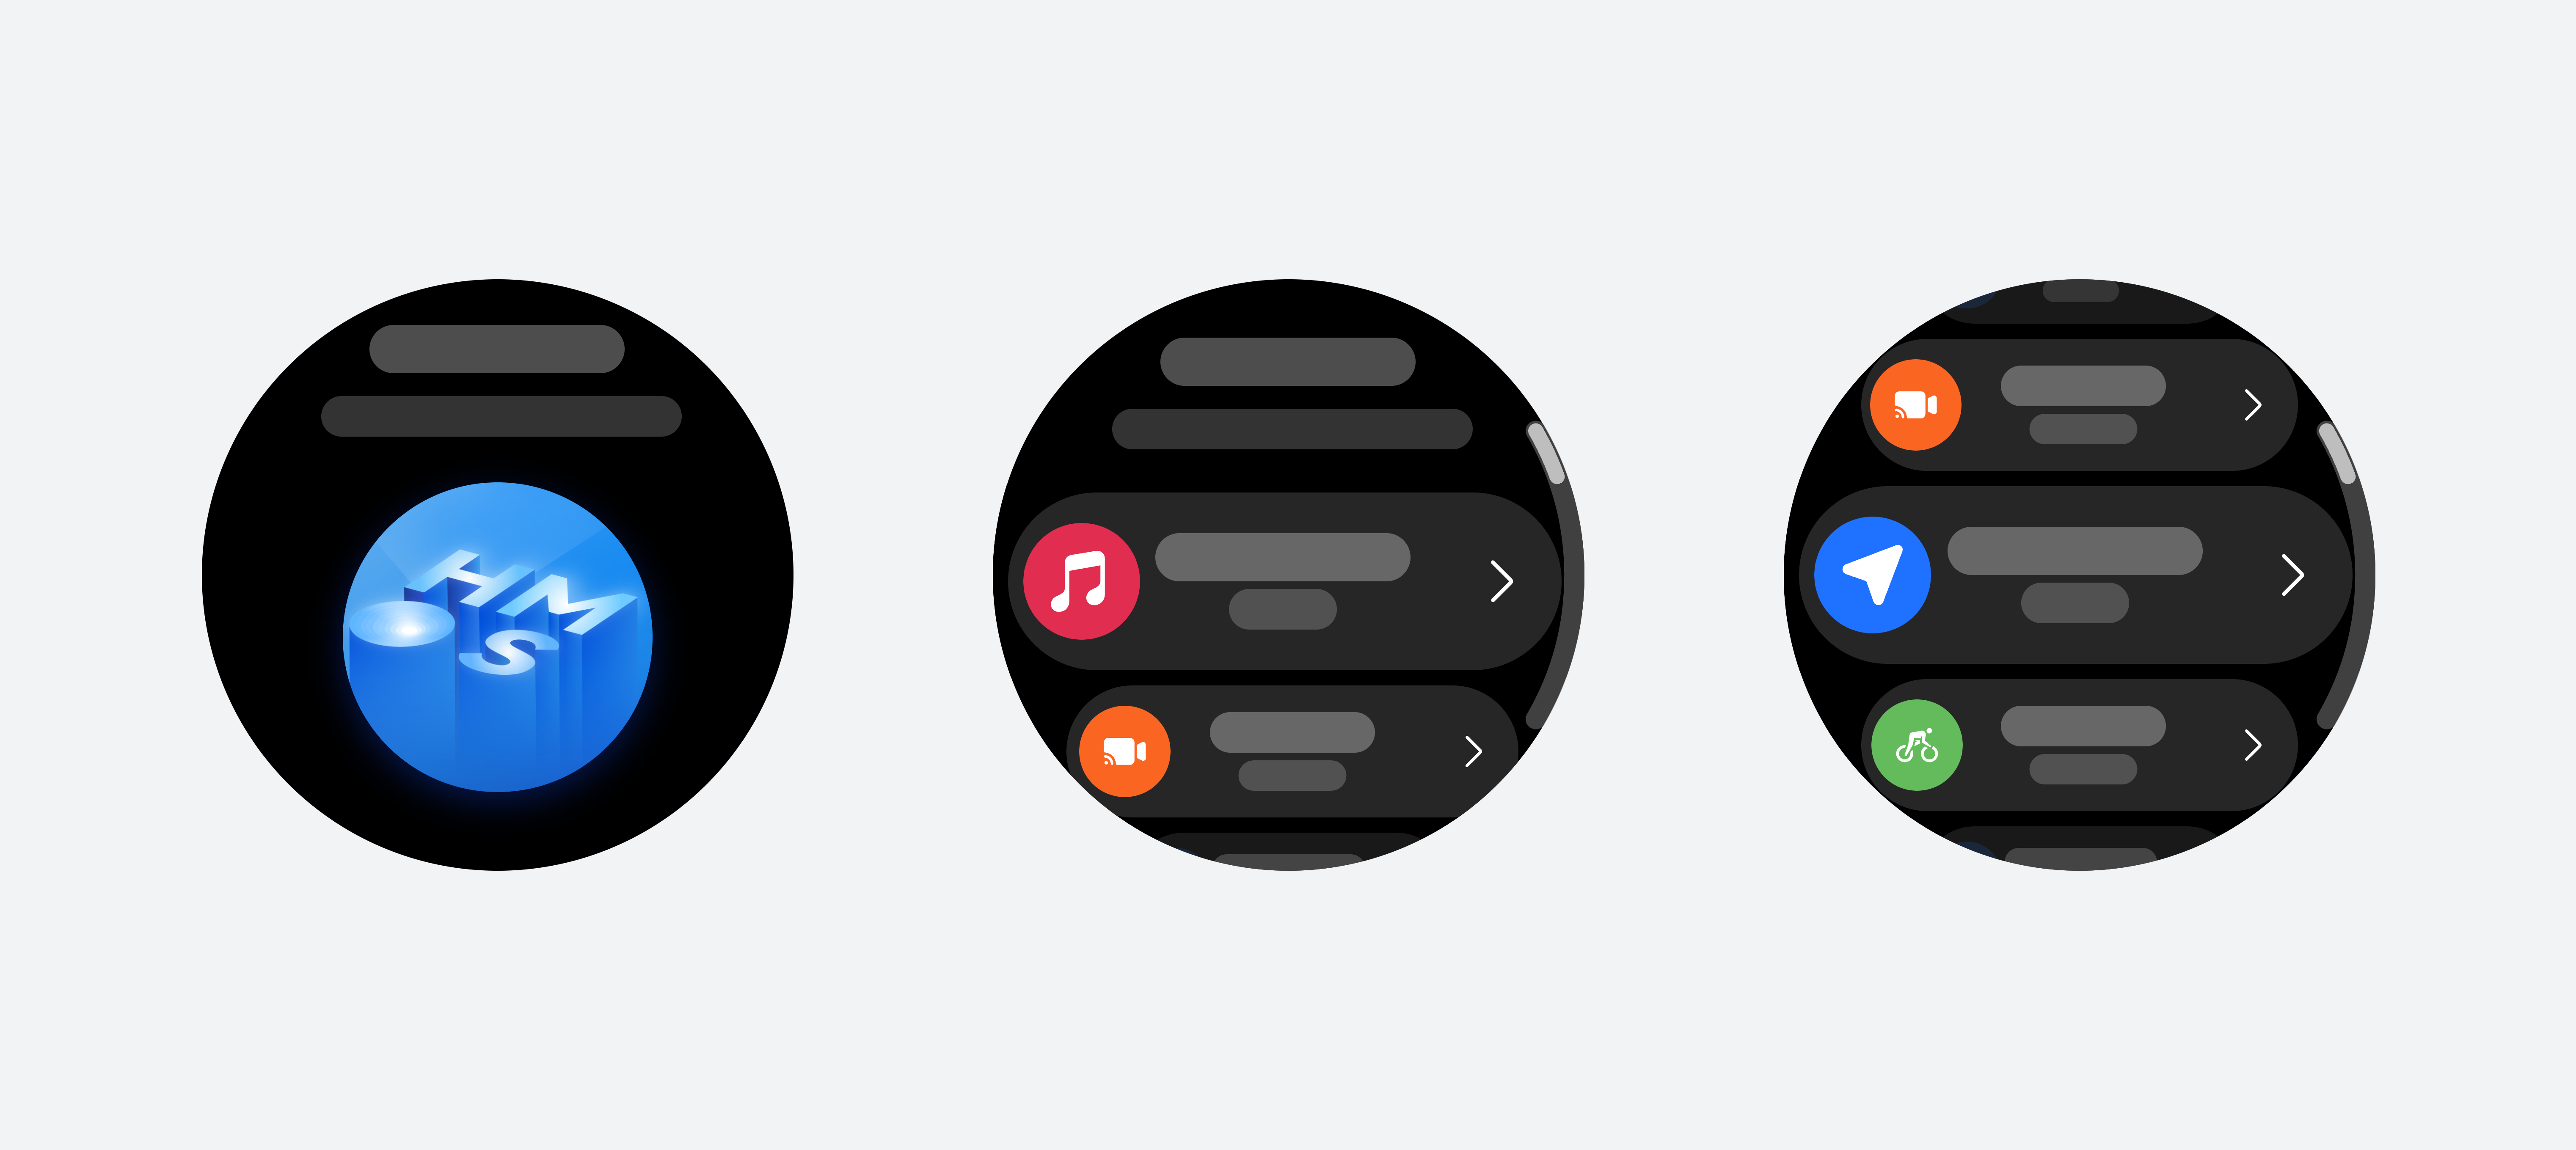
- Enable the dark theme by default to reduce display power consumption.
- Keep the screen on only when necessary, such as during video playback, gaming, or navigation.
- Enable the dark theme by default to reduce display power consumption.
- Background app management
- Start critical service apps, such as alarm, calendar, email, and instant messaging (IM) apps, only when required.
- Except when launched by a foreground app, alarm, calendar, email, and IM apps should start only when necessary. Non-essential apps must not start automatically under any circumstances.
- Location service guidelines
- Allow background GPS access only for core features, such as navigation and fitness tracking.
- Do not access location services in the background unless the operation is initiated through user interaction.
If your app needs to keep the screen on in scenarios such as navigation or video playback, implement the feature as follows.
- Obtain a window instance by calling window.getLastWindow in EntryAbility.
onWindowStageCreate(windowStage: window.WindowStage): void { let windowClass: window.Window | undefined = undefined; window.getLastWindow(this.context, (err: BusinessError, data: window.Window) => { const errCode: number = err.code; if (errCode) { hilog.error(0x0000, TAG, 'Failed to obtain the top window. Cause: ' + JSON.stringify(err)); return; } windowClass = data; hilog.info(0x0000, TAG, 'Succeeded in obtaining the top window. Data: ' + JSON.stringify(data)); AppStorage.setOrCreate('windowClass', windowClass); }); // ... } - Call setWindowKeepScreenOn() on the window instance and set isKeepScreenOn to true to keep the screen on.
// Window object obtained from EntryAbility, which is used to ensure that the screen is steady on during navigation. @StorageLink('windowClass') windowClass: window.Window | undefined = undefined; // ... aboutToAppear(): void { // ... if (this.windowClass) { this.windowClass.setWindowKeepScreenOn(true, (err: BusinessError) => { const errCode: number = err.code; if (errCode) { hilog.error(0x0000, TAG, `Failed to set the screen to be always on. Cause code: ${err.code}, message: ${err.message}`); return; } hilog.info(0x0000, TAG, 'Succeeded in setting the screen to be always on.'); }); } } - To disable the keep-screen-on feature, call setWindowKeepScreenOn() again and set isKeepScreenOn to false.
[h2]Cross-Device Connectivity
Communication between a phone and a wearable is a core development scenario for wearable apps. Wear Engine provides standardized APIs for implementing cross-device interactions. The basic development process is as follows:
- Call wearEngine.getDeviceClient() to obtain the client of the device module.
export class ConnectUtil { // Peer communication device entity class object device?: wearEngine.Device; // Unique ID of the peer communication device. deviceRandomId?: string; // Used to obtain linked devices deviceClient?: wearEngine.DeviceClient; // ... constructor(context: Context) { if (canIUse('SystemCapability.Health.WearEngine')) { this.deviceClient = wearEngine.getDeviceClient(context); // ... } } // ... } - Obtain the devices that are currently connected and support the wearEngine capability set.
// Obtains the information about the peer device connected to the peer device // and listens on the communication between the peer device and the peer device. async getConnectedDevices(): Promise<void> { try { if (canIUse('SystemCapability.Health.WearEngine')) { let devices: wearEngine.Device[] = await this.deviceClient?.getConnectedDevices() as wearEngine.Device[]; this.device = devices[0]; this.deviceRandomId = devices[0].randomId; } await this.registerMessageReceiver(); } catch (err) { hilog.error(0x0000, TAG, 'getConnectedDevices is err' + JSON.stringify(err)); } } - Obtain the client of the P2P module for interconnection and communication.
export class ConnectUtil { // ... // Used to p2p p2pClient?: wearEngine.P2pClient; // ... constructor(context: Context) { if (canIUse('SystemCapability.Health.WearEngine')) { // ... this.p2pClient = wearEngine.getP2pClient(context); } } // ... } - Subscribe to events for messages sent from the peer app to the local app.
// Callback Method for Listening to Peer Communication. private onMsgCallback: Callback<wearEngine.P2pMessage> = (data: wearEngine.P2pMessage): void => { // Decodes the intercepted content into a character string. let decoder: util.TextDecoder = util.TextDecoder.create(); if (canIUse('SystemCapability.Health.WearEngine')) { let str: string = decoder.decodeToString(data.content); promptAction.openToast({ message: 'message: ' + str, duration: 2000 }); } } // Listening to the communication between the peer end. async registerMessageReceiver(): Promise<void> { try { if (canIUse('SystemCapability.Health.WearEngine')) { await this.p2pClient?.registerMessageReceiver(this.deviceRandomId, appParam, this.onMsgCallback); hilog.info(0x0000, TAG, 'registerMessageReceiver is ok'); } } catch (err) { hilog.error(0x0000, TAG, 'registerMessageReceiver is err ', JSON.stringify(err)); } } // Disabling the interception of peer communication. async unregisterMessageReceiver(): Promise<void> { try { if (canIUse('SystemCapability.Health.WearEngine')) { await this.p2pClient?.unregisterMessageReceiver(this.deviceRandomId, appParam, this.onMsgCallback); hilog.info(0x0000, TAG, 'unregisterMessageReceiver is ok'); } } catch (err) { hilog.error(0x0000, TAG, 'unregisterMessageReceiver is err ', JSON.stringify(err)); } } - Send a message to the peer device.
// Method of sending messages to the peer end
async sendMessage(message: string): Promise<void> {
  try {
    let p2pMessage: wearEngine.P2pMessage = this.getP2pMessage(message);
    if (canIUse('SystemCapability.Health.WearEngine')) {
      let value = await this.p2pClient?.sendMessage(this.deviceRandomId, appParam, p2pMessage);
      hilog.info(0x0000, TAG, 'sendMessage value is' + JSON.stringify(value))
    }
  } catch (err) {
    hilog.error(0x0000, TAG, 'sys sendMessage is err ' + JSON.stringify(err));
  }
}

- Some wearables may not support WearEngine. Therefore, be sure to account for device differences during development. Before calling any WearEngine APIs, use canIUse to check whether the required capability is supported. This helps ensure app stability and prevents crashes caused by compatibility issues. For details, see Multi-Device Application Development.
- To implement cross-device communication with Wear Engine, your app must obtain the required Wear Engine permission. For details, see Applying for Wear Engine Kit Integration.
- The implementation principles for communication between phone and wearable apps are the same on both sides. For detailed development guidance, see Phone-Watch Interconnection and Heart Rate Monitoring.
[h2]Notifications
Notifications on wearables can originate from the following sources:
- Phone app notifications: After notification permission is granted to Huawei Health, notifications from apps on the paired phone are synchronized to the wearable.
- Phone-initiated notifications: A phone app uses the Wear Engine APIs to send notifications directly to the wearable.
- Local wearable notifications: A wearable app publishes notifications locally through Notification Kit.
Phone app notifications
In the Huawei Health app, open the notification settings page and enable notification access for the desired phone apps. Notifications from those apps are then synchronized to the paired Huawei wearable in real time.
Phone-initiated notifications
A phone app can proactively send notifications to a wearable by calling notify() in Wear Engine. The development process is as follows:
- Obtain the Notify client class through wearEngine.getNotifyClient().
// Used to notify message
notifyClient: wearEngine.NotifyClient | undefined;
Obtain the client of the Notify module using the context of the ability where the current component resides.
try { this.connectUtils.notifyClient = wearEngine.getNotifyClient(this.getUIContext().getHostContext()); } catch (err) { hilog.error(0x0000, TAG, `Failed to get notify client. Cause code: ${err.code}, message: ${err.message}`); } - Use NotifyClient.notify() to send template-based notifications from a phone to a wearable.
/*
 * Method of notifying a message to watch.
 */
notifyMessage() {
  // Configure the notification content.
  // Including the package name of the notification source, notification title, and notification content.
  let type1Notification: wearEngine.Notification = {
    type: wearEngine.NotificationType.NOTIFICATION_WITHOUT_BUTTONS,
    bundleName: 'com.example.smartwatchmapnavigation',
    title: 'smartwatchmapnavigation',
    text: 'walk navigation start',
  }
  let options: wearEngine.NotificationOptions = {
    notification: type1Notification,
    onAction: (feedback: wearEngine.NotificationFeedback) => {
      hilog.info(0x000, TAG,
        `one button notify get feedback is ${feedback.action ? feedback.action : feedback.errorCode}`);
    }
  }

  // Sends a notification to the watch based on notifyClient.
  // This method can be invoked only by apps on mobile phones.
  this.notifyClient!.notify(this.deviceRandomId, options).then(result => {
    hilog.info(0x000, TAG, `Succeeded in sending notification.`);
  }).catch((error: BusinessError) => {
    hilog.error(0x000, TAG, `Failed to send notification. Code is ${error.code}, message is ${error.message}`);
  })
}

Calling NotifyClient.notify() in Wear Engine requires the Wear Engine permission. For details, see Applying for Wear Engine Kit Integration.
Local wearable notifications
A wearable app can publish local notifications through the NotificationManager module.
- Request notification authorization.
You can determine whether the user has granted authorization based on the error code returned by requestEnableNotification. An error code of 1600004 indicates that the user has denied the authorization request.
aboutToAppear() { let context = this.getUIContext().getHostContext() as common.UIAbilityContext; notificationManager.isNotificationEnabled().then((data: boolean) => { hilog.info(DOMAIN_NUMBER, TAG, "isNotificationEnabled success, data: " + JSON.stringify(data)); if (!data) { notificationManager.requestEnableNotification(context).then(() => { hilog.info(DOMAIN_NUMBER, TAG, `[ANS] requestEnableNotification success`); }).catch((err: BusinessError) => { if (1600004 == err.code) { hilog.error(DOMAIN_NUMBER, TAG, `[ANS] requestEnableNotification refused, code is ${err.code}, message is ${err.message}`); } else { hilog.error(DOMAIN_NUMBER, TAG, `[ANS] requestEnableNotification failed, code is ${err.code}, message is ${err.message}`); } }); } }).catch((err: BusinessError) => { hilog.error(DOMAIN_NUMBER, TAG, `isNotificationEnabled fail, code is ${err.code}, message is ${err.message}`); }); } - Create a NotificationRequest object and publish a notification.
Button ('Notification sending')
  .onClick(()=>{
    let notificationRequest: notificationManager.NotificationRequest = {
      id: 1,
      content: {
        // General text type notification.
        notificationContentType: notificationManager.ContentType.NOTIFICATION_CONTENT_BASIC_TEXT,
        normal: {
          title: 'test_title',
          text: 'test_text',
          additionalText: 'test_additionalText',
        }
      }
    };
    notificationManager.publish(notificationRequest, (err: BusinessError) => {
      if (err) {
        hilog.error(DOMAIN_NUMBER, TAG, `Failed to publish notification. Code is ${err.code}, message is ${err.message}`);
        return;
      }
      hilog.info(DOMAIN_NUMBER, TAG, 'Succeeded in publishing notification.');
    });
  })

As capability support varies across devices, use canIUse to check whether the required capability is supported before calling the corresponding APIs. This helps ensure app stability and prevents crashes caused by compatibility issues. For details, see Multi-Device Application Development.
[h2]Minor Mode Adaptation
Apps for children's smartwatches are designed for child users. Apps in categories such as early education, content consumption, social interaction, audio and video, and games should carefully evaluate the requirements for protecting minors. If your app needs to adjust its content, feature entry points, or usage duration based on the system's minor mode, adapt your app to support this capability.
For APIs related to minor mode, see the minorsProtection capability in Account Kit. Depending on your app scenario, you can obtain the minor mode status, retrieve the user's age group, or guide users to enable minor mode.
[h2]Project Debugging
How Do I Debug an App on a Wearable?
Problem: After obtaining a wearable, you may not know how to deploy and debug your app on the device.
Solution: Wearables support Wi-Fi wireless debugging with automatic signing. Follow these recommendations when debugging:
- Debugging mode: Use Wi-Fi wireless debugging (automatic signing supported). For details, see Running Your App on a Local Real Device In Wireless Mode.
- Connection stability: The Wi-Fi debugging connection is disconnected when the wearable screen turns off. To maintain a stable debugging session, increase the screen timeout in settings.
- Device authorization: During the first debugging session, the wearable displays a prompt asking you to trust the device. Tap trust to allow the IDE to connect.
[h2]Project Configuration
How Do I Configure a Wearable App Project?
Problem: You may not know which project configurations are required for wearables or how the project configuration differs between adult smartwatches and children's smartwatches.
Solution: To develop an app for a wearable, set deviceTypes to wearable in the module section of the module.json5 file. If your project currently targets lightweight smartwatches and you want to migrate it to support adult smartwatches, see FA Project Migration.
For adult smartwatch apps, no additional configuration is required after completing the preceding steps. For children's smartwatch apps, you must also configure the distribution policy for children's smartwatches. In addition, ensure that DevEco Studio 6.1.0 Release or later is installed. Perform the following steps:
- Create distributionFilter_config.json in the resources/base/profile directory. Configure the square display and screen size in the file as follows:
{ "distributionFilter": { "screenShape": { "policy": "include", "value": [ "rect" ] }, "screenWindow": { "policy": "include", "value": [ "480*408" ] } } } - Associate the distribution policy file with module.json5 and declare the device characteristics for children's smartwatches. The following snippet shows the required configuration. Merge it into the module section according to your project structure.
{ "module": { "deviceTypes": [ "wearable" ], "metadata": [ { "name": "string", "value": "string", "resource": "$profile:distributionFilter_config" } ], "requiredDeviceFeatures": { "wearable": [ "child" ] } } } - For child smartwatch app projects, the API version must be API 23 or later. To meet this requirement, modify the relevant fields in the project-level build-profile.json5 file as follows:
{
  "targetSdkVersion": "6.1.0(23)",
  "compatibleSdkVersion": "6.1.0(23)"
}
[h2]Package Management Policy
For app projects developed using the layered architecture based on the "One-Time Development for Multi-Device Deployment" paradigm, how should HAP packages for wearables and other device types be managed?
Problem: You may not know how to manage HAP packages when your app uses the "One-Time Development for Multi-Device Deployment" paradigm to manage phone and wearable apps within a single project.
Solution: Since apps on wearables often differ significantly from those on other devices in terms of UI design and functionality, it is recommended that separate HAP packages be used for precise adaptation.
- Separate HAP packages for precise adaptation: Since wearables and other device types differ significantly in UI design and functionality, create separate HAP packages to build modular components for phones/tablets and wearables, enabling device-specific UX design, resource optimization, and customized user experiences.
- For child smartwatch apps, the same app cannot currently be precisely distributed to both adult smartwatches and child smartwatches. Use separate projects or separate HAP packages for development and release.
For details, see the content related to the product customization layer in Layered Architecture Design.
[h2]App Release
Watch app release precautions
Problem: You may have questions about releasing a watch app that targets wearables and lite wearables.
- When releasing a watch app, the system supports only Watch as the device type, without distinguishing between wearables and lite ones.

- If an app supports both wearables and lite ones, it is unclear whether their corresponding release packages are required for the app release.
Solution:
- Click OK. On the release page, select the target device type.

- Wearables support both ArkTS and JS, whereas lite wearables support only JS. If your app release package supports both wearables and lite wearables, you do not need to distinguish between release packages. If your app release package supports only one type of wearable device, you must create separate App IDs for wearables and lite wearables and upload the corresponding release packages.
- For details about how to create an app, see Creating a HarmonyOS App.
In addition to the preceding procedure, child smartwatch apps are subject to additional review requirements and submission materials. For details, see Child Smartwatch App Release Precautions.
[h2]Functionality Development
The app works properly on one wearable but crashes or a feature does not respond on another wearable.
Problem: You may find that your app works properly on one wearable but crashes, exits unexpectedly, or a feature does not respond on another wearable.
Possible cause: Different wearables vary in hardware configurations and supported system capabilities. Your app may not be fully adapted to these device differences.
Solution:
- Check capabilities before calling APIs. Before calling a related API, use the canIUse API to check whether the required capability is available, ensuring app stability. For details, see Multi-Device Application Development.
- Verify hardware support. If a feature does not respond, check whether the device supports the required hardware capability. For example, if rotary crown events are not received, first verify that the wearable is equipped with a rotary crown.
Synchronous or asynchronous APIs do not work properly after migrating an FA project.
Problem: You may find that synchronous or asynchronous APIs no longer work properly after migrating your project.
Solution: Update the API invocation pattern. For example, for the huks.generateKeyItem() API, change the original implementation:
huks.generateKeyItem(alias, options, callback);
to:
try {
  const data = await huks.generateKeyItem(alias, options);
  // Result of successful processing.
} catch (error) {
  // Capture and handle exceptions.
}
Communication with the phone stops working after migrating an FA project.
Problem: You may find that communication between the wearable app and the phone no longer works after migrating your FA project.
Possible cause: The app uses fingerprint information to authenticate inter-app communication. After migration, the app ID changes. If the fingerprint in the configuration file is not updated, communication fails.
Solution: Run the "hdc shell bm dump –n YourBundleName | grep appIdentifier" command to obtain the app ID of the wearable app, and update the fingerprint value in the configuration files of both the wearable app and the phone app.
Child Smartwatch App Release Precautions
Child smartwatch apps are subject to additional review requirements and submission material requirements during release.
The general release configuration and process are described in Releasing a HarmonyOS App. In addition to meeting the release requirements for wearable apps, child smartwatch apps must also meet the following additional requirements:
- Complete the child smartwatch app onboarding access application before development.
- Complete a self-check against the child smartwatch app release criteria after app development is complete.
- Submit the self-check acknowledgment for the Third-Party App Rules for HUAWEI WATCH KIDS.
The following sections describe these requirements in detail.
- Apply for child smartwatch app onboarding approval.
Before developing a child smartwatch app, send an email with the subject Huawei Child Smartwatch App Onboarding Application to developer@huawei.com. Include the following information in the email. If you have already contacted a Huawei representative, you can submit the required information directly to the representative, who will configure the app trustlist. Huawei representatives include Business Development (BD) and Solution Architect (SA) contacts.
App name
xxx
Bundle name
xxx.xxx.xxx
App version
xxx
App ID
xxx (For details about how to create an app ID, see Creating an App ID for a HarmonyOS App.)
Target wearable
Child smartwatches only; or adult smartwatches and child smartwatches.
Is the app name the same as that of the adult smartwatch app?
Yes/No (If the app name is the same, the package name must be different.)
Is the app name the same as that of apps on phones, tablets, PCs, or other device types?
Yes/No (If the app name is the same, the package name must be different.)
Developer name
xxx
Additional information (required)
Include an app introduction, the percentage of free content, a description of app features, and any other relevant information. The format is not restricted.
The application result will be provided within 10 working days.
- Development Preparation
After your application is approved, evaluate and develop your app in accordance with the Third-Party App Rules for HUAWEI WATCH KIDS. After development is complete, send the self-check acknowledgment for the rules to developer@huawei.com.
- Submit your app.
After the child smartwatch app is developed, select smartwatch as the device type when submitting the app. Child smartwatch apps are submitted under the smartwatch category. For the general release configuration and submission process, see Releasing a HarmonyOS App. During submission, ignore the following dialog box and click Confirm or close the dialog box to continue.

- Select app categories and tags.
Category: Select the appropriate category based on your app's characteristics (for example, Music, Entertainment, or Kids). Selecting the Apps/Kids category is optional.

App tags: Select at least one tag as the primary app tag based on your app's characteristics. You can optionally select one or more additional tags. Selecting the Kids tag is optional.

FA Project Migration
Wearables are compatible with the FA model. This section describes how to migrate a lite wearable project developed with JS to wearables, enabling the app to continue working after migration and adapt to the new device type.
Using a lite wearable app as an example, the following steps describe how to migrate a JS-based project to wearables:
- Create a project in DevEco Studio.


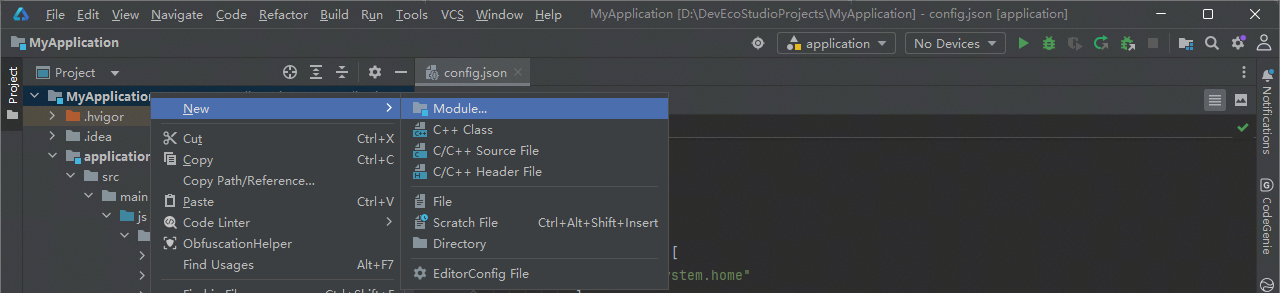
Right-click the Project directory and choose New > Module from the shortcut menu to create a module.
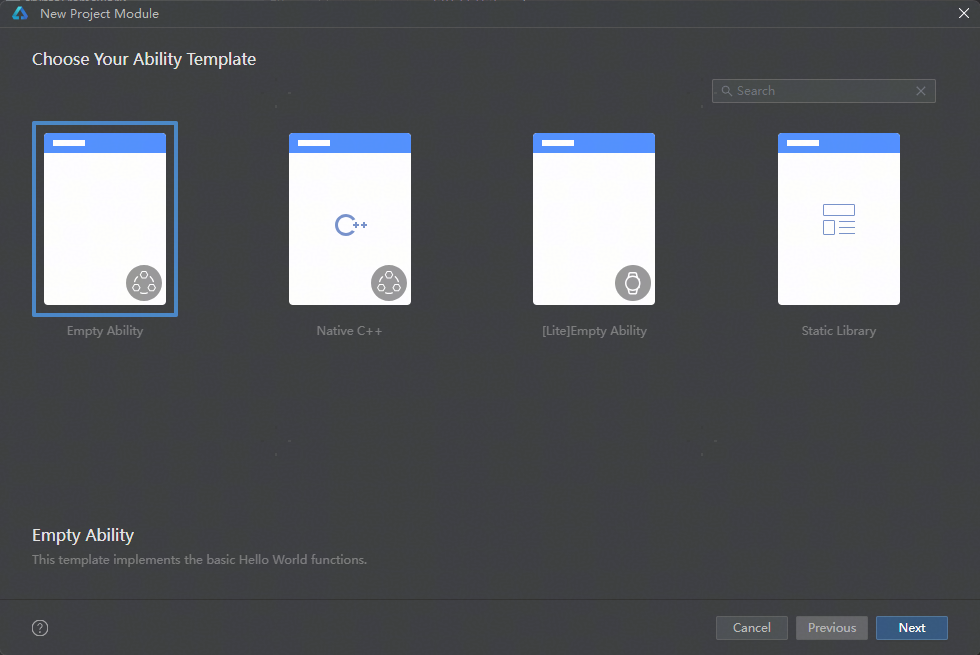
Select Empty Ability and click Next.
Retain the default settings and click Next.
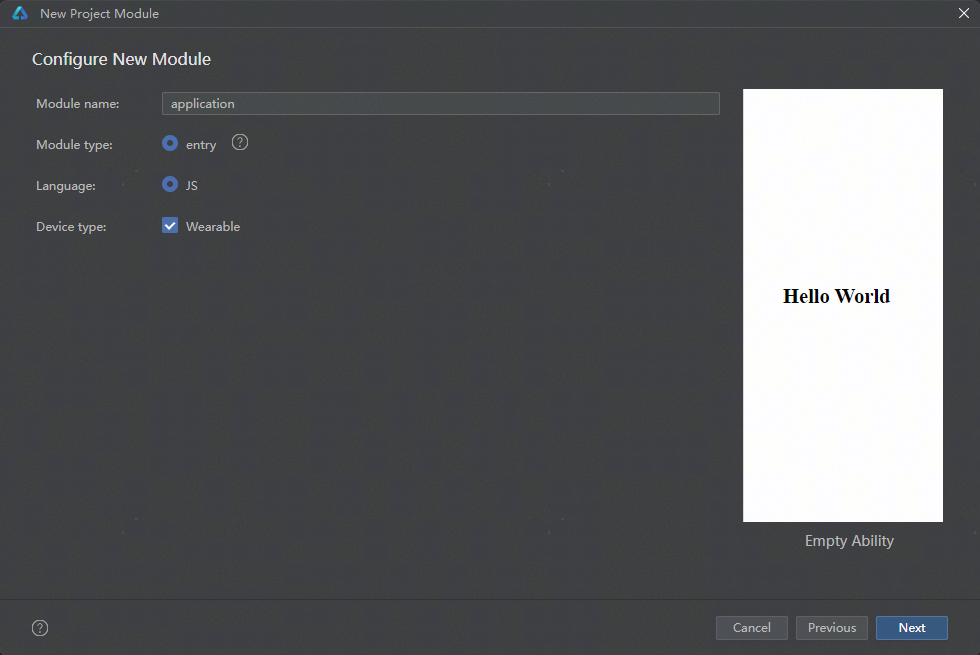
To make the project compatible with wearables, you need to change Ability name to HiWearMainAbility. Click Finish. The module compatible with wearables has been created.
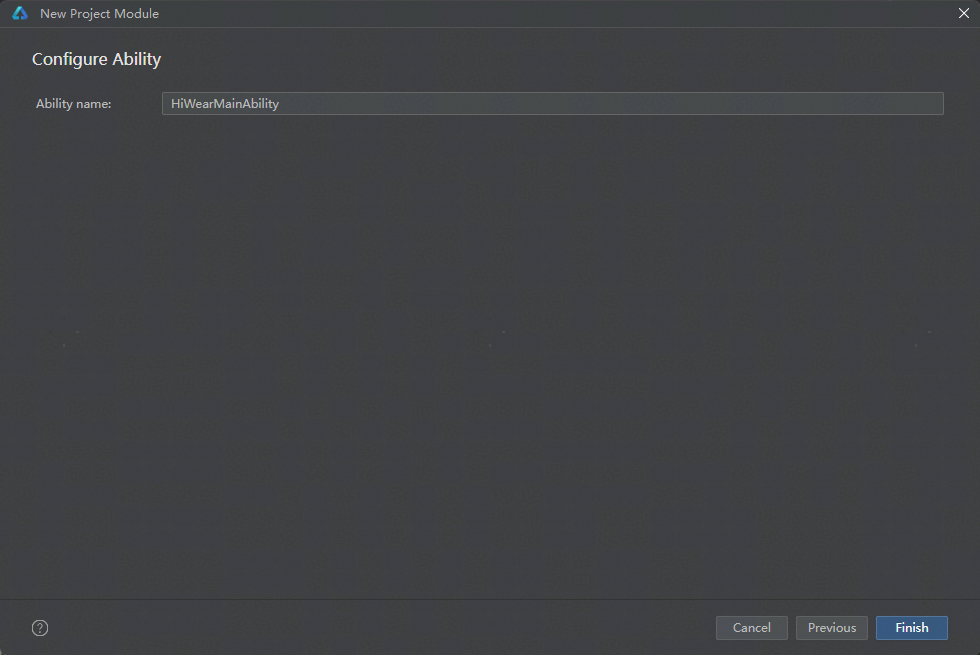
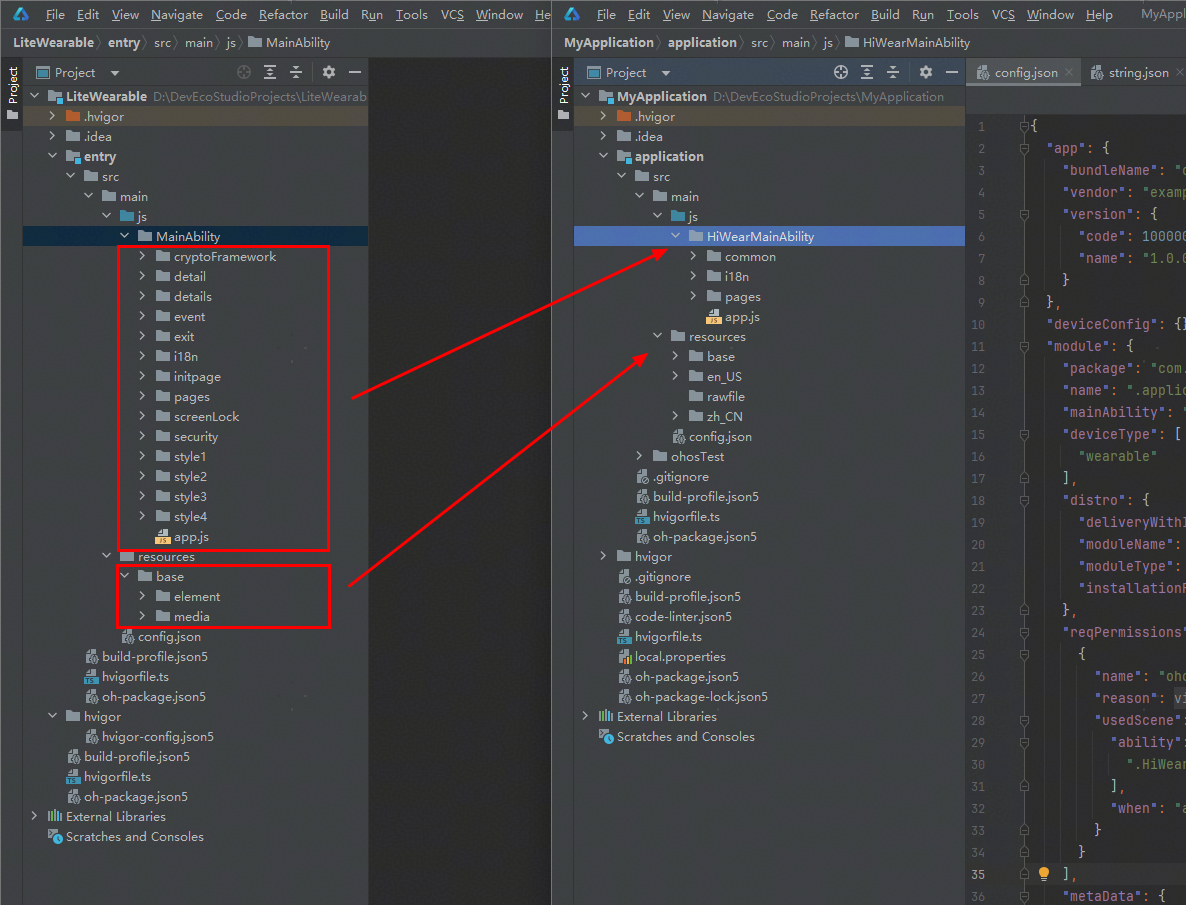
Delete the entry module created by default. The basic framework for porting a lite wearable project has been created.

- Move the code files and resource files in the /entry/src/main/js directory of the original lite wearable project to the corresponding directories in the new project.
- Modify the configuration files required for adapting to wearables.
After migrating the files, modify config.json. Modify the reference of resource files. If there are new page files in the pages directory, add them to the config.json file. Change the value of designWidth to 466.
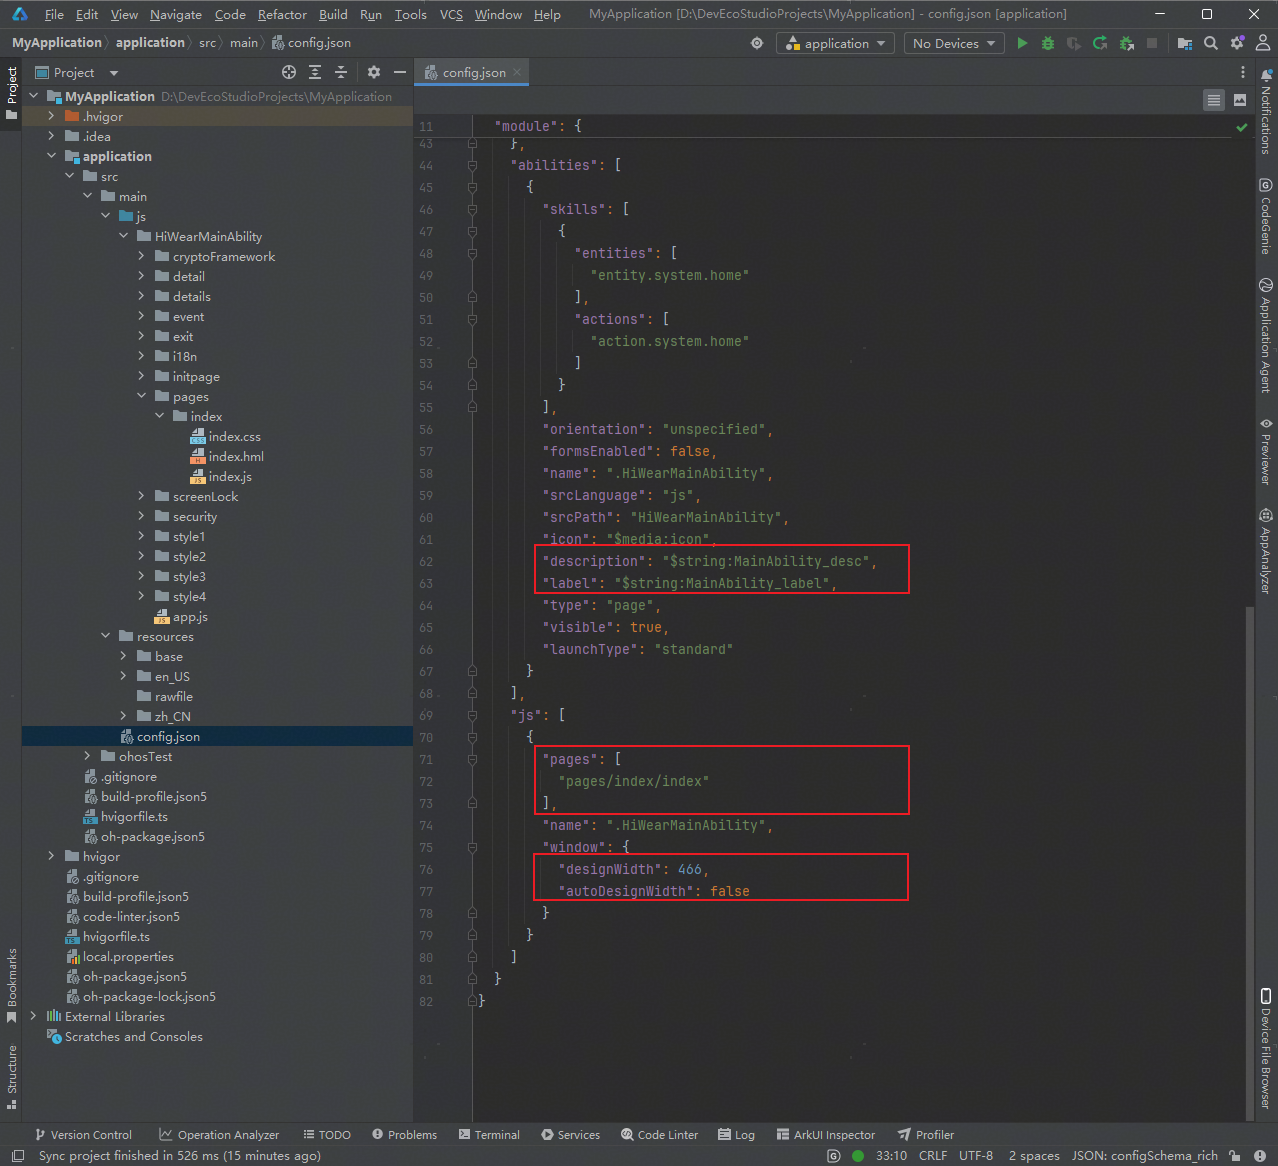
Add the required permissions to the config.json file. If the vibration function is used in the original project, add the vibration permission.

- Adapt the code. The synchronization/asynchronization mechanism of lite wearables is different from that of wearables. Therefore, you need to modify related APIs during the migration. The following uses the Huks API as an example to describe the modification.
huks.generateKeyItem(alias, options, callback);
The callback is executed synchronously on a lite wearable, but asynchronously on a wearable. Therefore, you need to add await to the code to ensure that the code is executed synchronously on wearables:
try {
  const data = await huks.generateKeyItem(alias, options);
  // Result of successful processing.
} catch (error) {
  // Capture and handle exceptions.
}