Overview
In some development scenarios, images need to adapt to containers of different sizes. If the image is directly resized, key areas (such as rounded corners, borders, or pattern details) may be distorted or blurred, affecting the visual effect. A typical example is the chat bubble, whose background image needs to be dynamically adjusted according to the content length and height.
The resizable attribute provided by the Image component can accurately specify the resizable and fixed areas of an image, ensuring that the image can maintain a good visual effect in containers with different dimensions.
This section uses the chat bubble and resizable placeholder image as examples to describe how to use the resizable attribute to implement image resizing.
How to Implement
The resizable attribute of the Image component is used to implement precise image resizing. The core principle is to specify fixed and resizable areas of an image. During resizing, only the resizable area is resized, and the fixed area remains unchanged.
The type of the resizable attribute is ResizableOptions. Two image resizing solutions are supported: slice(slice: { left, right, top, bottom }) and lattice(lattice: DrawingLattice).
[h2]Using slice to Resize an Image
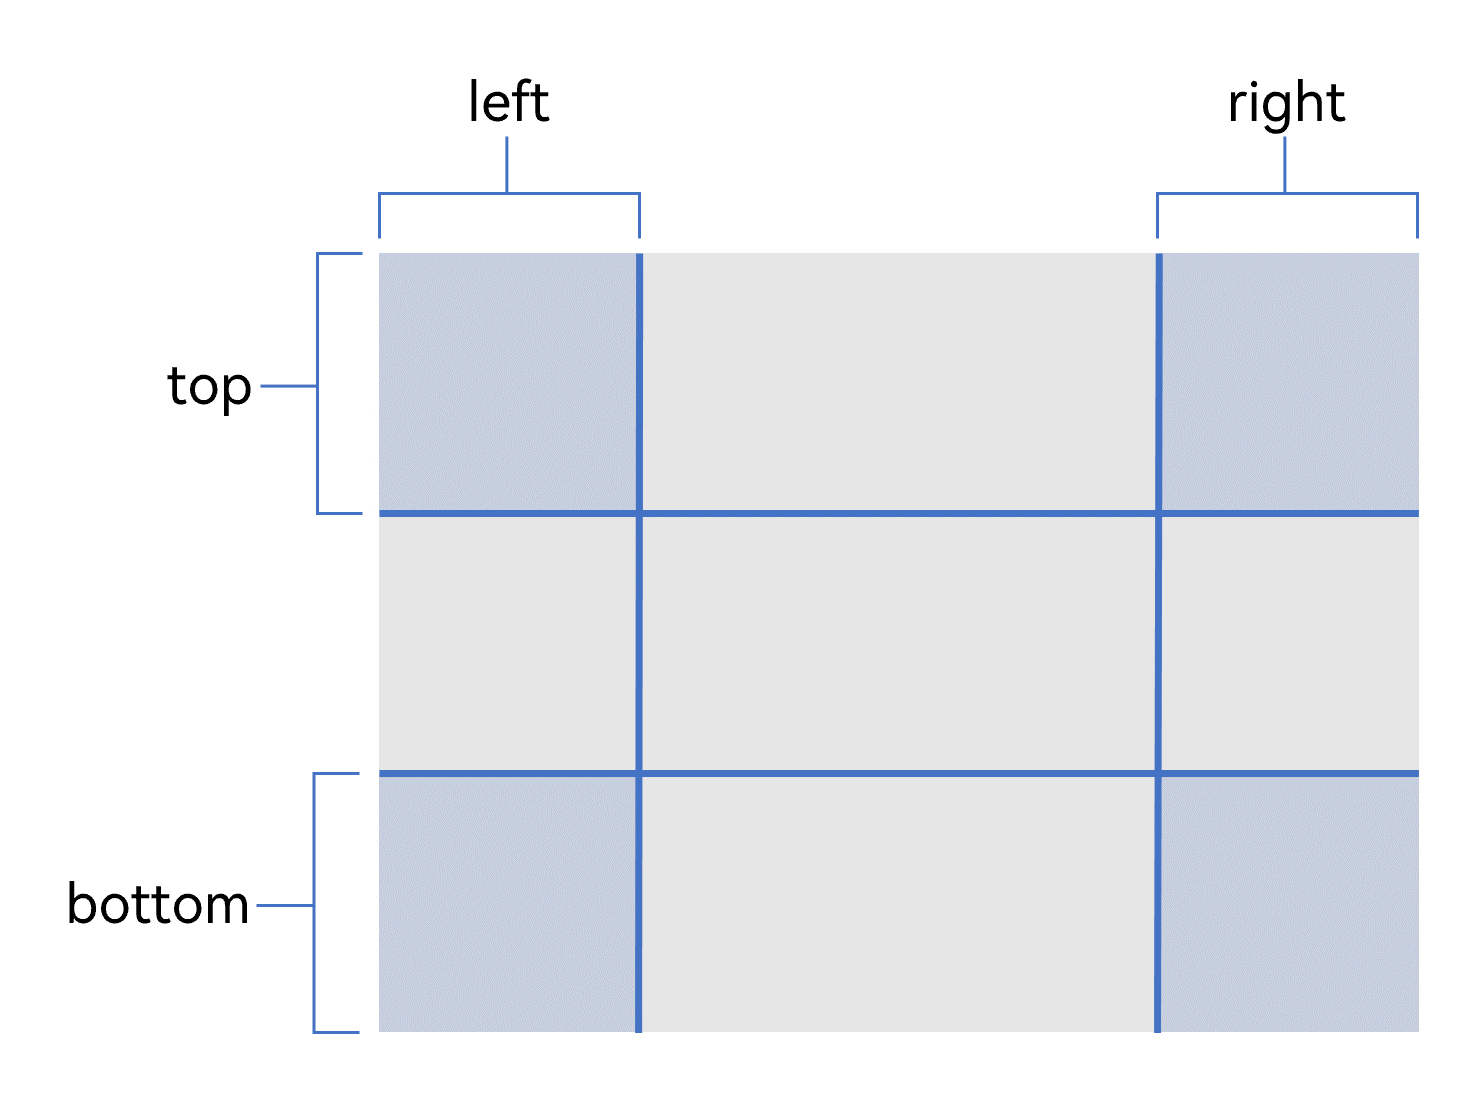
You can use the slice parameter to specify the offset (in pixels) for the top, bottom, left, and right directions of the original image, and divide the image into a nine-grid layout. The four corner areas are fixed, and the other areas are resizable. The following figure shows the effect.
The following figure shows the resizing effect of each area. The four corner areas have fixed width and height. The middle area can be resized up, down, left, and right. The height of the resizable areas at the top and bottom remains unchanged, and the width of the resizable areas on the left and right remains unchanged.
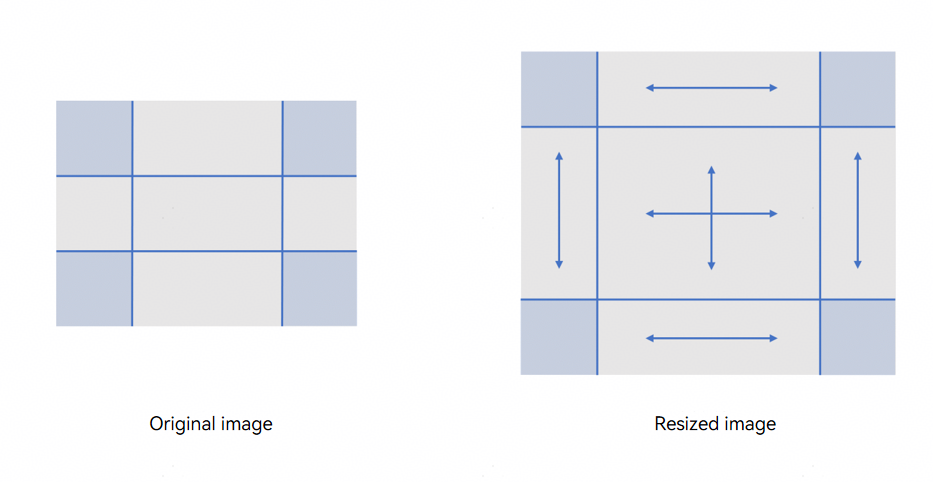
In addition to being used in the resizable attribute, slice can also be used in the backgroundImageResizable attribute.
Note that when a number is passed as the coordinate parameter value, the default unit is vp, but the value will be displayed in px. To ensure that the display effect of a fixed area is consistent on different devices, you need to pass data in the px unit.
Image($r('app.media.bg_right_message'))
  // ...
  .resizable({
    slice: {
      left: '40px',
      top: '80px',
      right: '70px',
      bottom: '40px'
    }
  })
[h2]Using lattice to Resize an Image
You can set the lattice parameter to divide the original image into regular rectangular grids based on the coordinate arrays (in pixels) in the horizontal and vertical directions. The number of rows and columns is the array length plus 1. The grids at the intersections of even rows and even columns are fixed areas (as shown in the blue part in the following figure), and the other areas are resizable areas. During resizing, the fixed areas remain unchanged, and other areas are resized as required.
For example, the following figure uses the x-axis coordinate array [1, 150, 648] and y-axis coordinate array to divide the image into a grid with 3 rows and 3 columns. The blue area in the figure is the fixed area where even rows and even columns intersect.
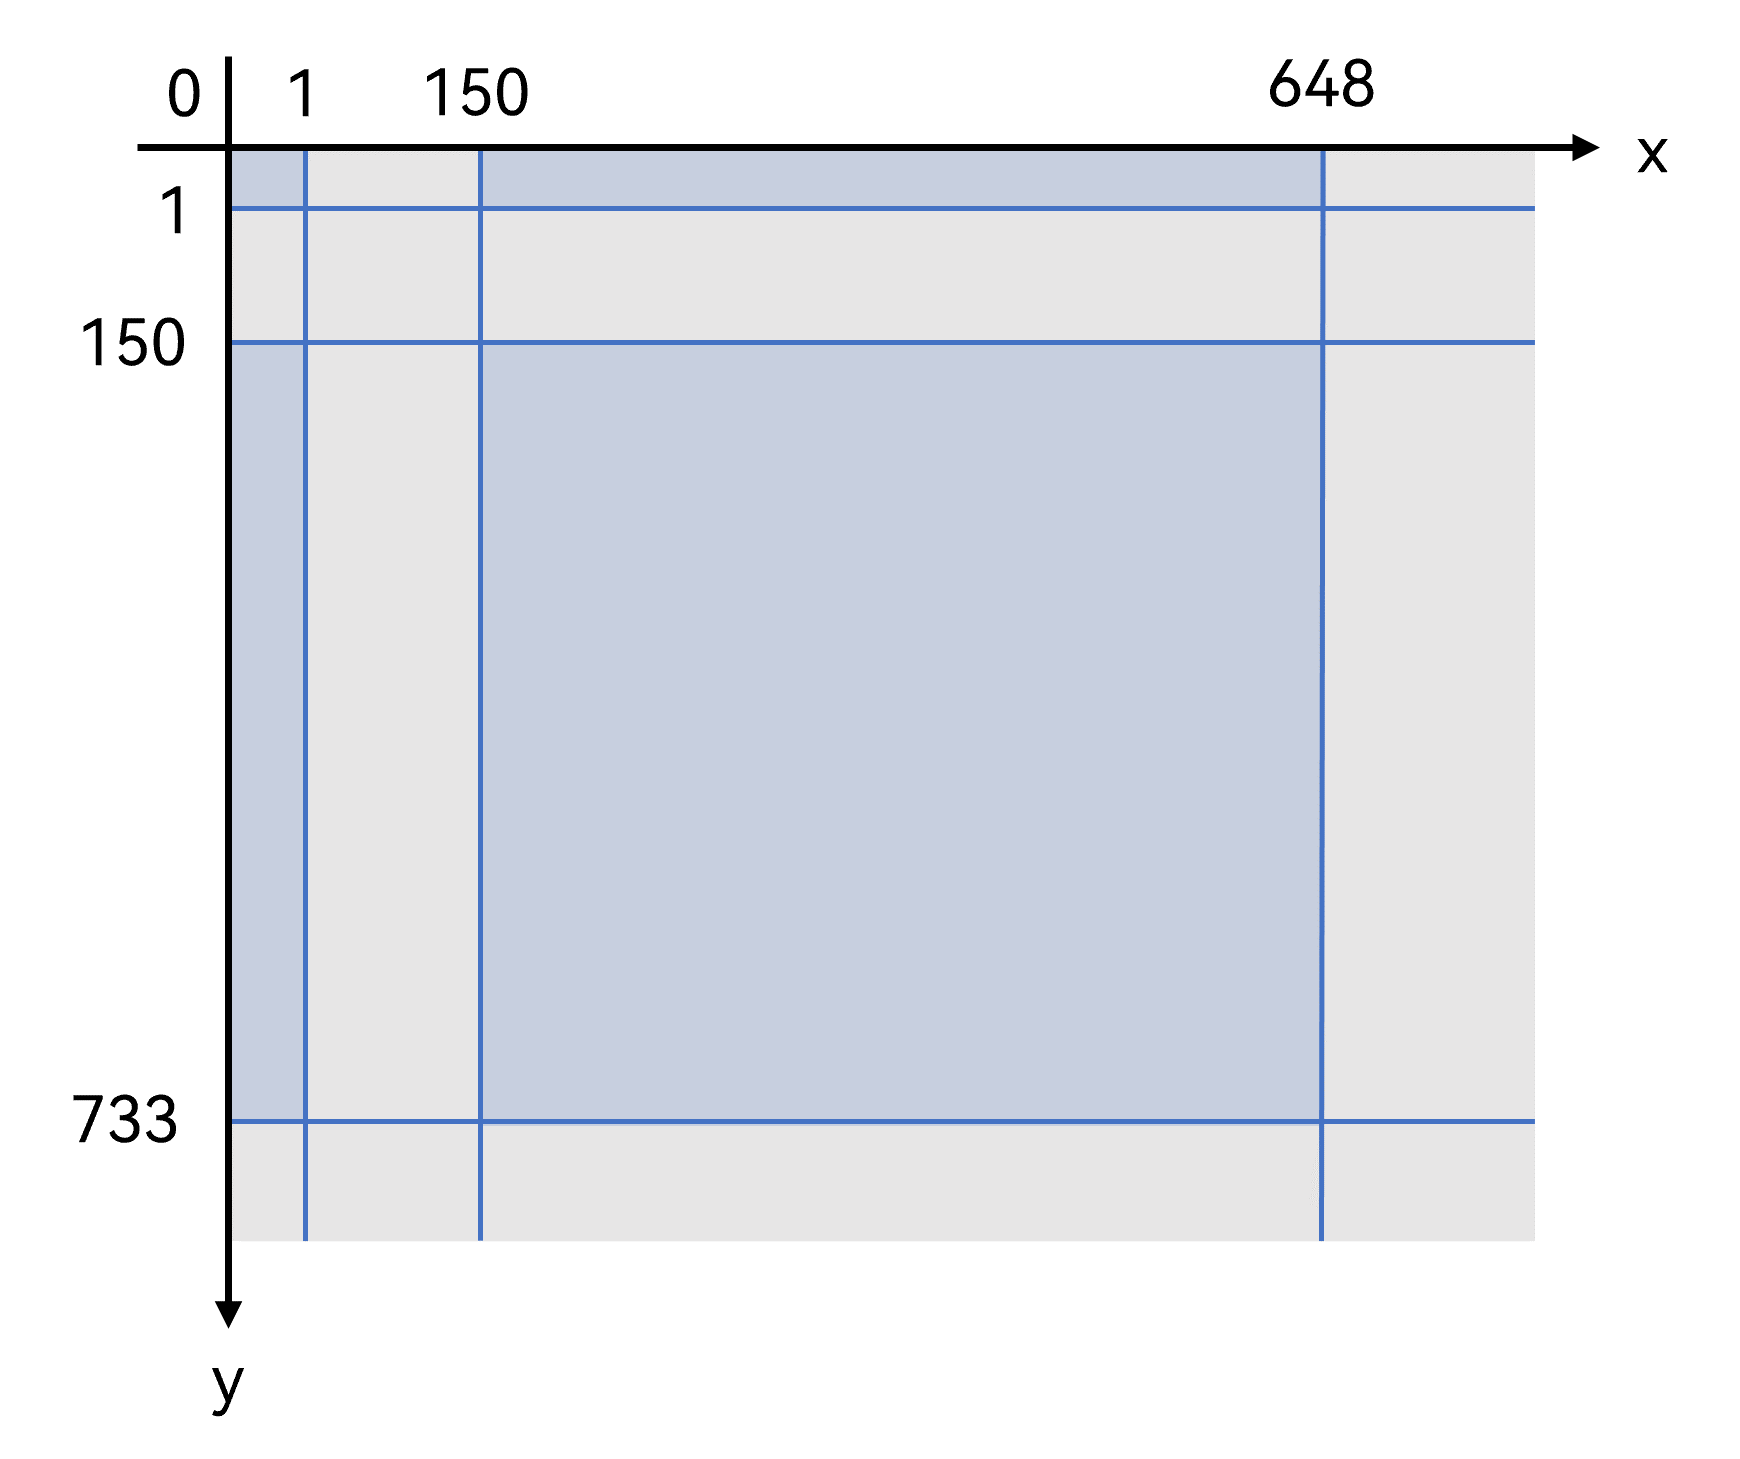

Note that the number count of rows and columns here starts from row 0 and column 0. For example, the blue areas mentioned above correspond to row 0 column 0, row 0 column 2, row 2 column 0, and row 2 column 2—all are intersections of even-numbered rows and columns. These areas are fixed and cannot be resized.
The sample code is as follows:
private xDivs: Array<number> = [1, 60, 243];
private yDivs: Array<number> = [1, 50, 253];
private drawingLatticeFirst: DrawingLattice =
  drawing.Lattice.createImageLattice(this.xDivs, this.yDivs, this.xDivs.length, this.yDivs.length);
// ...
      Image($r('app.media.placeholder_img'))
        .height(this.imgHeight)
        .width('100%')
        .resizable({
          lattice: this.drawingLatticeFirst
        })
// ...
Compared with slice (only the four corners can be specified as non-resizable), lattice allows you to flexibly stretch an image. You can set appropriate coordinate parameters to specify any area to resize or remain unchanged.
[h2]Comparison of Image Resizing Implemented by slice and lattice
The following compares the implementation modes and application scenarios of slice and lattice. You can select a proper solution as required.
| Item | Implementation by slice | Implementation by lattice |
|---|---|---|
| Core implementation logic | By using the four offset values for the top, bottom, left, and right, the four corner areas are defined as fixed areas. | By using horizontal and vertical coordinates, an image is divided into a grid matrix, and the intersection areas of even rows and even columns are fixed areas. |
| Application scenario | Applies to scenarios where the four corners are not to be resized. For example, the chat bubbles, text box background, and coupon background. | Applies to more complex scenarios or scenarios where the middle area is not resized. For example, placeholder images with logos, card backgrounds with decorations, and dialog box backgrounds with complex borders. |
[h2]When to Use
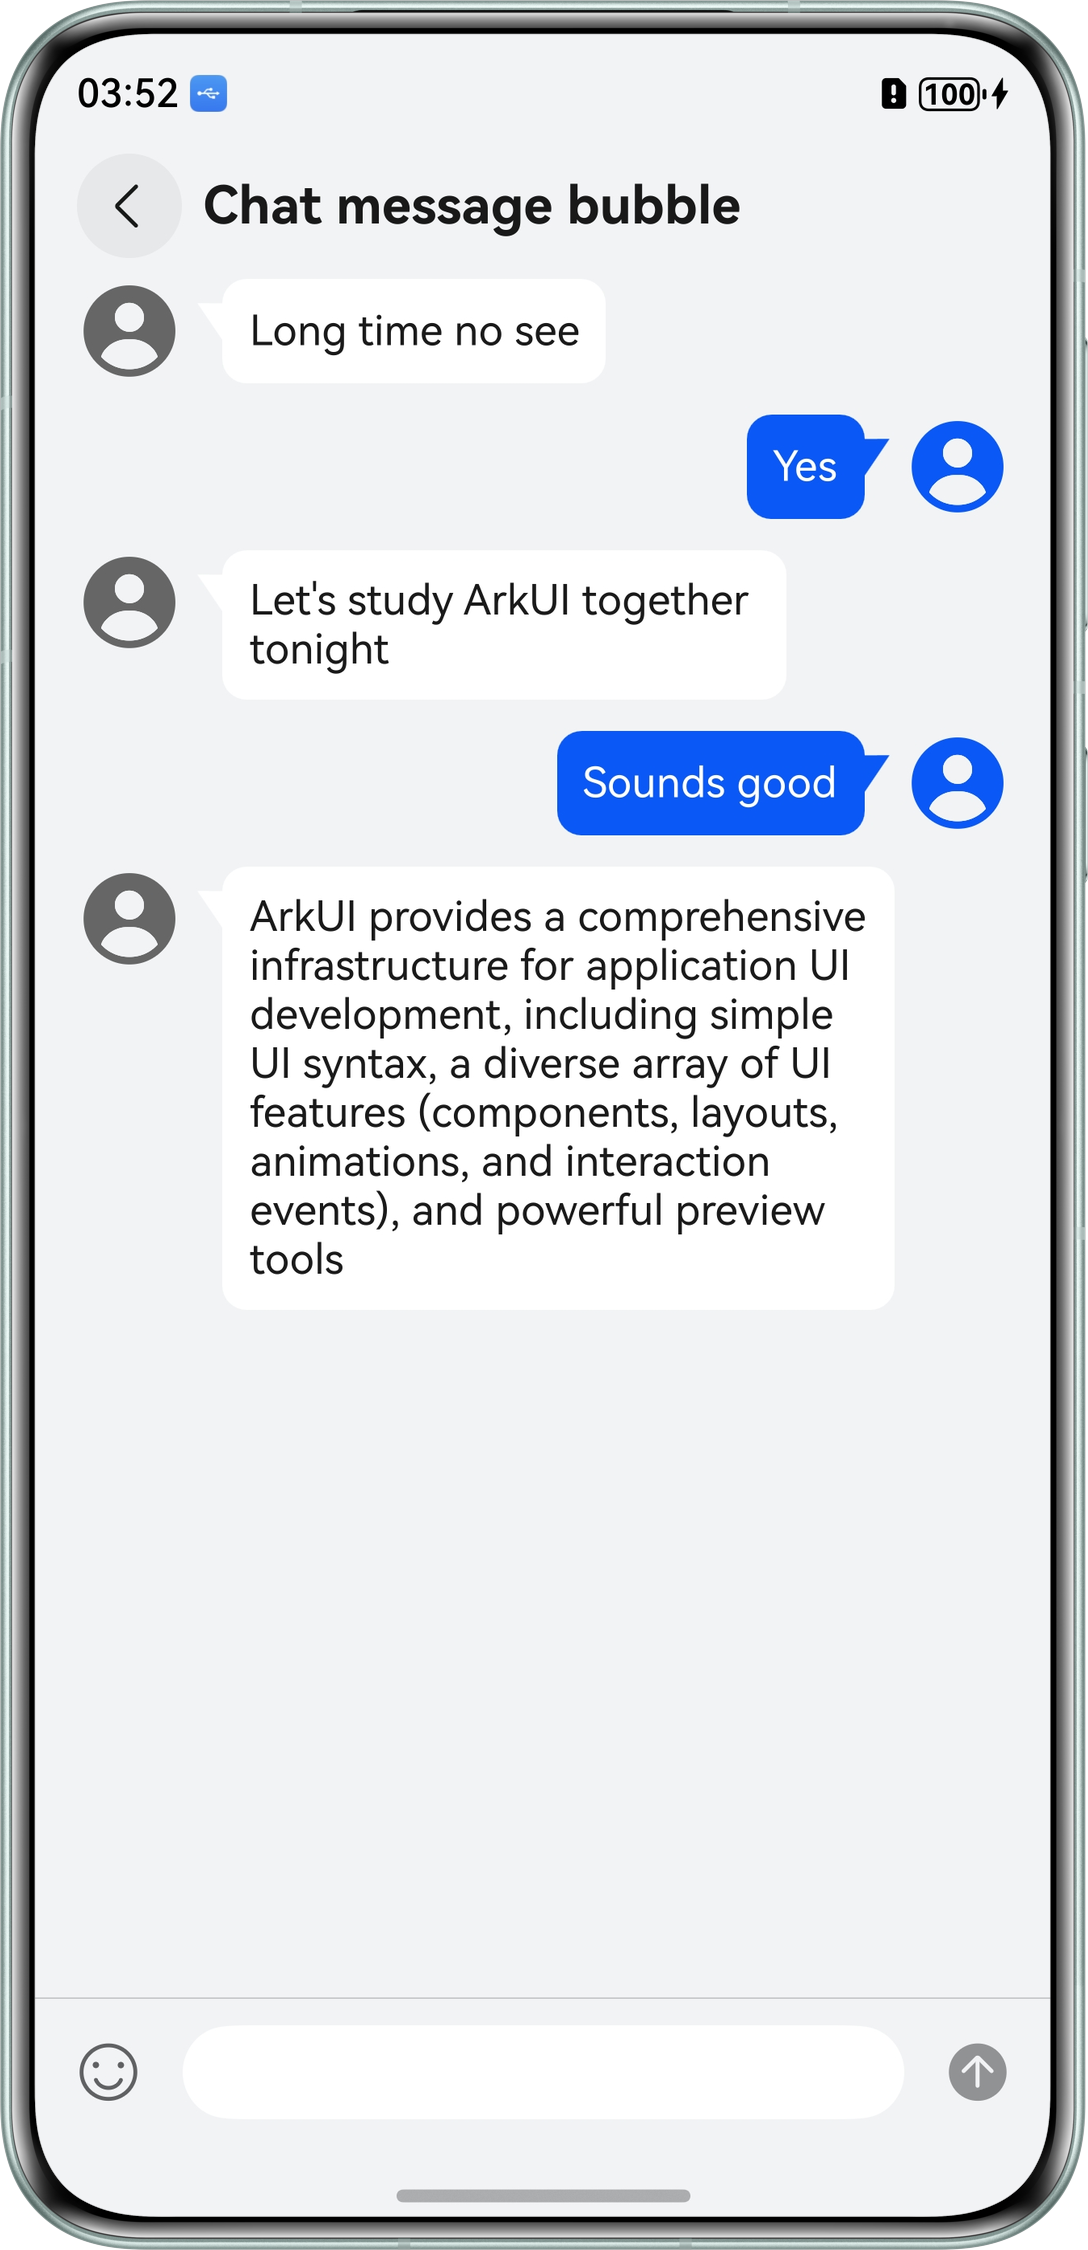
Chat bubbles are widely used in social applications. The following figure shows the effect. When the length and height of the message content are different, the rounded corners on all sides and the shape of the small triangular indicator of the chat bubble must remain unchanged.
[h2]How to Implement
slice is used to implement chat bubbles. The main solution is to keep the rounded corners and triangles unchanged. The procedure is as follows:
Divide the image into grid areas and determine the corresponding offset values.
You can find the accurate offset values of the top, bottom, left, and right sides of the fixed area of the original image using the coordinates provided by UX or using image editing tools such as Photoshop. The following figure shows the division and coordinates of the message bubble image.

Implement the message bubble layout.
slice can be used in the backgroundImageResizable attribute. You can set the backgroundImage attribute for the Text component of the message content to use it as the background image of the content. When the content width and height are different, the background image is scaled accordingly. Then, assign the offset value ({ left: '70px', top: '80px', right: '40px', bottom: '40px' }) obtained earlier to the slice parameter in the backgroundImageResizable attribute of the Text component.
Text(this.message)
  .fontSize($r('sys.float.Body_L'))
  .fontColor($r('sys.color.font_primary'))
  .backgroundImage($r('app.media.bg_left_message'))
  .constraintSize({
    maxWidth: 'calc(100% - 90vp)',
    minHeight: 40,
    minWidth: 50
  })
  .padding({
    left: 20,
    top: 10,
    right: 10,
    bottom: 10
  })
  .backgroundImageSize({
    height: '100%',
    width: '100%'
  })
  .backgroundImageResizable({
    slice: {
      left: '70px',
      top: '80px',
      right: '40px',
      bottom: '40px'
    }
  })
[h2]When to Use
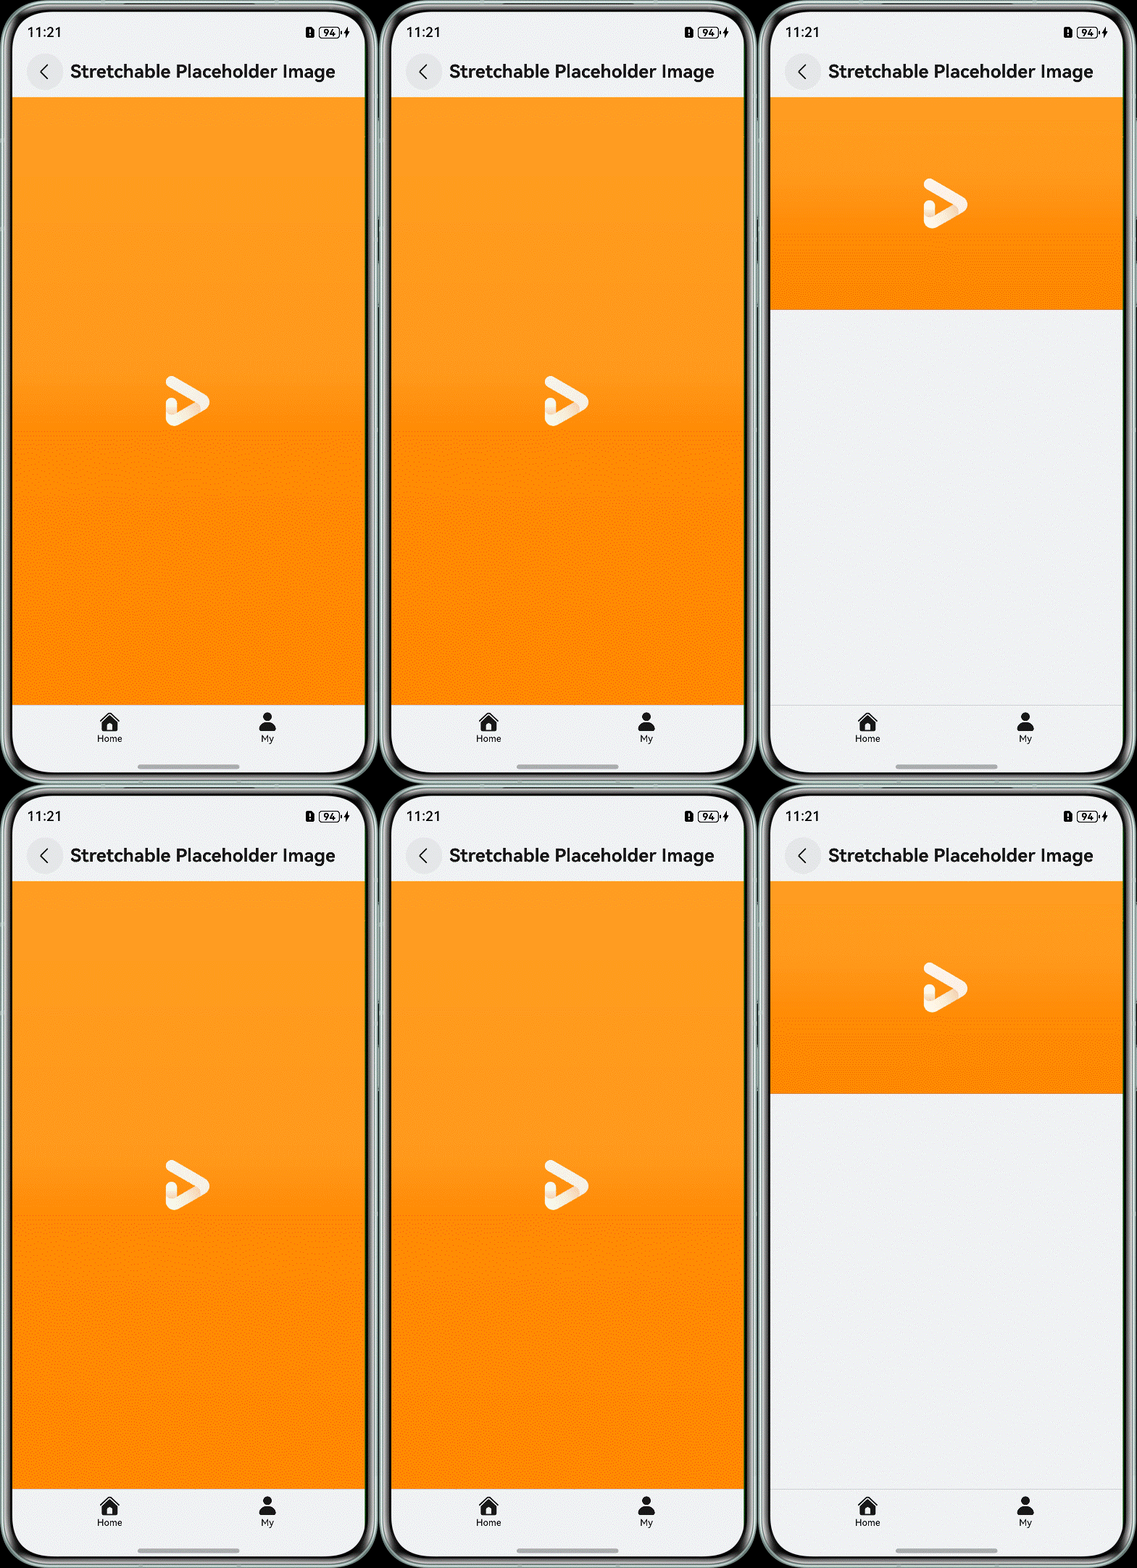
The resizable placeholder image must be implemented such that its edge areas can be resized while the logo area in the middle remains unchanged, as shown in the following figure. This section uses lattice to implement the resizable placeholder image.
[h2]How to Implement
The middle area of the resizable placeholder image is fixed. According to the principle of Using lattice to Resize an Image, you need to specify the middle area of the image as the intersection of even rows and even columns. The procedure is as follows:
Divide the image into grid areas and determine the coordinate array.
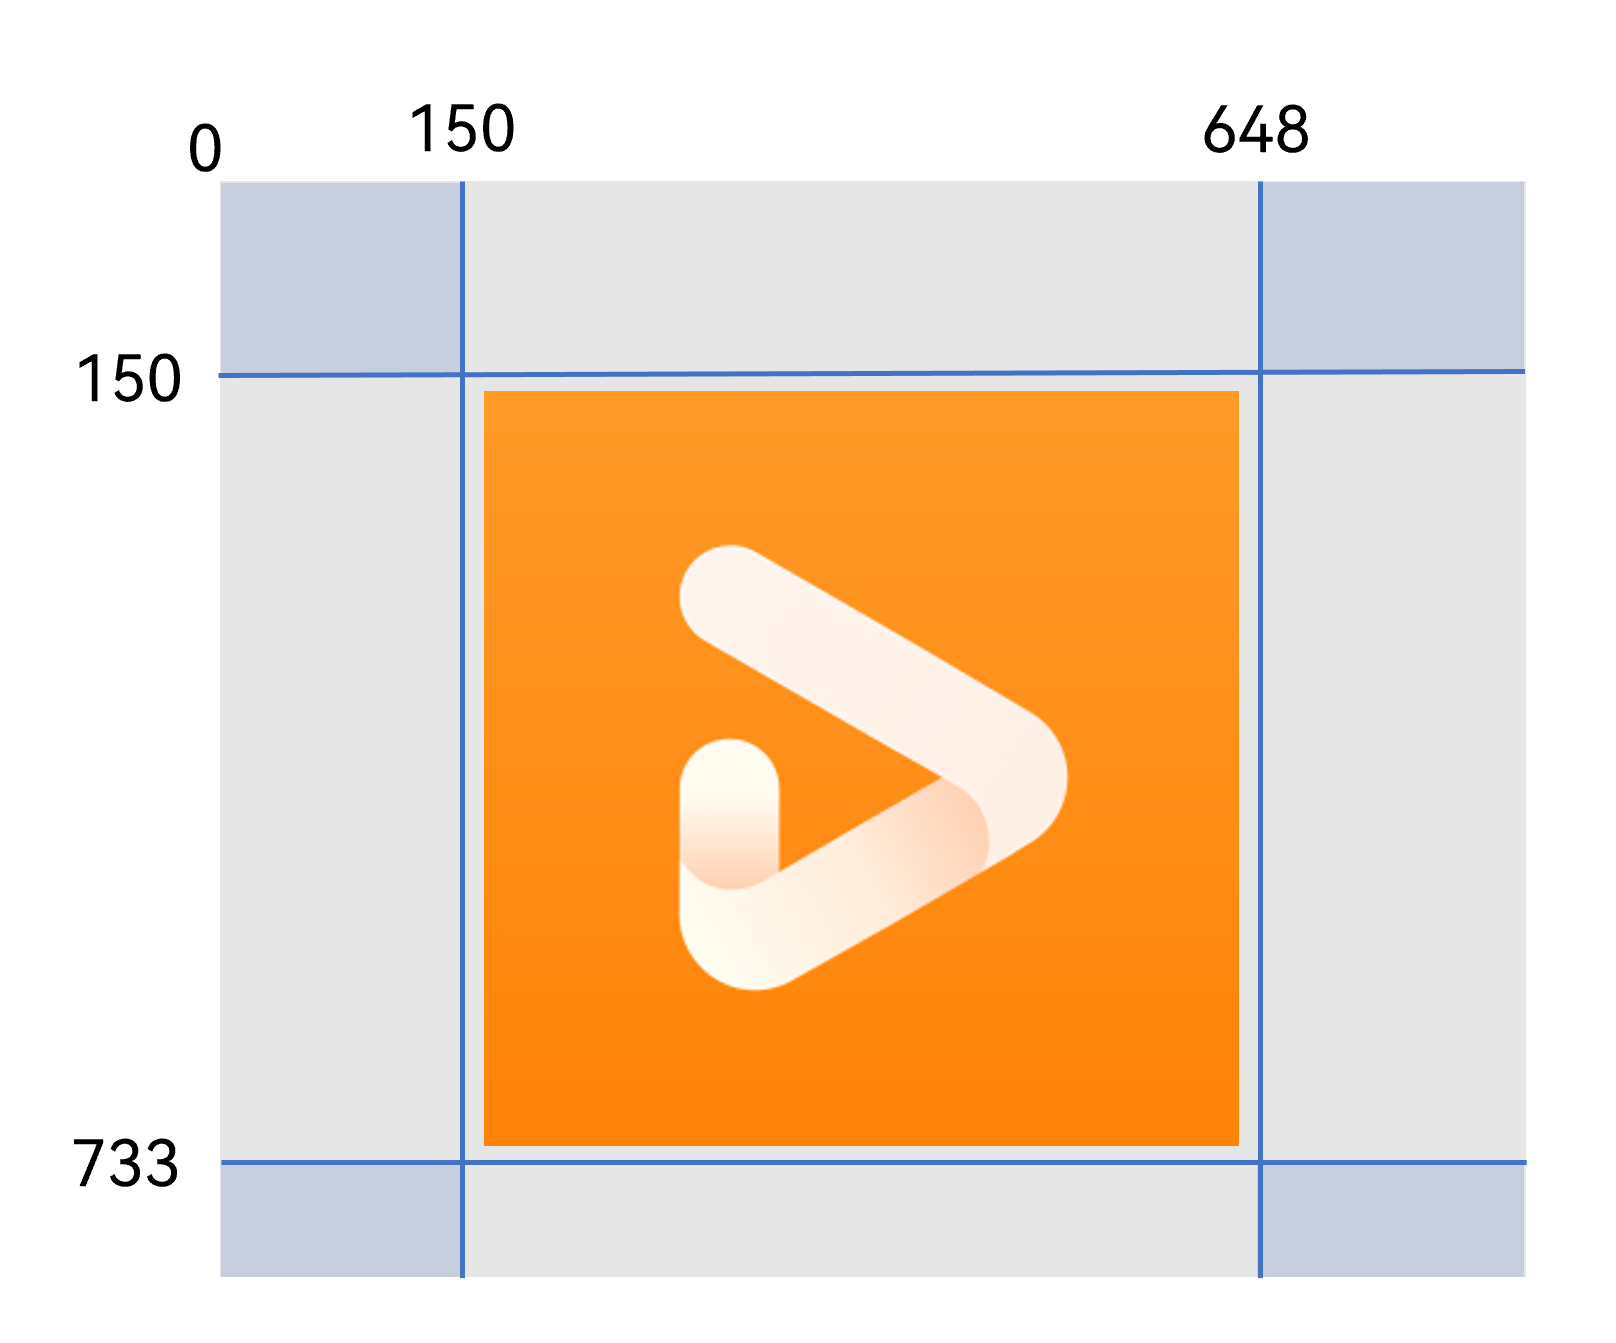
The coordinate array of the image logo area can be provided by UX designers or manually obtained by developers using image editing tools such as Photoshop. In the example scenario, the x-axis coordinate array of the area is [150, 648], and the y-axis coordinate array is [150, 733]. If the coordinate array is used directly, the image will be divided into a grid of 3 rows and 3 columns. The logo area will be located at the intersection of row 1 and column 1 (not even rows and columns), which cannot achieve the expected effect. The following figure shows the effect.
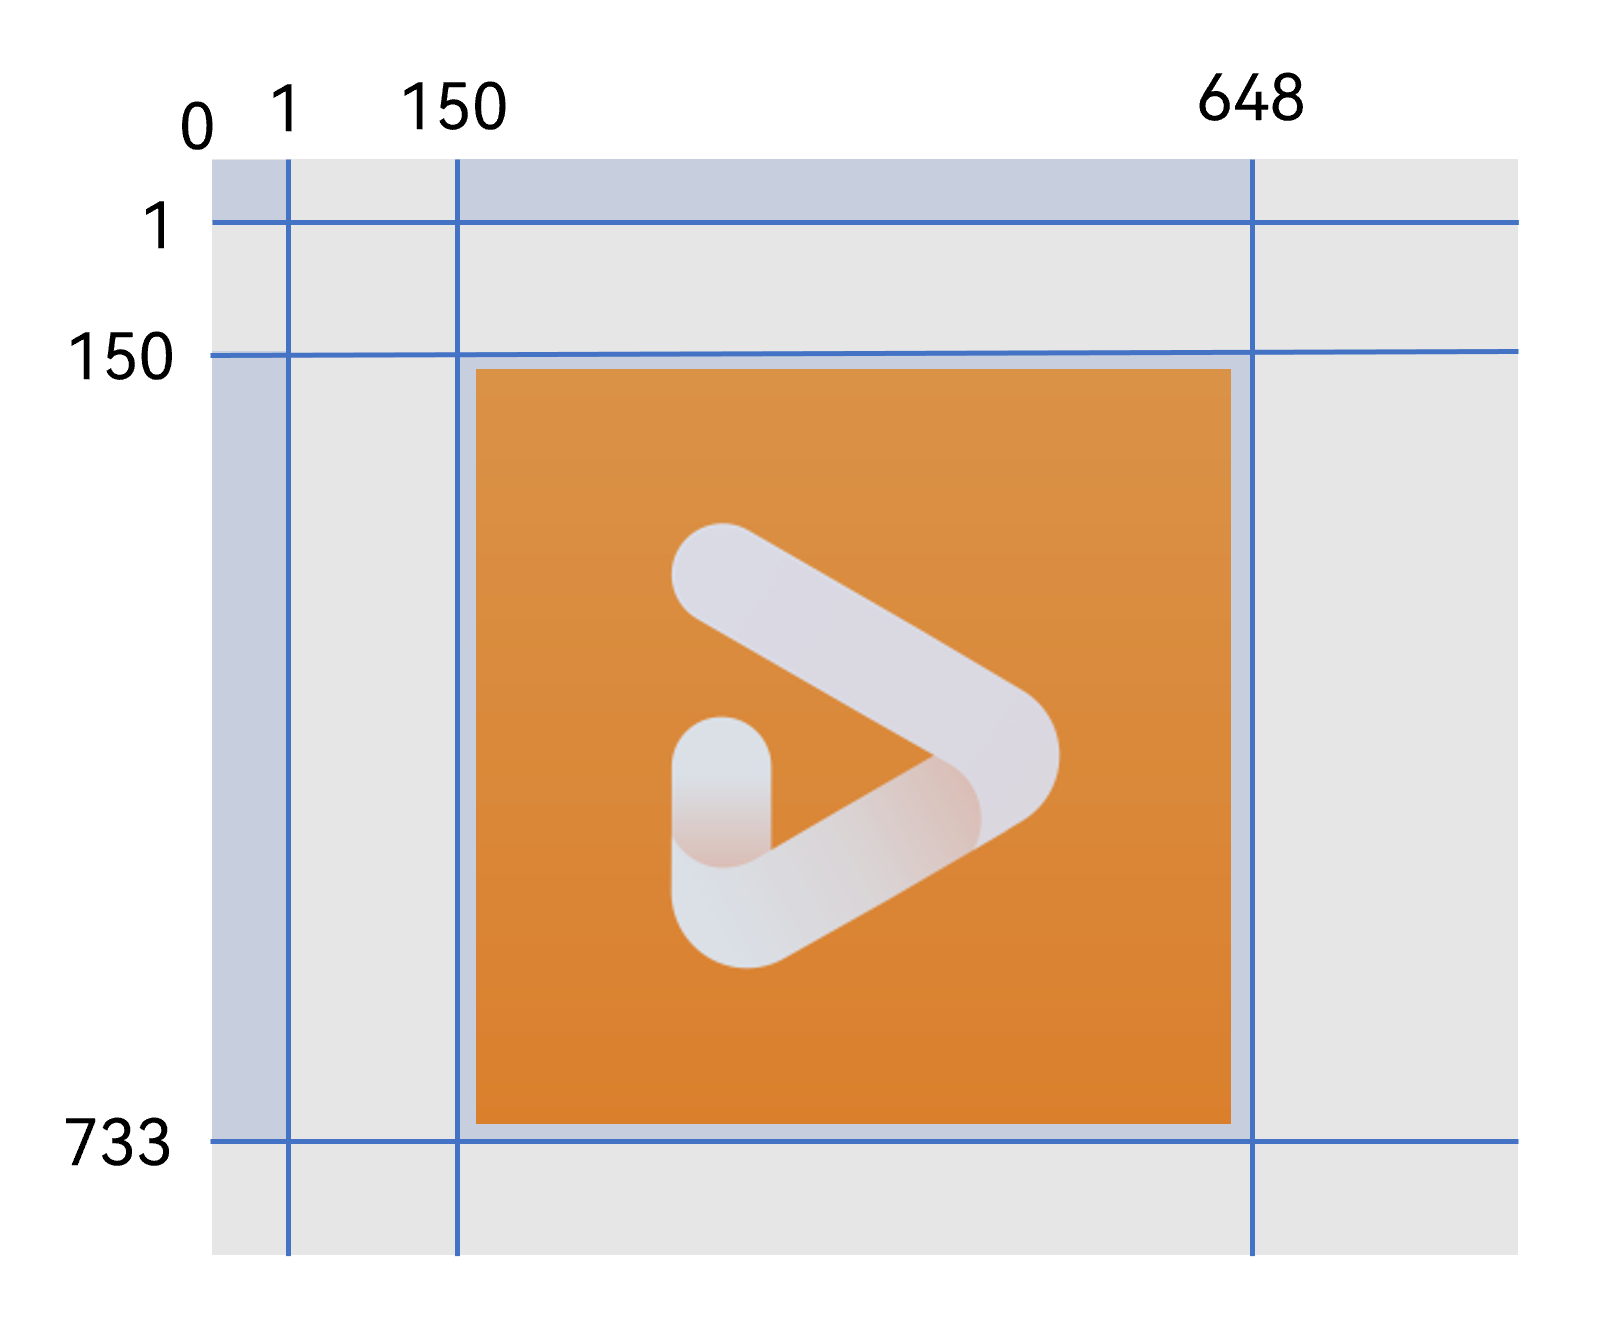
To solve this problem, you can add a coordinate point to the x-axis and y-axis respectively, so that the logo area is located at the intersection of row 2 and column 2 (even rows and columns). To avoid affecting the display effect, you can add a small coordinate value, for example, 1, before the original coordinate. As a result, the new x-axis coordinate array is [1, 150, 648], and the new y-axis coordinate array is [1, 150, 733], as shown in the following figure.
Implement the resizable placeholder image layout.
Based on the obtained x-axis and y-axis coordinate point arrays, use the createImageLattice() method to create a rectangular grid object and set it to the lattice parameter.
@Component
struct PlaceholderImgView {
  @State imgHeight: Length = '35%';
  @State isEnlarge: boolean = false;
  private xDivs: Array<number> = [1, 60, 243];
  private yDivs: Array<number> = [1, 50, 253];
  private drawingLatticeFirst: DrawingLattice =
    drawing.Lattice.createImageLattice(this.xDivs, this.yDivs, this.xDivs.length, this.yDivs.length);
  // ...

  build() {
    NavDestination() {
      Stack() {
        Image($r('app.media.placeholder_img'))
          .height(this.imgHeight)
          .width('100%')
          .resizable({
            lattice: this.drawingLatticeFirst
          })
          .onClick(() => {
            if (this.isEnlarge) {
              this.imgHeight = '35%';
            } else {
              this.imgHeight = '100%';
            }
            this.isEnlarge = !this.isEnlarge;
          })
      }
    }
    // ...
  }
}
[h2]Resizing Area of the Image Component Is Displayed Differently on Different Devices After the resizable Attribute Is Set
Symptom
After the slice parameter of resizable is used to set the non-resizable area, the display effect on the mobile phone is different from that on the tablet. The non-resizable area is normal on the mobile phone, but distorted on the tablet.
Possible Causes
When you use resizable to set the slice parameter, you may directly transfer a number without unit. The parameter is in vp by default. The px conversion ratio of vp varies with devices, which causes the display effect of the fixed area to be inconsistent.
Solution
It is recommended that px be used as the unit of the parameter. The sample code is as follows:
Image($r('app.media.bg_right_message'))
  // ...
  .resizable({
    slice: {
      left: '40px',
      top: '80px',
      right: '70px',
      bottom: '40px'
    }
  })
[h2]resizable Attribute Setting Does Not Take Effect, and the Image Is Still Resized and Distorted
Symptom
The slice or lattice parameter is used to set a non-resizable area on the image. When the image is resized, the area is still distorted.
Possible Causes
- When the slice or lattice parameter is used to divide a non-resizable area, the coordinate positioning is inaccurate and the target area cannot be accurately located. As a result, the non-resizable area is incorrectly divided.
- The slice or lattice parameter is incorrectly set. For example, the parameter value exceeds the width and height of the image, or an invalid parameter value is set.
Solution
- If the problem is caused by inaccurate coordinate positioning, you can calibrate and divide the coordinate points of the non-resizable area again by referring to How to Implement.
- If the problem is caused by incorrect parameter settings, ensure that the coordinate points are within the image area.
- For lattice, the value of the x-axis array element must be greater than or equal to 0 and less than the image width; the value of the y-axis array element must be greater than or equal to 0 and less than the image height.
- For details about the value range of the slice parameter, see its description in ResizableOptions.