Use Cases
After the Push Kit server sends a message to a device, the device will report the message delivery status to the Push Kit server, and the Push Kit server will send the result to your app's receipt server in a message receipt, so you can learn about the status of the delivered message and rectify any possible errors.
Due to the network status and message quantity, the message receipt sending may be delayed after the Push Kit server receives a response from the user device. If the delay is too long, the user device may be offline.
Message Receipt Service Development
Develop your receipt server code by referring to the description of the API for sending a receipt. The service API address will be used as the callback address in Setting Receipt Parameters.
Enabling the Receipt Permission
-
Sign in to AppGallery Connect, click Development and services, click the desired project, and go to Project settings.

-
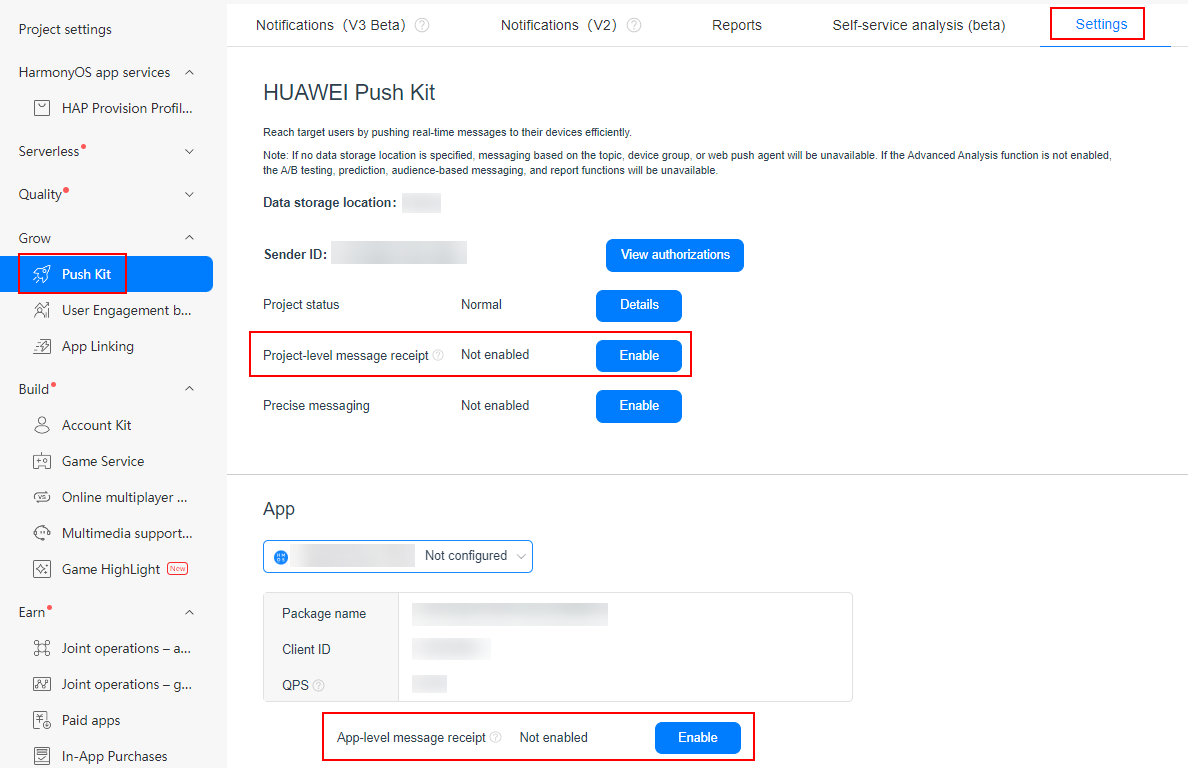
Find and click the desired project in the project list. Then, go to Grow > Push Kit > Settings. On the Settings page that is displayed, choose to set the project-level message receipt or app-level message receipt. Note that the URL for receiving the project-level message receipt is valid for all apps in the project. If you set both the project-level and app-level message receipt receiving URLs, the app-level message receipt receiving URL is used first.
-
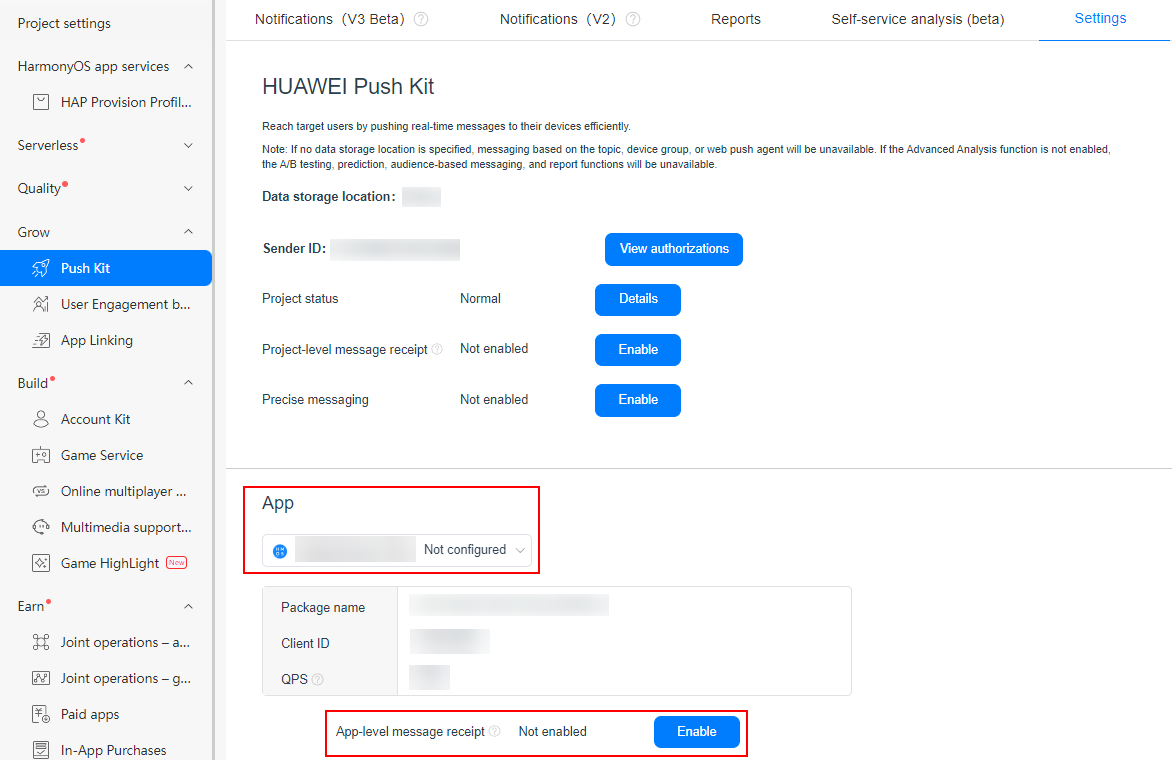
Take the app-level message receipt configuration as an example. Select an app for which the receipt needs to be set and click Enable.
-
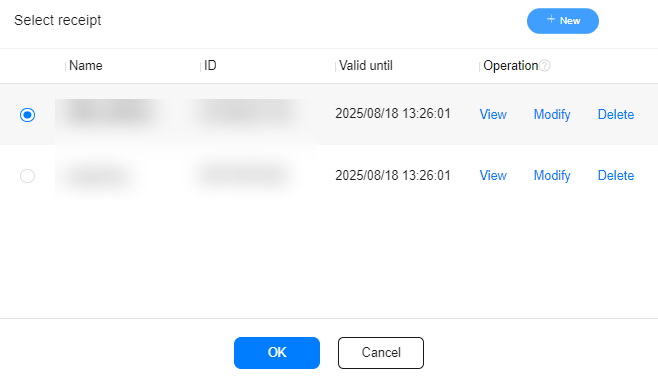
On the Select receipt page that is displayed, select an existing receipt or create a receipt.
Setting Receipt Parameters
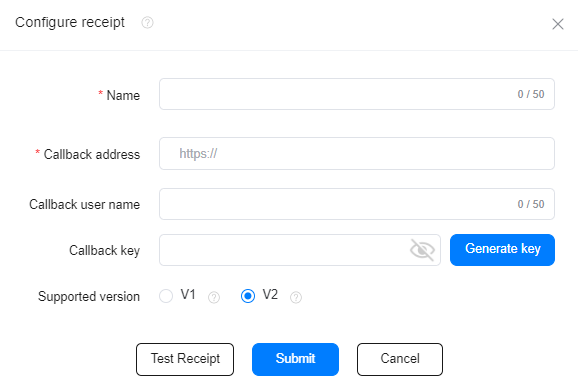
Create a receipt and set the parameters in the following figure.
-
Set the message receipt name and callback address.
After the callback address is configured, the Push Kit server will check whether the certificate provided by the message receipt server (app server for receiving the message receipt) is issued by a commercial CA.
-
Commercial CA prompt information:

-
Self-signed CA prompt information:
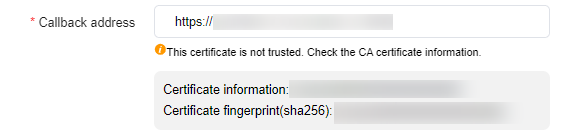

If the certificate expires, you will be unable to receive message receipts. You should promptly replace the certificate of your message receipt server.
-
-
Configure the callback user name (userName, which is optional) and callback key (secret, which is optional) for identity verification. The callback key can be automatically generated.
-
Obtain X-HUAWEI-CALLBACK-ID from the request header of the receipt message. An example is as follows:
X-HUAWEI-CALLBACK-ID:
timestamp=1563*****1261;nonce=a07bfa17-6d82-4b53-a9a2-07c*****eef1;value=E4YeO*********************QXF+c=
In the example, timestamp indicates the millisecond-level timestamp of the receipt message, nonce indicates a random UUID, value indicates the signature information, and the signing method is Base64(HMAC-SHA256(secret, timestamp+nonce+userName)).
-
Generate a signature based on timestamp, nonce, userName, and secret and compare the signature with the content of value for signature verification. You can also click Generate key in AppGallery Connect to automatically generate a callback key.
The Java sample code for generating a signature is as follows:
StringBuilder buf = new StringBuilder();
buf.append(timestamp);
buf.append(nonce);
// Callback user name configured for the message receipt.
buf.append(userName);
// Callback key configured for the message receipt.
String secret = "your secret";
String signature = "";
try {
  Mac mac = Mac.getInstance("HmacSHA256");
  // The receipt key of the earlier version is encrypted using secret.getBytes(UTF_8), and the receipt key of the new version is encoded using Base64.
  SecretKeySpec key = new SecretKeySpec(Base64.getDecoder().decode(secret), "HmacSHA256");
  mac.init(key);
  byte[] encodeV = mac.doFinal(buf.toString().getBytes(UTF_8));
  signature = Base64.getEncoder().encodeToString(encodeV);
} catch (NoSuchAlgorithmException | InvalidKeyException e) {
  // Generate error logs.
  // ...
}
-
-
Configure the supported version for the receipt.

The V1 receipt does not support scenario-specific messages. Use the V2 receipt.
-
Click Test Receipt to test the receipt callback address. After completing the test, click Submit. The receipt is created.

-
The Push Kit server interacts with the app server that receives message receipts using HTTPS. The Push Kit server will verify the certificate provided by the app server. Therefore, your app server should use an HTTPS certificate issued by a commercial CA.
-
If you have configured the receipt correctly, your receipt server will receive a test message from the Push Kit server after you click Test Receipt. The message content is fixed for a receipt version and is used only for testing.
Sample message:
Message delivery receipt:

All scenario-specific messages except widget update messages support the message delivery receipt.
 {
  "statuses": [
    {
      "biTag": "bi**62",
      "pushType": 0,
      "token": "MsDZmCSyuS+Gd***********ZLs8Es",
      "requestId": "169802**1701",
      "appPackageName": "com.**.**",
      "deliveryStatus": {
        "result": 0,
        "timestamp": 1697741455082
      }
    }
  ]
}
Widget update receipt:
{
  "statuses": [
    {
      "biTag": "bi**62",
      "pushType": 1,
      "token": "MsDZmCSyuS+Gd***********ZLs8Es",
      "requestId": "169802**1701",
      "appPackageName": "com.**.**",
      "formStatus": {
        "formId": 10086,
        "result": 0,
        "timestamp": 1698027152082
      }
    }
  ]
}
The test is passed only when your message receipt server returns a success response. Then, click Submit to complete message receipt creation.
Success response:
{ "code": "0", "message": "success" } -
Receipt Status Codes

Before locating errors based on receipt status codes, check whether the URL of the message push API (https://push-api.cloud.huawei.com/v3/[projectId]/messages:send) is correct.
-
Use the message push API URL of the V3 version but not the V1 or V2 version. For details, please refer to Request URL Version Problem in a Scenario-Specific Message.
-
Check whether the projectId in the message push API URL is the same as the ID of the project to which the current app belongs. If not, update projectId in the API URL, regenerate a JWT, obtain a new push token, and then push the message again.
You can collect statistics on received message receipt status codes and make analysis. The following table lists the receipt status codes.
| Receipt Status Code | Description | Cause and Troubleshooting |
|---|---|---|
| 0 | The message is delivered successfully. | N/A |
| 2 | The token is invalid as the app has been uninstalled. | The app does not exist after the message is successfully sent to the device. The app has been uninstalled in most cases. |
| 5 | The token is not matched. | The token in the received message is different from the local token. Possible causes are as follows: · The user has cleared the local app data. · The user has updated the app by uninstallation and reinstallation. · You have deleted the local token by calling the pushService.deleteToken() method from your app. · You have called deleteAAID() from your app, which deletes the local token together with the AAID. · After the device is restored to factory settings, the user relaunches the preloaded app, or reinstalls and launches the non-preloaded app. No app token exists in local data storage when the device receives the message. A possible cause is as follows: · The app is not activated. If the error persists, submit a ticket online. |
| 6 | The notification message is not displayed. | Possible causes are as follows: · The user has disabled the notification function on the device. · The user has disabled the notification function of the app. · The user has enabled the youth mode. |
| 10 | Inactive device. | If a device is inactive (that is, the device has not connected to the network for 30 consecutive days), no message is sent to the device. |
| 14 | Other errors. | Internal network errors. |
| 15 | The message sent to an offline user is controlled. | 1. A message overwriting policy for offline users has been set through collapseKey in the server-side API. Based on the policy, the message is overwritten and therefore not delivered to the device. 2. A maximum of 120 messages can be cached when a user is offline. When the number of cached messages reaches this threshold, each new incoming message overwrites the oldest cached message. |
| 22 | Target users do not match. | The user to which the push token belongs does not match the local user on the current device. Ensure that the push token used for messaging is the same as that requested for the local user. NOTE If the local user before accessing PrivateSpace is user A, after PrivateSpace access, the system switches the local user to user B. At this time, if you use the push token requested for user A to send a message, this receipt status code will be returned. |
| 27 | The app process does not exist, and the background message is cached. | The target app process does not exist on the device. As a result, the background message is cached. |
| 31 | The target app does not contain the target page. | Check the skills configuration and the setting of the clickAction field in the request body by referring to Actions to Be Triggered upon Message Tapping. |
| 51 | The device is powered on but not unlocked. | The user restarted the device but did not unlock the device screen. |
| 102 | The message is discarded due to frequency control. | The message sending frequency is governed based on service scenarios and traffic. In cases where message sending is unnecessary or unreasonable, frequency limits will be applied. |
| 144 | The profileId parameter does not exist. | Check the profileId field in the payload of the downlink scenario-specific message. |
| 151 | The push message is not displayed, or formId of the widget does not exist. | 1. Ensure that the widget has been added to the home screen of the user device. 2. Ensure that the formId specified in the widget update message exists. |
| 155 | Failed to update the live view. | Verify that your notification has been created and has not expired. |
| 156 | The live view update messages are out of order. | The version field carried in the live view notification message is earlier than the current version. As a result, the update fails. |
| 158 | The live view to be created already exists. | A live view with the same activityId created using Live View Kit already exists on the device. |
| 188 | Failed to launch the app. | Try again later. |
| 191 | Failed to update the badge. | The badge is incorrectly set in the OS. |
| 256 | The message upper limit is reached. | Check the details of the frequency control policy. |
| 259 | The message is rejected. | 1. The message contains inappropriate content. 2. The message contains an insecure URL. Change the message content or URL. |
| 261 | The widget does not exist. | The widget update message is not delivered due to control by the Push Kit server (control period: 30 days). You are advised to filter out invalid messages. Cause: The widget corresponding to the formId in the widget update message does not exist. Enter an allocated formId to avoid that the widget update message cannot be delivered in the control period. |
| 262 | The number of widget updates has reached the upper limit. | The widget update message is not delivered due to control by the Push Kit server (control period: one day). You are advised to filter out invalid messages. Cause: The number of widget update times on the user device has reached the upper limit. (The frequency control threshold on the server side is not reached.) |
| 264 | The message is not subscribed to. | A user has not agreed to a subscription, but the subscription message is sent. |
| 265 | The live view update is controlled. | The live view notification corresponding to the activityId does not exist. Sending live view messages with this activityId is restricted for 24 hours. |
| 268 | The status field is not passed. | The status field is not passed when a live view created through Push Kit is updated. |
| 269 | The live view already exists. | A live view with the same activityId created through Push Kit already exists. |

Filter out tokens with the receipt status code 2, 5, 6, or 10 to reduce invalid message pushes.