Overview
This guide is designed for developers working on video playback apps. It addresses typical use cases in popular video playback apps and demonstrates how to use the AVPlayer system media player to create a video playback app.
This topic will walk you through using HarmonyOS media and ArkUI capabilities to implement essential playback features like play, pause, seek, mute, loop, window scaling, speed adjustment, and volume control. These features help create flexible interactions and optimal viewing experience.

Scenario | Description | Implementation |
|---|---|---|
Load video resources and control play, pause, and stop operations. | Use the AVPlayer APIs. | |
Slide the progress bar to jump to a specific playback position. | Use the Slider component to implement the progress bar, and trigger seek operations in the onChange callback. | |
Toggle mute for media playback. | Call the setMediaMuted() API of AVPlayer. | |
Automatically replay the video from the start upon completion. | Set the loop property to true for AVPlayer when it is in the prepared state. | |
Adjust how video content fits the display area. | Adjust the videoScaleType property of AVPlayer. | |
Adjust the playback speed via button selection or the long-press gesture. | Call the setSpeed() API of AVPlayer to set the playback speed, with appropriate UI components (either the combination of a button and a dialog box or the long-press gesture). | |
Slide on the screen to adjust the volume. | Use the AVVolumePanel component to display the volume panel, and bind pan gesture listeners to the component for volume adjustment. | |
Display subtitles below the video and switch languages as needed. | Use addSubtitleFromFd() of AVPlayer to load external subtitle resources, register the callback function on('subtitleUpdate') of AVPlayer to manage updates, and switch subtitle resources and reset playback with the reset() API of AVPlayer. |
[h2]When to Use
Use AVPlayer to implement core video playback capabilities, including video resource loading, playing, pausing, stopping, and releasing.
This scenario demonstrates how to use AVPlayer to develop video playback features, using the complete playback of a video as an example to achieve end-to-end playback of raw media resources.
The playback process includes creating an AVPlayer instance, setting playback resources and windows, setting playback parameters (volume, speed, and scaling mode), controlling playback (play, pause, seek, and stop), resetting the playback configuration, and releasing the instance. During app development, you can use the state property of AVPlayer to obtain its state or call on('stateChange') to listen for state changes. If the app performs an operation when AVPlayer is not in the given state, the system may throw an exception or generate other undefined behavior.
For details, see Using AVPlayer to Play Videos (ArkTS).
[h2]How to Develop
- Creating instance: Call createAVPlayer() to create an AVPlayer instance. AVPlayer is initialized and enters the idle state.
- Setting video resources: Set the url or fdSrc property of the AVPlayer instance. AVPlayer enters the initialized state.
- Preparing for playback: Call the prepare() API. AVPlayer enters the prepared state.
- Playing: Call the play() API. AVPlayer enters the playing state.
- Pausing: Call the pause() API. AVPlayer enters the paused state.
- Stopping: Call the stop() API. AVPlayer enters the stopped state.
- Destroying instance: Call the release() API to destroy the instance. AVPlayer enters the released state and exits the playback.
[h2]When to Use
Enable users to jump to specific points in the video by interacting with a progress bar.

[h2]How to Develop
Use the Slider component to implement a progress bar, and set the component attributes to customize the progress bar style. Call the seek() API of AVPlayer in the onChange() event for precise playback positioning.
/**
 * Progress slider
 */
Slider({
  value: this.currentTime,
  min: 0,
  max: this.durationTime,
  style: SliderStyle.OutSet
})
  .id('Slider')
  .blockColor(Color.White)
  .trackColor(Color.Gray)
  .selectedColor($r('app.color.slider_selected'))
  .showTips(false)
  .onChange((value: number, mode: SliderChangeMode) => {
    if (mode === SliderChangeMode.Begin) {
      this.isSwiping = true;
      this.avPlayerController.videoPause();
    }
    this.avPlayerController.videoSeek(value);
    this.currentTime = value;
    if (mode === SliderChangeMode.End) {
      this.isSwiping = false;
      this.flag = true;
      this.avPlayerController.videoPlay();
    }
}) [h2]When to Use
Enable or disable muted playback via a toggle on the screen button for enhanced media playback interactivity.

[h2]How to Develop
- Add a Button component (displayed as an icon) to the bottom operation bar, and set the component attributes to customize the button style. Call the videoMuted() API encapsulated in the AvPlayerController.ets file in the onClick() event.
/** * Video Muted Button */ Button() { Image(this.isMuted ? $r('app.media.ic_video_speaker_slash') : $r('app.media.ic_video_speaker')) .width($r('app.float.size_30')) .height($r('app.float.size_30')) } .type(ButtonType.Normal) .width($r('app.float.size_30')) .height($r('app.float.size_30')) .borderRadius($r('app.float.size_20')) .backgroundColor('rgba(0, 0, 0, 0)') .margin({ left: $r('app.float.size_5') }) .fontColor(Color.White) .onClick(() => { this.isMuted = !this.isMuted; this.avPlayerController.videoMuted(this.isMuted) }) - Call the setMediaMuted() API of AVPlayer in videoMuted() to mute or unmute the video. In the API, the first parameter mediaType specifies the media type, where MEDIA_TYPE_AUD indicates audio. The second parameter specifies whether to mute the media.
/**
 * Video muted
 * @param isMuted
 * @returns
 */
async videoMuted(isMuted: boolean): Promise<void> {
  if (this.avPlayer) {
    try {
      this.isMuted = isMuted;
      await this.avPlayer!.setMediaMuted(media.MediaType.MEDIA_TYPE_AUD, isMuted)
    } catch (err) {
      hilog.error(CommonConstants.LOG_DOMAIN, TAG,
        `videoMuted failed, code is ${err.code}, message is ${err.message}`);
    }
  }
}
[h2]How to Develop
// Callback function for state machine changes
this.avPlayer.on('stateChange', async (state) => {
  if (!this.avPlayer) {
    return;
  }
  switch (state) {
    // ...
    case 'prepared': // This state machine is reported after the prepare interface is successfully invoked.
      this.isReady = true;
      this.avPlayer.loop = true
      // ...
      break;
    // ...
  }
}); [h2]When to Use
Allow users to adjust how video content scales to fit different display areas. This feature is crucial in scenarios involving frequent window resizing, aspect ratio adaptation, full-screen/windowed mode switching, and multi-screen collaboration when the video width and height are not fixed.
You can tap a button to bring up a quick settings menu. If you select Stretch to Window Size, the video is stretched to fill the entire window, ideal for making the most of the available screen space when aspect ratio preservation is not critical. If you select Scale to Window by Shortest Side, the video is scaled based on the shortest side while maintaining the original aspect ratio, perfect for keeping the content's intended look without distortion.


[h2]How to Implement
Switch window scaling modes by adjusting the videoScaleType setting in AVPlayer. Note that VIDEO_SCALE_TYPE_SCALED_ASPECT (scaling to window by longest side) is available for atomic services since API version 20. For earlier versions, you can set a fixed size for the video to match the screen dimensions.

The videoScaleType setting of AVPlayer takes effect only when the height and width of the XComponent are not fixed.
[h2]How to Develop
- Select Stretch to Window Size or Scale to Window by Shortest Side, and then call the corresponding videoScaleFit() or videoScaleFitCrop() API.
List() { ForEach(this.scaleList, (item: Resource, index) => { ListItem() { Column() { Row() { Text(item) // ... Blank() Image(this.windowScaleSelect === index ? $r('app.media.ic_radio_selected') : $r('app.media.ic_radio')) // ... } // ... } .width('90%') } .width('100%') .height($r('app.float.size_48')) .onClick(() => { this.windowScaleSelect = index; switch (this.windowScaleSelect) { case ZERO: this.avPlayerController.videoScaleFit(); break; case ONE: this.avPlayerController.videoScaleFitCrop(); break; default: break; } this.controller.close(); }) }) } - Set the videoScaleType property of AVPlayer in videoScaleFit() or videoScaleFitCrop(). VIDEO_SCALE_TYPE_FIT means to stretch the video to the window size, and VIDEO_SCALE_TYPE_FIT_CROP means to scale the video based on the shortest side to fill the window.
/**
 * Set window scale mode
 */
videoScaleFit(): void {
  if (this.avPlayer) {
    try {
      this.avPlayer.videoScaleType = media.VideoScaleType.VIDEO_SCALE_TYPE_FIT
    } catch (err) {
      hilog.error(CommonConstants.LOG_DOMAIN, TAG,
        `videoScaleType_0 failed, code is ${err.code}, message is ${err.message}`);
    }
  }
}

videoScaleFitCrop(): void {
  if (this.avPlayer) {
    try {
      this.avPlayer.videoScaleType = media.VideoScaleType.VIDEO_SCALE_TYPE_FIT_CROP
    } catch (err) {
      hilog.error(CommonConstants.LOG_DOMAIN, TAG,
        `videoScaleType_1 failed, code is ${err.code}, message is ${err.message}`);
    }
  }
}
[h2]When to Use
Allow users to select preset options via buttons for flexible control over the video playback speed.

[h2]How to Implement
Call the setSpeed() API of AVPlayer to set the playback speed according to the option chosen.
[h2]How to Develop
- Offer options like 1.0X, 1.25X, 1.75X, or 2.0X. After the selection, call the corresponding playback speed setter.
ForEach(this.speedList, (item: Resource, index) => { ListItem() { Column() { Row() { Text(item) // ... Blank() Image(this.speedSelect === index ? $r('app.media.ic_radio_selected') : $r('app.media.ic_radio')) // ... } // ... } .width('90%') } .width('100%') .height($r('app.float.size_48')) .onClick(() => { this.speedSelect = index; switch (this.speedSelect) { case ZERO: this.avPlayerController.videoSpeed(media.PlaybackSpeed.SPEED_FORWARD_1_00_X); break; case ONE: this.avPlayerController.videoSpeed(media.PlaybackSpeed.SPEED_FORWARD_1_25_X); break; case TWO: this.avPlayerController.videoSpeed(media.PlaybackSpeed.SPEED_FORWARD_1_75_X); break; case THREE: this.avPlayerController.videoSpeed(media.PlaybackSpeed.SPEED_FORWARD_2_00_X); break; default: break; } this.controller.close(); }) }, (item: Resource, index) => index + '_' + JSON.stringify(item)) } - Call the setSpeed() API of AVPlayer to set the playback speed.
videoSpeed(speed: number): void {
  if (this.avPlayer) {
    try {
      this.avPlayer.setSpeed(speed);
    } catch (err) {
      hilog.error(CommonConstants.LOG_DOMAIN, TAG,
        `videoSpeed failed, code is ${err.code}, message is ${err.message}`);
    }
  }
}
[h2]When to Use
Enable playback at 2x speed with a long press and resume 1x speed when the press is released.
[h2]How to Implement
Bind the LongPressGesture event to a component, and call the setSpeed() API of AVPlayer. Pass media.PlaybackSpeed.SPEED_FORWARD_2_00_X on press start for 2x speed, and pass media.PlaybackSpeed.SPEED_FORWARD_1_00_X on press end to revert to 1x speed.
[h2]How to Develop
- Bind the LongPressGesture event to a component, and call the videoSpeed() API. Pass media.PlaybackSpeed.SPEED_FORWARD_2_00_X on press start for 2x speed, and pass media.PlaybackSpeed.SPEED_FORWARD_1_00_X on press end to revert to 1x speed.
.gesture( LongPressGesture({ repeat: true }) .onAction(() => { this.speedSelect = CASE_THREE this.avPlayerController.videoSpeed(media.PlaybackSpeed.SPEED_FORWARD_2_00_X); }) .onActionEnd(() => { this.speedSelect = CASE_ZERO this.avPlayerController.videoSpeed(media.PlaybackSpeed.SPEED_FORWARD_1_00_X); }) ) - Call the setSpeed() API of AVPlayer to set the playback speed.
videoSpeed(speed: number): void {
  if (this.avPlayer) {
    try {
      this.avPlayer.setSpeed(speed);
    } catch (err) {
      hilog.error(CommonConstants.LOG_DOMAIN, TAG,
        `videoSpeed failed, code is ${err.code}, message is ${err.message}`);
    }
  }
}
[h2]When to Use
Enable users to adjust volume through intuitive vertical swipe gestures without interrupting playback. Volume control is positioned on the left side of the window, and users can simply slide up or down to adjust the volume level.

[h2]How to Implement
Use the AVVolumePanel component to display the system volume panel, bind the PanGesture event to the component, and set the sliding direction to vertical. Slide up to increase volume and down to decrease.
- Add the AVVolumePanel component to display the system volume panel.
import { AVVolumePanel } from '@kit.AudioKit'; @Component export struct SetVolume { @Prop volume: number = 5 @Prop volumeVisible: boolean = false build() { Column() { AVVolumePanel({ volumeLevel: this.volume, volumeParameter: { position: { x: 50, y: 1000 } } }) .width(10) } .visibility(this.volumeVisible ? Visibility.Visible : Visibility.Hidden) .height('50%') } } - Bind the PanGesture gesture event to the component and calculate the volume based on slide distance.
.gesture(
  PanGesture({ direction: PanDirection.Vertical })
    .onActionStart(() => {
    })
    .onActionUpdate((event: GestureEvent) => {
      this.volumeVisible = true;
      let curVolume = this.volume - this.getUIContext().vp2px(event.offsetY) / this.windowHeight;
      curVolume = curVolume >= 15.0 ? 15.0 : curVolume;
      curVolume = curVolume <= 0.0 ? 0.0 : curVolume;
      this.volume = curVolume;
    })
    .onActionEnd(() => {
      this.setVolumeTimer();
    })
)
[h2]When to Use
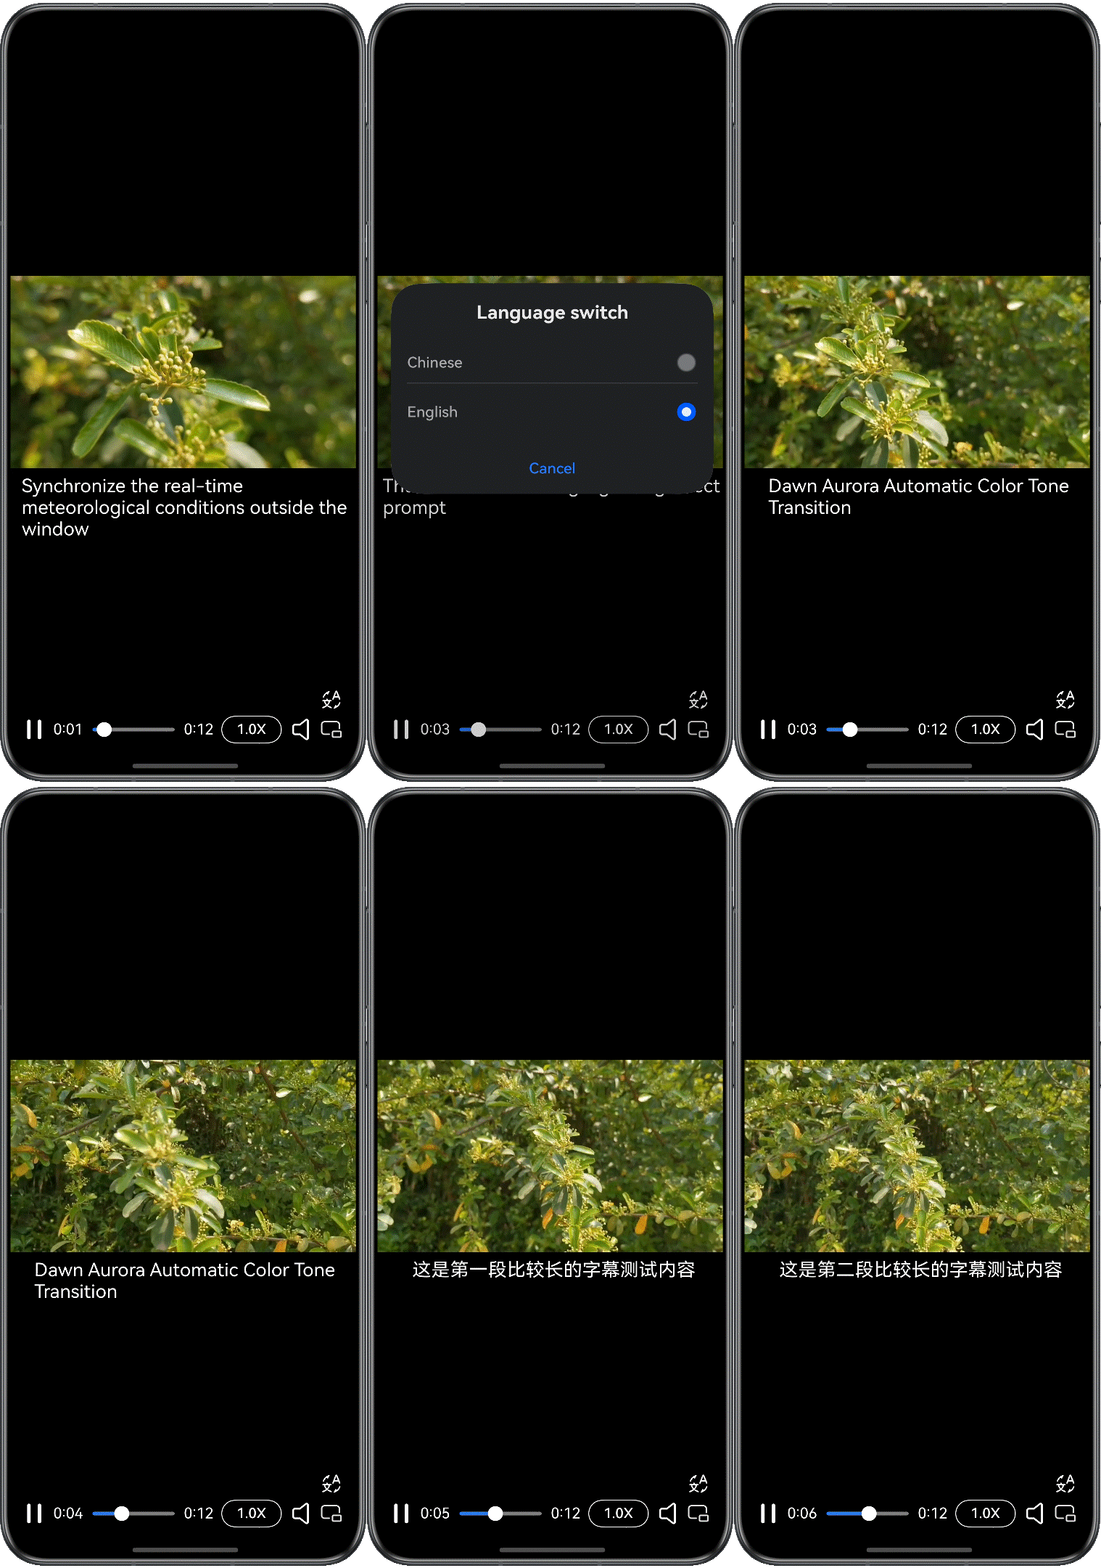
Allow users to load external subtitle files and switch between different languages with proper synchronization.
[h2]How to Implement
Use the addSubtitleFromFd() API of AVPlayer to load external subtitles, and use the on('subtitleUpdate') API to register a subtitle callback. In the callback, fetch subtitle text and refresh the content displayed by the Text component using the status variable. Use the Text component to display subtitles and set the font format.
To switch subtitle languages, load the corresponding subtitle resources for the selected language, and then call the reset() API of AVPlayer to reset AVPlayer and reinitialize it.
- Use the addSubtitleFromFd() API of AVPlayer to add an external subtitle resource to the video.
if (this.curSource.caption) { let fileDescriptorSub = await this.context.resourceManager.getRawFd(this.curSource.caption); this.avPlayer.addSubtitleFromFd(fileDescriptorSub.fd, fileDescriptorSub.offset, fileDescriptorSub.length) .catch((err: BusinessError) => { hilog.error(CommonConstants.LOG_DOMAIN, TAG, `addSubtitleFromFd failed, code is ${err.code}, message is ${err.message}`); }); } - Subscribe to external subtitle events using the on('subtitleUpdate') API of AVPlayer to receive updates. An app can subscribe to only one subtitle update event. When the app initiates multiple subscriptions to this event, the last subscription is applied. In the callback, retrieve subtitle text and current time. In this way, the content displayed by the Text component can be refreshed through the status variable.
this.avPlayer.on('subtitleUpdate', (info: media.SubtitleInfo) => { if (info) { let text = (!info.text) ? '' : info.text; this.currentCaption = text; //update current caption content } else { this.currentCaption = ''; hilog.error(CommonConstants.LOG_DOMAIN, TAG, 'subtitleUpdate info is null'); } }); - Use the status variable to refresh the content displayed by the Text component and adjust the subtitle's font format by modifying the component attributes.
Stack({ alignContent: Alignment.Center }) { Text(this.avPlayerController.currentCaption) .fontColor(Color.White) .fontSize($r('app.float.size_20')) .fontFamily('Sans') } .width('100%') .position({ x: $r('app.float.size_zero'), y: $r('app.float.size_216') }) .zIndex(1) - Switch the subtitle resource based on the selected language, and call the reset() API of AVPlayer to reset AVPlayer and reinitialize it.
async languageChange(languageSelect: number = 0): Promise<void> {
  if (this.avPlayer) {
    try {
      if (this.curSource && this.curSource.caption) {
        this.curSource.caption = languageSelect === 0 ? 'captions.srt' : 'en_captions.srt'
        this.curSource.seekTime = this.avPlayer.currentTime;
        await this.avPlayer.reset();
        this.initAVPlayer(this.curSource, this.surfaceID, this.avPlayer);
      }
    } catch (err) {
      hilog.error(CommonConstants.LOG_DOMAIN, TAG,
        `languageChange failed, code is ${err.code}, message is ${err.message}`);
    }
  }
}