Use Cases
Live view notifications can help users focus on ongoing tasks, facilitating quick viewing and instant handling of these tasks. For details about what a live view is, how to apply for the required permissions, supported scenarios, design specifications, and other information, please refer to Live View Kit.
Live view messages initiated through Push Kit support three types of operations:
-
Creating a live view: Live view creation through Push Kit is supported only in certain scenarios. For details, please refer to Restrictions on Creating and Updating Live Views Through Push Kit. For other scenarios, create a local live view through Live View Kit.
-
Updating a live view: A live view can be updated through Push Kit for all scenarios.
-
Ending a live view: A live view can be ended through Push Kit for all scenarios.
For details about the supported scenarios, please refer to Applicable Scope and Scenarios.
The process of sending live view messages through Push Kit varies depending on the method of creating the live view.
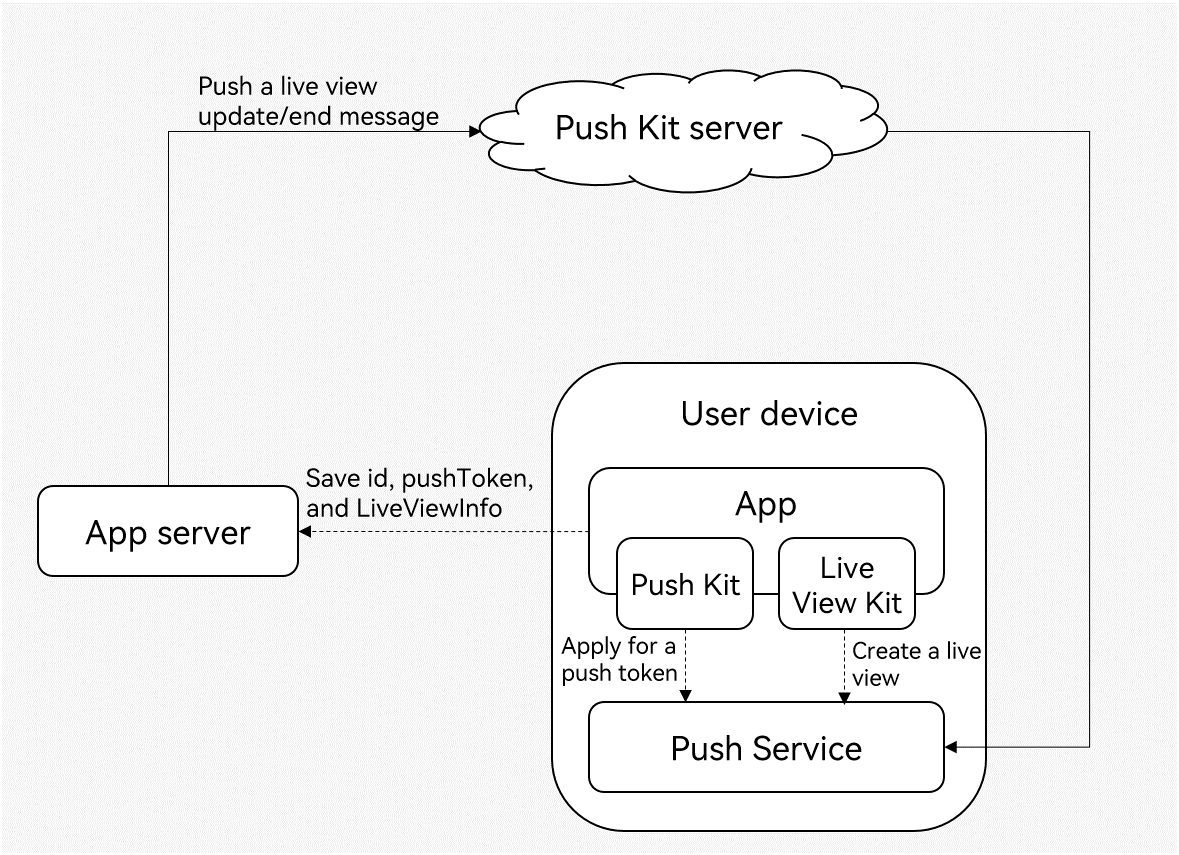
Creating a live view through Live View Kit, and updating and ending the live view through Push Kit
-
Request a push token from Push Kit.
-
Create a live view using Live View Kit. Then you need to save the live view ID, push token, live view scenarios (event), and business service status attributes to your app server.
-
When the order status of the business service changes, Push Kit pushes update messages to update or end the live view.
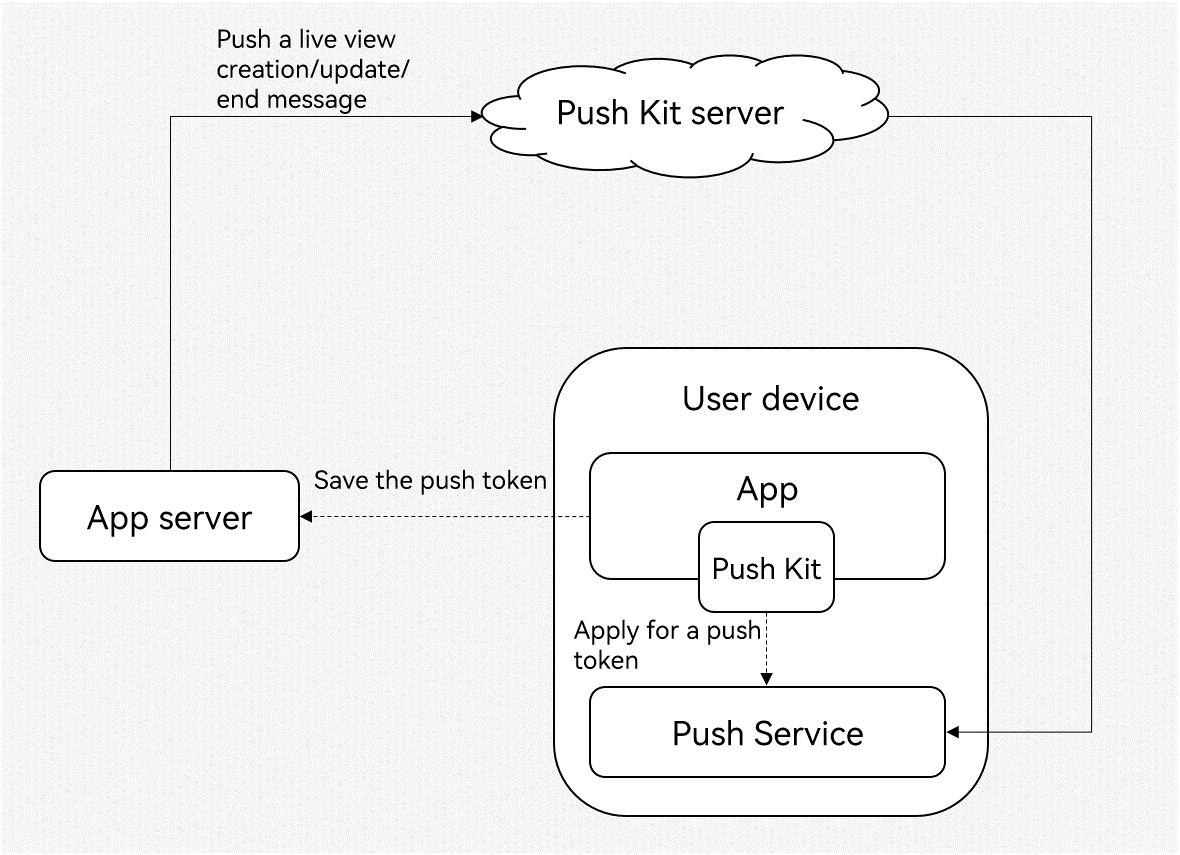
Creating, updating, and ending a live view through Push Kit
-
Request a push token from Push Kit.
-
Save the push token to your app server.
-
Use Push Kit to create/update/end a live view.

-
The lifecycle of a live view cannot exceed 8 hours. After 8 hours, the system considers that the live view ends.
-
To ensure the timeliness of live view messages, be sure to update the live view content promptly. If a live view is not updated for more than 2 hours, the system will hide it from the status bar and lock screen, but keep it visible in the notification panel. If a live view is not updated for more than 4 hours, the system considers that the live view ends and clears the live view from all display entrances.
Constraints
The capability of pushing live view messages is supported on phones and tablets. Starting from version 26.0.0, wearables are also supported.
Certain features are not available on wearables. For details, please refer to the description of related fields in LiveViewPayload (Live View Message).
Applying for Required Permissions
To push live view messages, you need to apply for the live view permission in the specific scenario first.

To push live view messages using Push Kit, you need to apply for the live view permission first. Relevant functions cannot be commissioned merely by trustlist configuration.
Frequency Control
During the debugging phase, the maximum number of test messages that can be pushed for each project every day is 1000. To send test messages, you need to set testMessage to true.
After formal release, the total number of messages that each app can push to a single device each day is subject to the device-based message frequency control policy. The message sending frequency is governed based on service scenarios and traffic. In cases where message sending is unnecessary or unreasonable, frequency limits will be applied.
The messages of a single live view can be updated for up to 30 times every 5 minutes and 180 times every hour on each device in the ride hailing and live score scenarios. In other scenarios, the messages of a single live view can be updated for up to 10 times every 5 minutes and 60 times every hour on each device. The excess messages will be discarded.
Development Procedure
-
Select a method for creating a live view based on your needs.
-
If you need to create a live view locally using Live View Kit, please refer to Creating a Local Live View.
-
If you need to remotely create a live view using Push Kit, ensure that you comply with relevant requirements. The following is a request example of the ride hailing scenario:
// Request URL POST "https://push-api.cloud.huawei.com/v3/[projectId]/messages:send" // Request header Content-Type: application/json Authorization: Bearer eyJr*****OiIx---****.eyJh*****iJodHR--***.QRod*****4Gp---**** push-type: 7 // Request body { "payload": { "activityId": 1, "operation": 0, "event": "TAXI", "status": "DRIVER_ON_THE_WAY", // Driver on the way. "activityData": { "notificationData": { "type": 3, "contentTitle": "{{status}}", // Driver on the way. "contentText": [ { "text": "1.2 km " }, { "text": "away", "foregroundColor": "#FF317AF7" }, { "text": " | " }, { "text": "5 minutes", "foregroundColor": "#FF317AF7" } ], "clickAction": { "actionType": 1, // Launch a custom app screen. "action": "xxxxxx" // Action corresponding to the ability of the in-app screen. }, "richProgress": { "type": 0, "nodeIcons": ["icon1.png", "icon2.png", "icon3.png"], // The value is file names in resources/rawfile. "indicatorIcon": "taxi.png", // The value is a file name in /resources/rawfile. "progress": 40, "indicatorType": 1, "color": "#FF317AF7", "bgColor": "#19000000" }, "extend": { "type": 3, "image": "phone.png", // The value is a file name in /resources/rawfile. "imageUrl": "https://www.xxx.com:8080/push/test", // The image specified by this URL is displayed preferentially. If the image cannot be displayed, the image specified by the image field is displayed. The image size cannot exceed 512 KB. This field is supported since API version 26.0.0. "clickAction": { "actionType": 0 // Tapping the auxiliary area opens the app home screen. } } }, "capsuleData": { "type": 1, "status": 1, "icon": "icon.png", // The value is a file name in /resources/rawfile. "bgColor": "#FF317AF7", "remind": "EXPAND", "title": "Picking up", "content": "About 5 minutes" } } }, "pushOptions": { "ttl": 1000, "biTag": "biTag" }, "target": { "token": [ "MAAALgE4G98BAAAAst************jq" ] } }- [projectId]: project ID. To obtain the value, sign in to AppGallery Connect, click Development and services, click the desired project, and go to Project settings.
- Authorization: a character string in JWT format. Obtain the value by referring to Authorization.
- push-type: The value 7 indicates the live view message type.
- activityId: live view activity ID. For details, please refer to activityId.
- operation: live view message operation type. The value 0 indicates creating a live view. For details, please refer to operation.
- event: scenario of the live view message, which must be the same as that you have applied for, for example, TAXI (ride hailing) and FLIGHT (flight). When a live view message is created via Push Kit, event can only be set to certain service scenarios. For details, please refer to Restrictions on Creating and Updating Live Views Through Push Kit.
- status: status of a live view message. This parameter is mandatory when operation is set to 0. The value range varies depending on the scenario type. For details, please refer to status Value Range. In addition, you need to enter the placeholder {{status}} at least once in the parameters that support placeholders. Push Kit will replace the placeholder {{status}} with the matching value in the status value range.
- activityData: live view data in your project. For details, please refer to activityData.
- type: live view layout type, including progress visualization and emphasized text. During live view creation, each scenario (event) can use only the specified layout type. For details, please refer to Restrictions on Live View Creation.
- token: push token. Obtain the value by referring to Obtaining a Push Token.
-
-
Call the REST API provided by the Push Kit server when the status of a user's service order changes to update or end the live view.
For details about the request message, please refer to the scenario-specific message API function description. (If the live view to be updated is remotely created using Push Kit, be sure to meet the relevant requirements during the update.)
// Request URL POST "https://push-api.cloud.huawei.com/v3/[projectId]/messages:send" // Request header Content-Type: application/json Authorization: Bearer eyJr*****OiIx---****.eyJh*****iJodHR--***.QRod*****4Gp---**** push-type: 7 // Request body { "payload": { "activityId": 1, "operation": 1, "event": "TAXI", "status": "HEADING_TO_DESTINATION", // Heading to the destination. "version": 1, "activityData": { "notificationData": { "type": 3, "contentTitle": "{{status}}", // Heading to the destination. "contentText": [ { "text": "Remaining distance: " }, { "text": "7.2 km", "foregroundColor": "#FF317AF7" }, { "text": " | About " }, { "text": "27 minutes", "foregroundColor": "#FF317AF7" } ], "clickAction": { "actionType": 1, // Launch a custom app screen. "action": "xxxxxx" // Action corresponding to the ability of the in-app screen. }, "richProgress": { "type": 0, "nodeIcons": ["icon1.png", "icon2.png", "icon3.png"], // The value is file names in resources/rawfile. "indicatorIcon": "taxi.png", // The value is a file name in /resources/rawfile. "progress": 70, "indicatorType": 1, "color": "#FF317AF7", "bgColor": "#19000000" }, "extend": { "type": 0 } }, "capsuleData": { "type": 1, "status": 1, "icon": "icon.png", // The value is a file name in /resources/rawfile. "bgColor": "#FF317AF7", "title": "27 minutes", "content": "Remaining distance: 7.2 km" } } }, "pushOptions": { "ttl": 1000, "biTag": "biTag" }, "target": { "token": [ "MAMzLg**********lPW" ] } }- [projectId]: project ID. To obtain the value, sign in to AppGallery Connect, click Development and services, click the desired project, and go to Project settings.
- Authorization: a character string in JWT format. Obtain the value by referring to Authorization.
- push-type: The value 7 indicates the live view message type.
- activityId: live view activity ID. For details, please refer to activityId.
- operation: live view notification operation type. The options are 0 (creating a live view), 1 (updating the live view), and 2 (ending the live view). For details, please refer to operation.
- event: scenario of the live view message, which must be the same as that you have applied for, for example, TAXI (ride hailing) and FLIGHT (flight). For details, please refer to event.
- status: status of a live view message. This parameter is mandatory when operation is set to 1 and the live view to be updated is created through Push Kit remotely. The value range varies depending on the scenario type. For details, please refer to status Value Range. In addition, you need to enter the placeholder {{status}} at least once in the parameters that support placeholders. Push Kit will replace the placeholder {{status}} with the matching value in the status value range.
- version: version number of the live view update notification. For details, please refer to version.
- activityData: live view data in your project. For details, please refer to activityData.
- type: live view layout type, including progress visualization and emphasized text. For details, please refer to type.
- token: push token. Obtain the value by referring to Obtaining a Push Token.

If the live view corresponding to a specific activityId does not exist in the scenario of updating or ending a live view, the use of this activityId to send live view messages will be banned for 24 hours.