
Creating an ArkTS Project
If you are opening DevEco Studio for the first time, click Create Project. If a project is already open, choose File > New > Create Project from the menu bar.
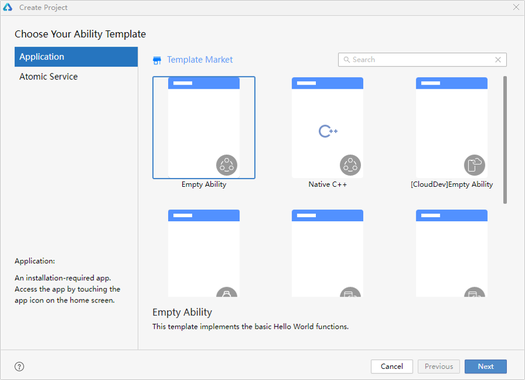
Select Application development (this topic uses application development as an example; for Atomic Service development, select Atomic Service), select the Empty Ability template, and click Next to proceed to the next configuration step.
To develop native projects, select the Native C++ template. For details about how to use templates, see Introduction to Project Templates.
On the Create Project page, choose 26.0.0 as an example of Compatible SDK, which specifies the earliest compatible API version. Retain the default values for other parameters.
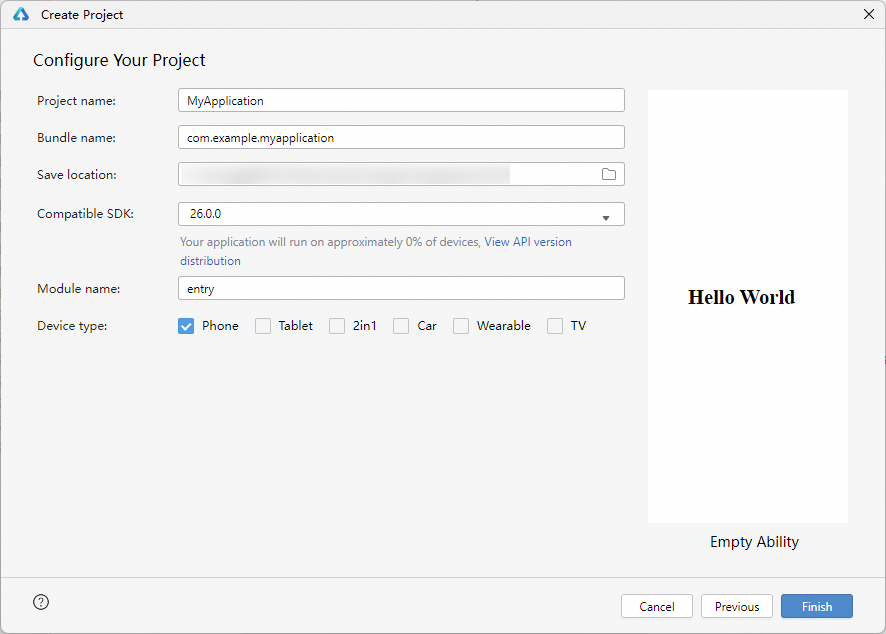
Click Finish. DevEco Studio will automatically generate the sample code and resources that match your project type. Wait until the project is created.
ArkTS Project Directory Structure (Stage Model)
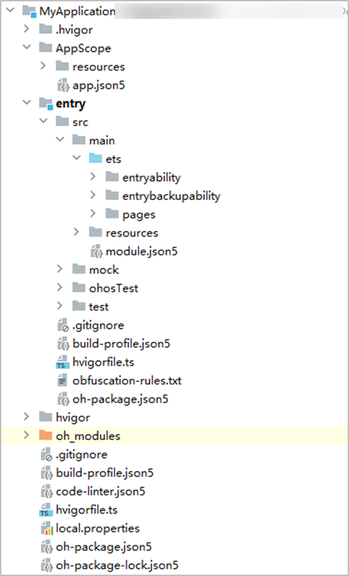
AppScope > app.json5: global configuration information of the application. For details, see app.json5 Configuration File.
entry: HarmonyOS project module, which is built into a HAP package.
src > main > ets: a collection of ArkTS source code.
src > main > ets > entryability: entry to your application/service.
src > main > ets > entrybackupability: the capability to back up and restore data.
src > main > ets > pages: pages included in your application/service.
src > main > resources: a collection of resource files used by your application/service, such as graphics, media, strings, and layout files. For details about resource files, see Resource Categories and Access.
src > main > module.json5: configuration file of the module This file describes the global configuration information of the application/service, the device-specific configuration information, and the configuration information of the HAP file. For details, see module.json5 Configuration File.
build-profile.json5: current module information and build configuration options, including buildOption and targets.
hvigorfile.ts: module-level build script.
obfuscation-rules.txt: obfuscation rule file. With the obfuscation feature enabled, the code will be compiled, obfuscated, and compressed during builds in release mode to protect code assets. For details, see Using Obfuscation for Code Hardening.
oh-package.json5: describes the bundle name, version, entry file (type declaration file), and dependencies.
oh_modules: third-party library dependency information.
build-profile.json5: project-level configuration information, including signingConfigs and products. Under products, you can configure the current operating environment, with HarmonyOS as the default.
hvigorfile.ts: project-level build script.
oh-package.json5: global configuration, including overrides, overrideDependencyMap, and parameterFile.
Building the First Page
Use the Text component.
After the project synchronization is complete, in the Project window, choose entry > src > main > ets > pages to open the Index.ets file, and change the page layout from relative layout (RelativeContainer) to linear layout (Row/Column).
In this document, the Row and Column components are used to create a layout for the page where text/button is used for page redirection or return. For more complex element alignment scenarios, you can use the RelativeContainer component for layout. For details about how to select and use UI layouts, see Layout Selection.
The sample code in the Index.ets file is shown below:
// Index.ets
@Entry
@Component
struct Index {
  @State message: string = 'Hello World';

  build() {
    Row() {
      Column() {
        Text(this.message)
          .fontSize(50)
          .fontWeight(FontWeight.Bold)
      }
      .width('100%')
    }
    .height('100%')
  }
}
Add a Button component.
On the default page, add a Button component to respond to the onClick events and implement redirection to another page. The sample code in the Index.ets file is shown below:
// Index.ets
@Entry
@Component
struct Index {
  @State message: string = 'Hello World';

  build() {
    Row() {
      Column() {
        Text(this.message)
          .fontSize(50)
          .fontWeight(FontWeight.Bold)
        // Add a button to respond to the onClick events.
        Button() {
          Text('Next')
            .fontSize(30)
            .fontWeight(FontWeight.Bold)
        }
        .type(ButtonType.Capsule)
        .margin({
          top: 20
        })
        .backgroundColor('#0D9FFB')
        .width('40%')
        .height('5%')
      }
      .width('100%')
    }
    .height('100%')
  }
}
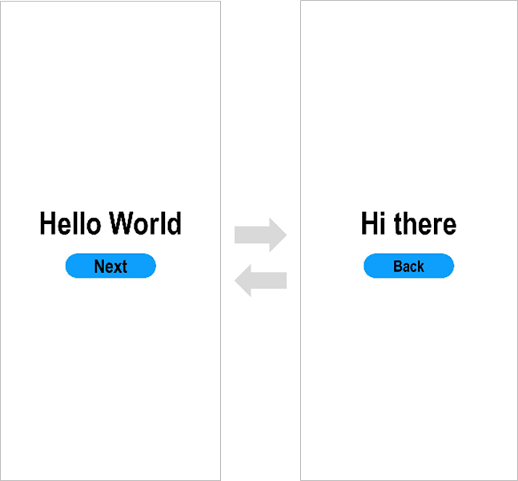
On the toolbar in the upper right corner of the editing window, click Previewer. Below is how the first page looks in the Previewer.

Building the Second Page
Create the second page.
Creating the second page file: In the Project window, choose entry > src > main > ets, right-click the pages folder, choose New > ArkTS File from the shortcut menu, name the page Second, and press Enter. Below shows the directory structure.
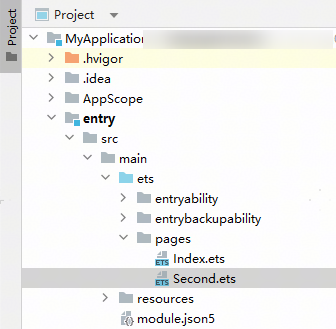

You can also right-click the pages folder, choose New > Page > Empty Page, name the page Second, and click Finish. In this way, there is no need to manually configure the route for the second page (described below).
Configuring the route for the second page: In the Project window, choose entry > src > main > resources > base > profile. In the main_pages.json file, set the route for the second page pages/Second under src. For example:
{
  "src": [
    "pages/Index",
    "pages/Second"
  ]
}
Add Text and Button components.
Add Text and Button components and set their styles, as you do for the first page. The following is an example of the Second.ets file:
// Second.ets
@Entry
@Component
struct Second {
  @State message: string = 'Hi there';

  build() {
    Row() {
      Column() {
        Text(this.message)
          .fontSize(50)
          .fontWeight(FontWeight.Bold)
        Button() {
          Text('Back')
            .fontSize(30)
            .fontWeight(FontWeight.Bold)
        }
        .type(ButtonType.Capsule)
        .margin({
          top: 20
        })
        .backgroundColor('#0D9FFB')
        .width('40%')
        .height('5%')
      }
      .width('100%')
    }
    .height('100%')
  }
}
Implementing Page Redirection
The navigation between pages can be implemented through the page router. which finds the target page based on the page URL.
To achieve better transition effects, you are advised to use Component Navigation.
Implement redirection from the first page to the second page.
In the Index.ets file of the first page, bind the onClick event to the Next button so that clicking this button redirects the user to the second page. The sample code in the Index.ets file is shown below:
// Index.ets
import { BusinessError } from '@kit.BasicServicesKit';

@Entry
@Component
struct Index {
  @State message: string = 'Hello World';

  build() {
    Row() {
      Column() {
        Text(this.message)
          .fontSize(50)
          .fontWeight(FontWeight.Bold)
        // Add a button to respond to the onClick events.
        Button() {
          Text('Next')
            .fontSize(30)
            .fontWeight(FontWeight.Bold)
        }
        .type(ButtonType.Capsule)
        .margin({
          top: 20
        })
        .backgroundColor('#0D9FFB')
        .width('40%')
        .height('5%')
        // Bind the onClick event to the button so that clicking the button redirects the user to the second page.
        .onClick(() => {
          console.info(`Succeeded in clicking the 'Next' button.`)
          // Obtain UIContext.
          let uiContext: UIContext = this.getUIContext();
          let router = uiContext.getRouter();
          // Redirect to the second page.
          router.pushUrl({ url: 'pages/Second' }).then(() => {
            console.info('Succeeded in jumping to the second page.')

          }).catch((err: BusinessError) => {
            console.error(`Failed to jump to the second page. Code is ${err.code}, message is ${err.message}`)
          })
        })
      }
      .width('100%')
    }
    .height('100%')
  }
}
Implement redirection from the second page to the first page.
In the Second.ets file of the second page, bind the onClick event to the Back button so that clicking this button redirects the user back to the first page. The sample code in the Second.ets file is shown below:
// Second.ets
import { BusinessError } from '@kit.BasicServicesKit';

@Entry
@Component
struct Second {
  @State message: string = 'Hi there';

  build() {
    Row() {
      Column() {
        Text(this.message)
          .fontSize(50)
          .fontWeight(FontWeight.Bold)
        Button() {
          Text('Back')
            .fontSize(30)
            .fontWeight(FontWeight.Bold)
        }
        .type(ButtonType.Capsule)
        .margin({
          top: 20
        })
        .backgroundColor('#0D9FFB')
        .width('40%')
        .height('5%')
        // Bind the onClick event to the Back button so that clicking the button redirects the user back to the first page.
        .onClick(() => {
          console.info(`Succeeded in clicking the 'Back' button.`)
          // Obtain UIContext.
          let uiContext: UIContext = this.getUIContext();
          let router = uiContext.getRouter();
          try {
            // Back to the first page.
            router.back()
            console.info('Succeeded in returning to the first page.')
          } catch (err) {
            let code = (err as BusinessError).code;
            let message = (err as BusinessError).message;
            console.error(`Failed to return to the first page. Code is ${code}, message is ${message}`)
          }
        })
      }
      .width('100%')
    }
    .height('100%')
  }
}
Open the Index.ets file and click the
 button in the previewer to refresh the file. The following figure shows an example.
Running the Application on a Real Device
Connect a real device running HarmonyOS to your computer. For details, see Running Your App on a Local Real Device.
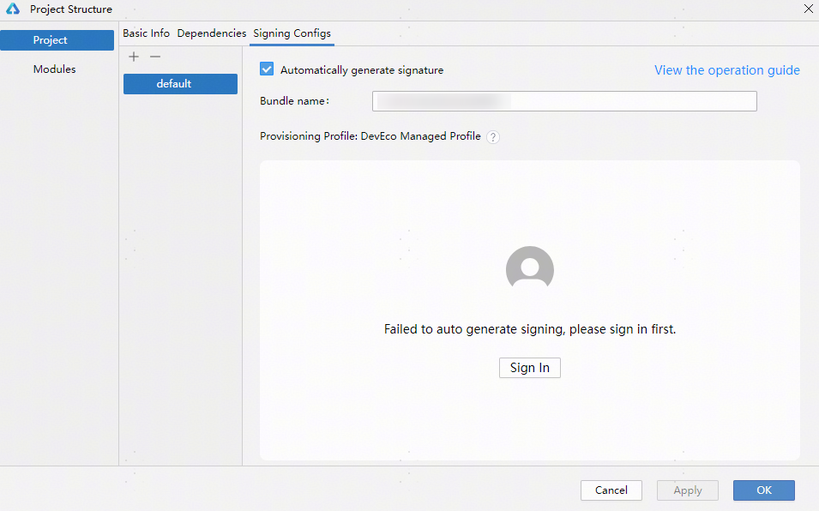
Choose File > Project Structure... > Project > Signing Configs and select Automatically generate signature. When prompted, click Sign In to log in. Then the system will automatically sign your app/atomic service. For details, see Configuring a Debug Signature. The following figures show the effects.
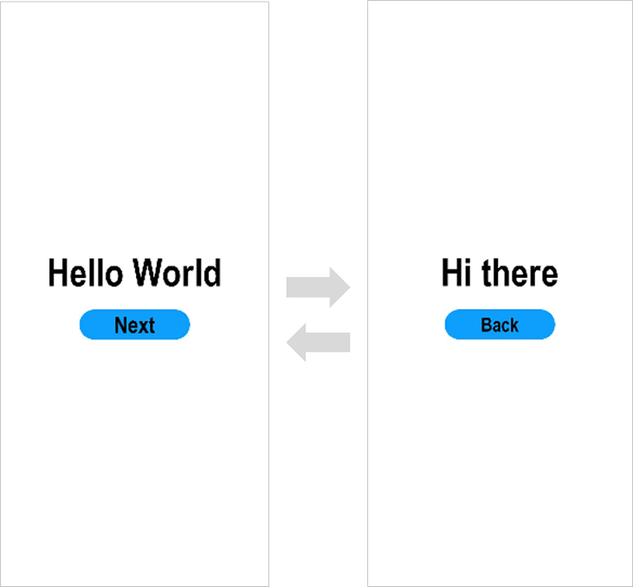
On the toolbar in the upper right corner of the editing window, click
 . The following figure shows an example.
Congratulations! You have successfully built your first HarmonyOS application based on ArkTS. Feel free to explore more HarmonyOS features!