Use Cases
Push Kit allows your app to connect to the cloud side using HTTPS, send scenario-specific messages using the V3 API for scenario-specific messaging, and define different values of push-type for different scenarios.
The following table lists the types of scenario-specific messages that you can send.
| push-type | Message Type |
|---|---|
| 0 | Alert message, including notification message and badge update message (Wearables and TVs do not support badge update messages.) |
| 1 | Widget update message |
| 2 | Text-to-speech message |
| 6 | Background message |
| 7 | Live view message (not supported by TVs and PCs/2-in-1 devices) |
| 10 | In-app call message (not supported by wearables, TVs, and PCs/2-in-1 devices) |
For details about scenario-specific messages, please refer to description of the REST API for scenario-specific messaging.
Development Procedure
-
Send a request from your server to obtain a JWT. For details, please refer to Generating a JWT Based on a Service Account.
-
Call the API provided by Push Kit on your app server to push scenario-specific messages. For details, please refer to description of the REST API for scenario-specific messaging.
URL for calling the API using HTTPS POST:
POST "https://push-api.cloud.huawei.com/v3/[projectId]/messages:send"
[projectId]: Replace it with your project ID. To obtain the project ID, sign in to AppGallery Connect, click Development and services, click the desired project, and go to Project settings.
Request header example:
Content-Type: application/json
Authorization: Bearer eyJr*****OiIx---****.eyJh*****iJodHR--***.QRod*****4Gp---****
push-type: 0
- The value of the Authorization parameter in the request header is the value Bearer combined with the JWT obtained in the previous step for generating a JWT from a service account online.
- The push-type parameter in the request header indicates the scenario-specific message type. The value 0 indicates an alert message.
Message body example:
{ "payload": { "notification": { "category": "MARKETING", "title": "Common notification title", "body": "Common notification content", "clickAction": { "actionType": 0 }, "notifyId": 12345 } }, "target": { "token": ["MAMzLg**********lPW"] }, "pushOptions": { "testMessage": true } }- You can check more request examples for pushing scenario-specific messages.
- You are advised to test functions before code development using a debugging tool, such as Postman.
-
(Optional) Receive the message receipt from Push Kit on your app server. For details, please refer to Developing the Message Receipt.

Push Kit provides Java-based server-side sample code for your reference (including obtaining a JWT and sending a notification message or widget update message). For details, please refer to the sample code.
Pushing a Notification Message Online in AppGallery Connect

Currently, only alert messages support this function.
-
Sign in to AppGallery Connect, click Development and services, click the desired project, and go to Project settings.

-
Find and click your project. Then go to Grow > Push Kit > Notifications (V3 Beta). On this tab page displayed, click Add notification to create a push task.

-
Set task parameters. The following uses an alert message as an example.
-
Configuring the push task
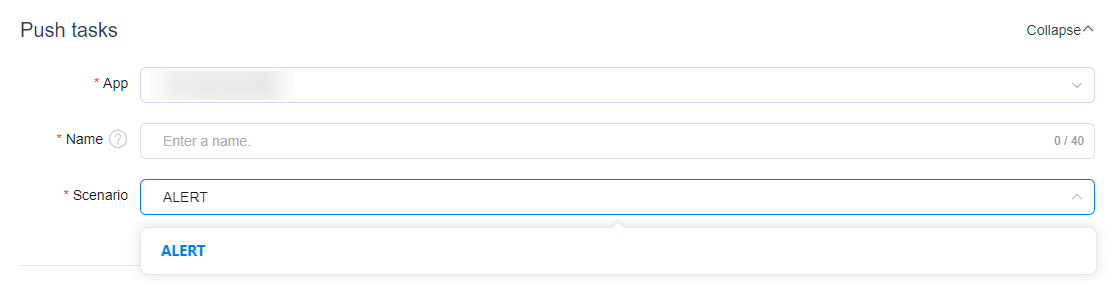
Parameter Description App Target app for message push. This parameter is mandatory. Name Name used to identify a notification in the console, which will not be displayed to users. This parameter is mandatory. Scenario Scenario-specific message type. Currently, only the ALERT option is supported. -
Configuring the push content - General parameters
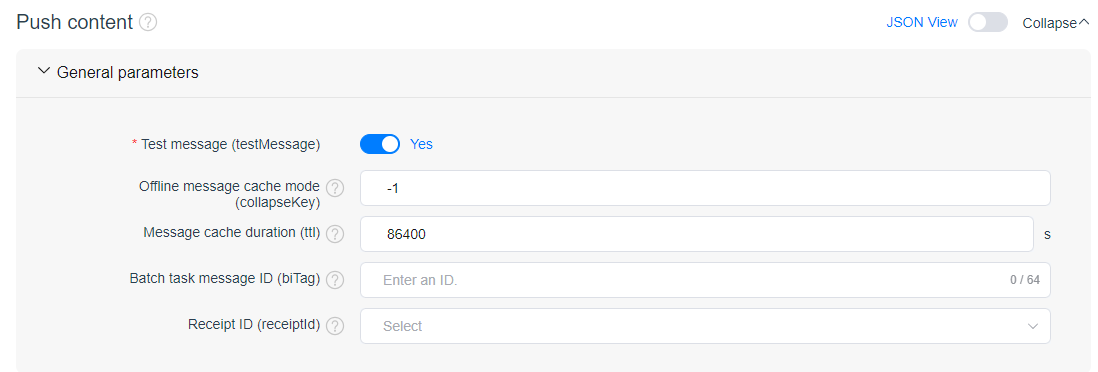
Parameter Description Test message (testMessage) This parameter is mandatory and maps to the testMessage parameter in the corresponding scenario-specific message API.
It indicates whether a message is a test message. The options are as follows:
false: formal message
true (default): test message
Offline message cache mode (collapseKey) This parameter is optional and maps to the collapseKey parameter in the corresponding scenario-specific message API.
It specifies the offline message cache mode. The value ranges from -1 to 100.
-1 (default): All offline messages are cached.
0\–100: offline message cache group ID. Offline messages are cached by group. In each group, only the latest offline message can be cached for each app.
Message cache duration (ttl) This parameter is optional and maps to the ttl parameter in the corresponding scenario-specific message API.
It specifies the message cache duration, in seconds. When a user device is offline, the Push Kit server caches messages. If the user device goes online within the message cache duration, the messages are delivered. Otherwise, the messages are discarded. The default value is 86400 (1 day), and the maximum value is 1296000 (15 days).
Batch task message ID (biTag) This parameter is optional and maps to the biTag parameter in the corresponding scenario-specific message API.
It indicates the tag of a message in a batch delivery task. The tag is returned to the app server when Push Kit sends the message receipt. The value contains a maximum of 64 bytes.
Receipt ID (receiptId) This parameter is optional and maps to the receiptId parameter in the corresponding scenario-specific message API.
It specifies the receipt ID that associates with the receipt URL and configuration of the downlink message. For details about how to view the receipt ID, please refer to Setting Receipt Parameters.
-
Configuring the push content - Sending messages to target devices

Parameter Description Device token (token) This parameter is mandatory and maps to the token parameter in the corresponding scenario-specific message API.
It specifies the tokens used to push messages to target users.
Example: MAMzL*******
-
Configuring the push content - Content
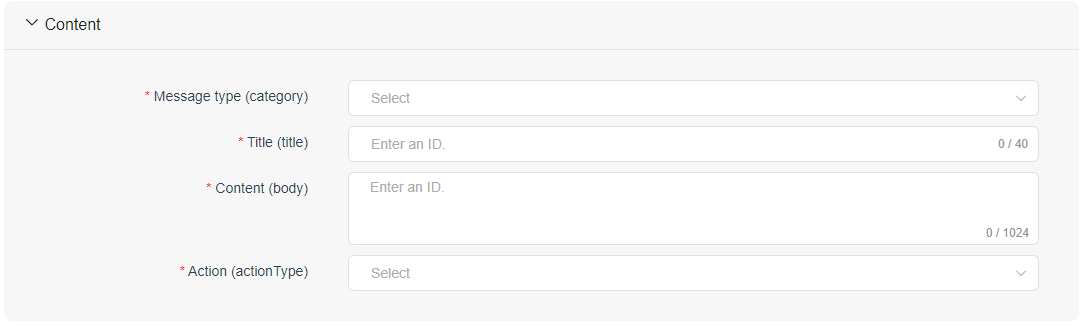
Parameter Description Message type (category) This parameter is mandatory and maps to the category parameter in the corresponding scenario-specific message API.
It specifies the notification message type. After the message self-classification permission has been obtained, this parameter is used to identify the message type. Different notification message types will affect the message display and notification modes. The options are as follows:
· IM: instant messaging
· VOIP: voice/video call
· SUBSCRIPTION: subscription
· TRAVEL: travel
· HEALTH: health
· WORK: work reminder
· ACCOUNT: account updates
· EXPRESS: order & logistics
· FINANCE: finance
· DEVICE_REMINDER: device reminder
· MAIL: email
· MARKETING: news, content recommendation, social media feeds, product promotion, financial news, life news, survey, function recommendation, and operational activities (for content marking only; no message sending acceleration)
· PLAY_VOICE: voice broadcast
Title (title) This parameter is mandatory and maps to the title parameter in the corresponding scenario-specific message API.
It specifies the notification message title.
Content (body) This parameter is mandatory and maps to the body parameter in the corresponding scenario-specific message API.
It specifies the notification message content.
Action (actionType) This parameter is mandatory and maps to the actionType parameter in clickAction in the corresponding scenario-specific message API.
It specifies the action triggered by a message tap, which can be opening the app home screen or opening a custom page defined via action or intentUri.
-
-
After the preceding steps are complete, click Submit in the upper right corner of the page to send the message.
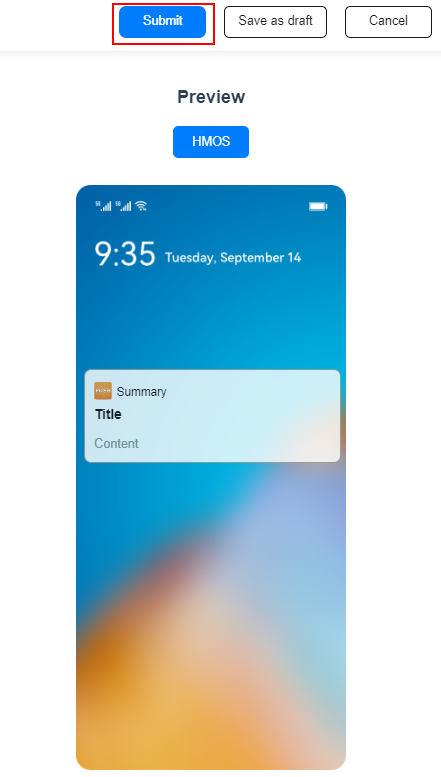

The preview effect is for reference only.