Overview
In image processing, the blur effect is a technique that reduces the clarity, details, or noise of an image, either locally or globally, through algorithms. Blur is commonly used to highlight the main subject, simulate depth of field, conceal sensitive information, or prepare for subsequent processing (such as edge detection).
The background blur discussed in this section is motion blur, which is categorized into material blur and regular blur based on the effect. Background blur is widely used in various scenarios. For example, it can be used to enhance the sense of hierarchy in pages with multiple cards or make page transitions smoother. To further improve performance, the system optimizes motion blur using caching techniques. This section describes how to efficiently use background blur technique in specific use cases.
| Effect Classification | APIs and Usage Description |
|---|---|
| Material blur | .backgroundBlurStyle(): Different blur radius, brightness, saturation, and mask color are encapsulated by enumerated values. It is suitable for scenarios where predefined effects are used by setting enumerated values. .backgroundEffect(): You can customize the blur radius, brightness, saturation, mask color, color picking mode, and gray scale parameters. It is suitable for scenarios where users need to customize the effect. |
| Common blur | .backdropBlur(): Only the blur radius and gray scale parameters can be set. It is suitable for scenarios where only the blur radius needs to be set, for example, page transition. |
[h2]System Rendering Workflow

RenderService (RS): This system process receives rendering instructions for self-rendered layers and ArkUI components from other system service processes (such as the home screen process) and user processes (such as applications). It performs unified composition and rendering control, utilizing CPUs/GPUs and other general-purpose computing devices.
[h2]RS Blur Cache Workflow
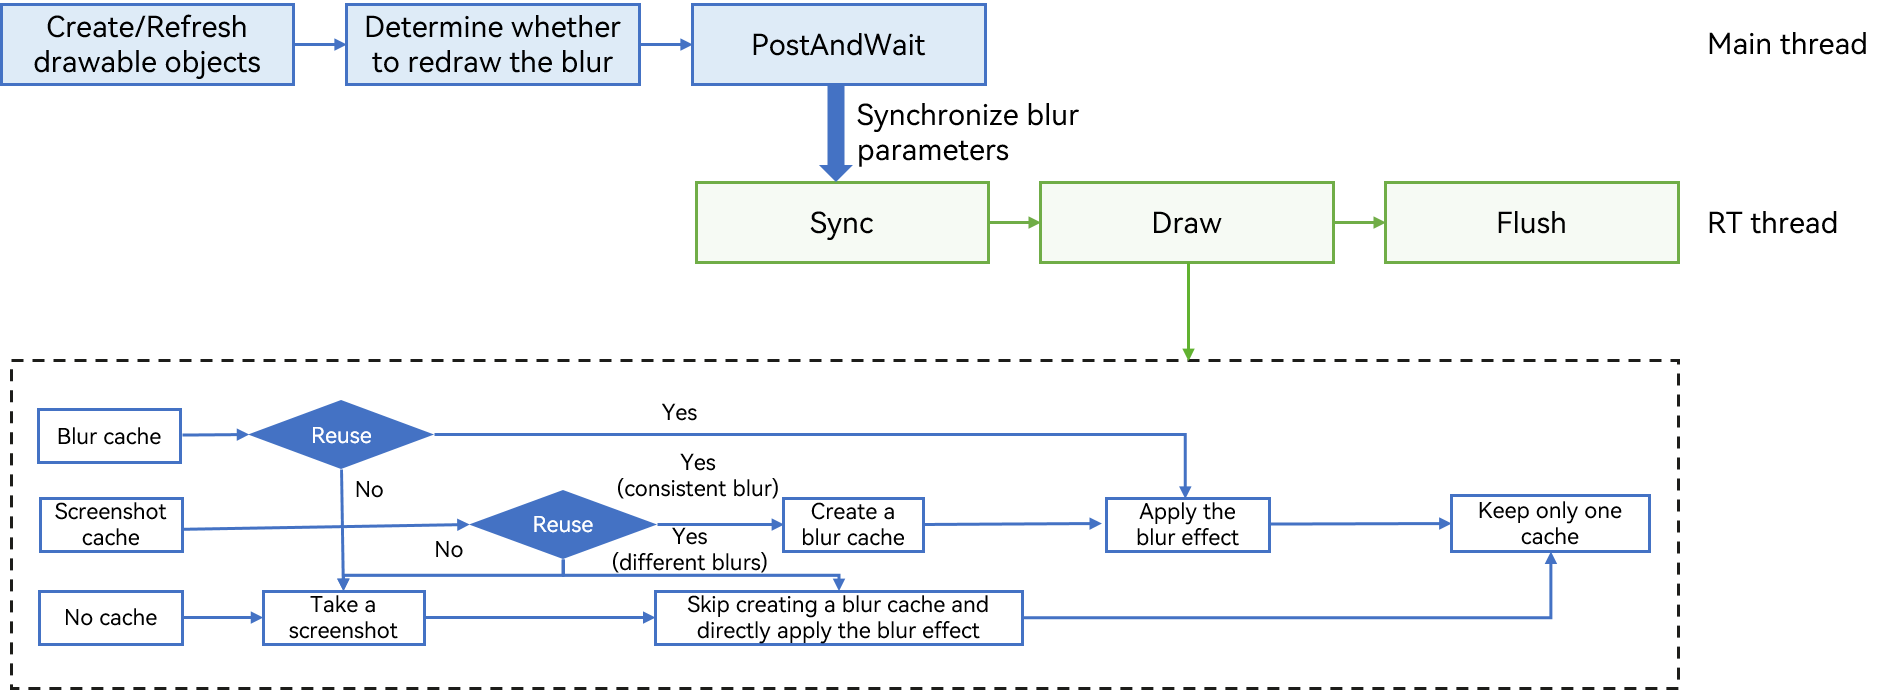
RenderThread (RT): rendering thread. The RS process is divided into the main thread and RT thread. The RT thread is responsible for receiving rendering parameters, rendering image effects, and displaying them on the screen.
The basic logic involves creating or refreshing drawable objects, synchronizing blur parameters, and caching screenshots and blur results. At most, only one cache (either a screenshot or a blur result) exists.
(1) Main thread: creates or refreshes drawable objects; determines whether to redraw the blur (based on changes in the blur area, blur parameters, or intersection with dirty areas); synchronizes blur parameters.
(2) RT thread: reuses the cache if it is valid; recalculates the blur and updates the cache otherwise.
[h2]Scenario
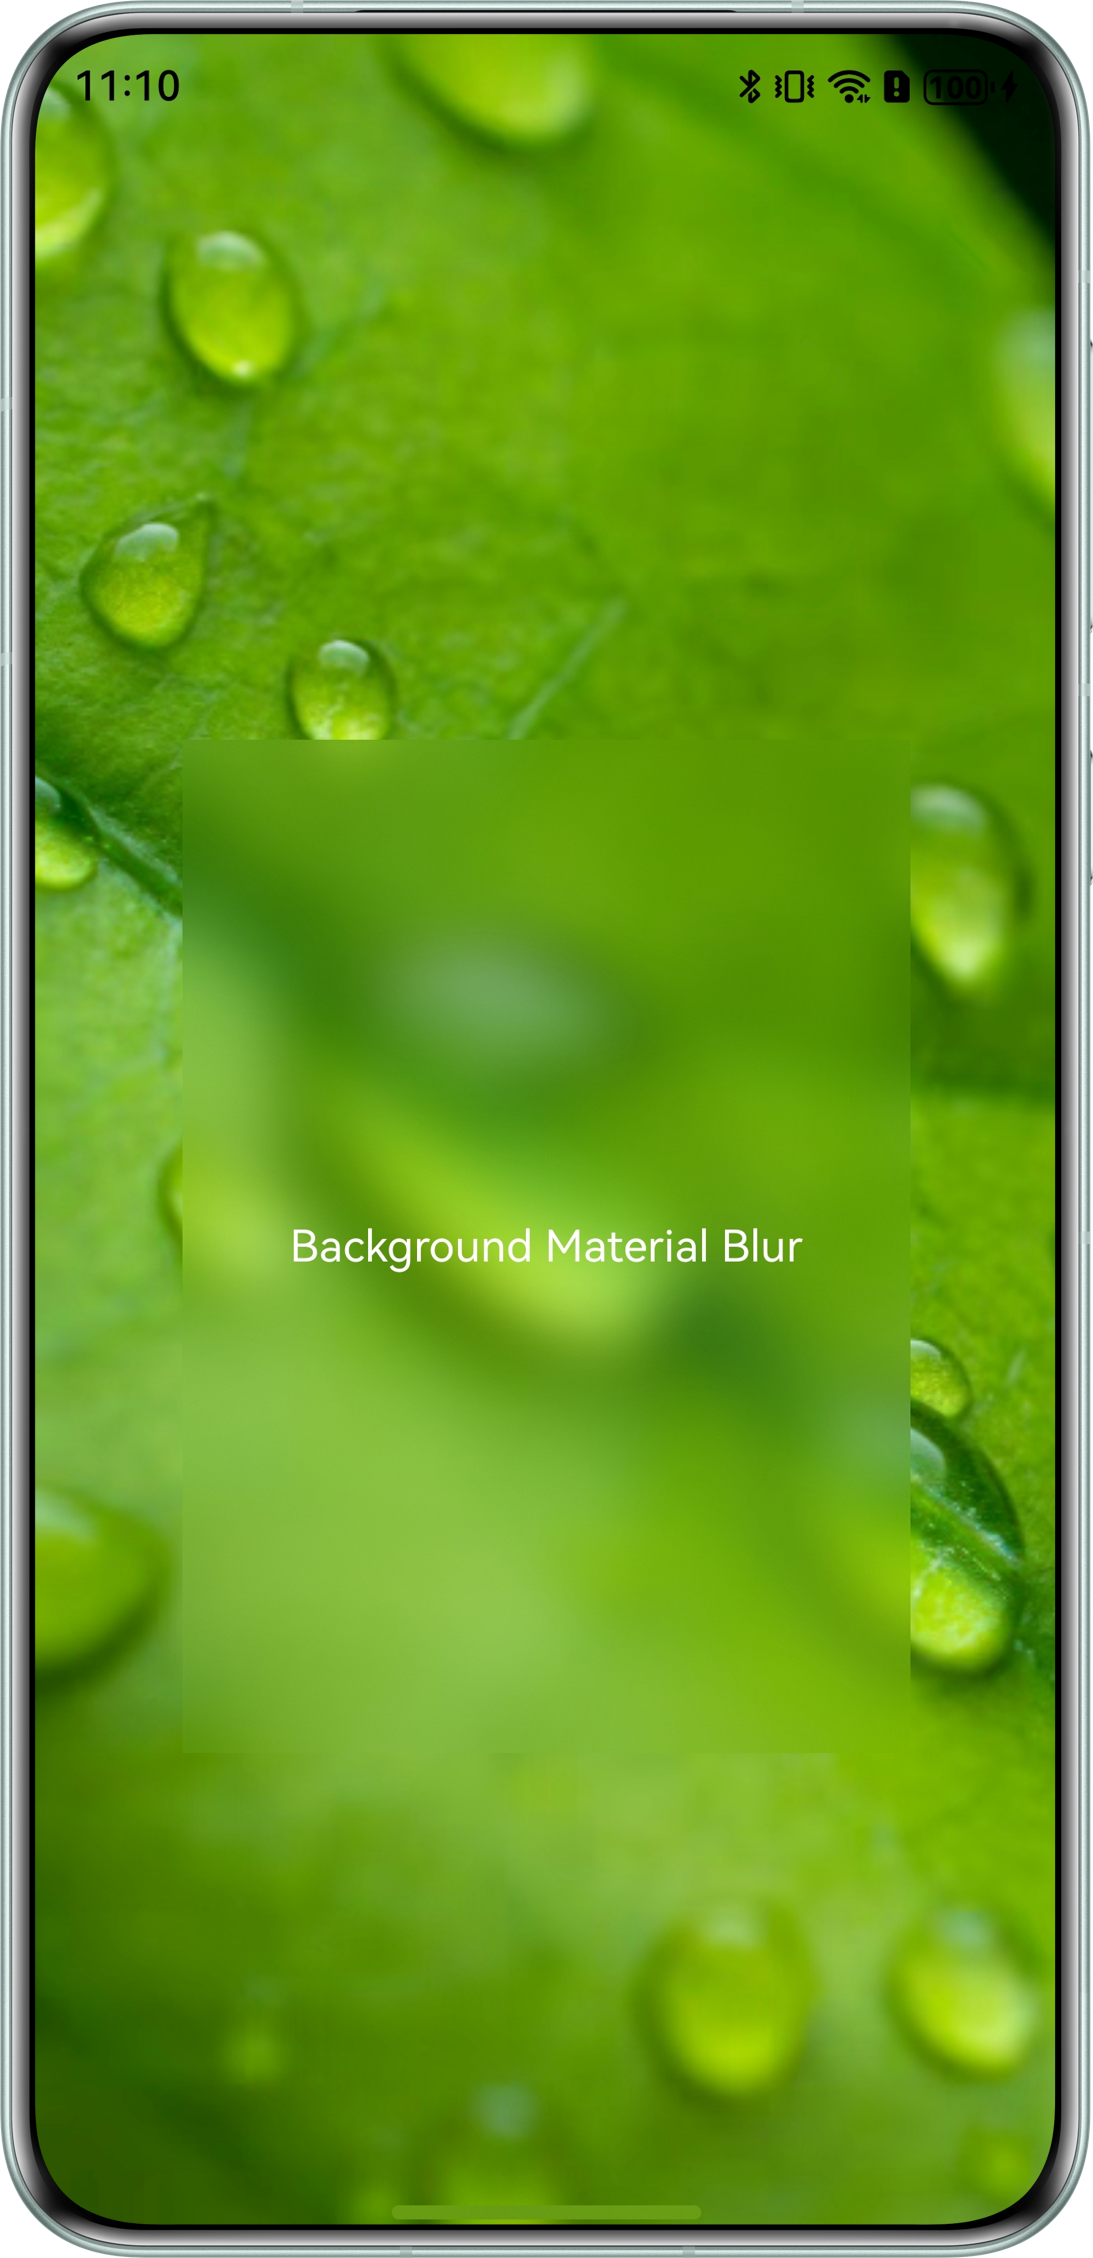
When setting the mask color for background blur, two color picking methods are available. The recommended method is using ColorPicker, which offers better performance.
Rendering
[h2]How to Implement
There are two ways to set the mask color for background blur.
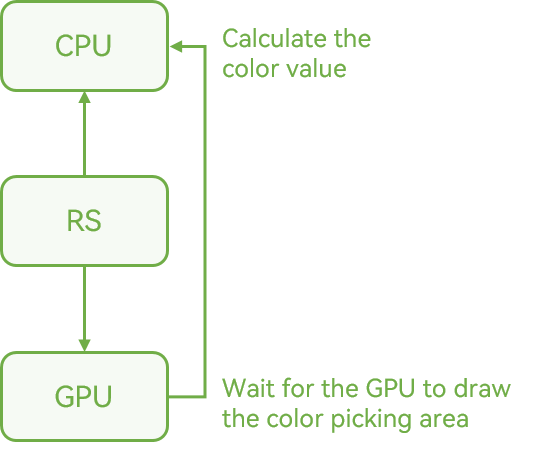
Method 1: Set the color to AdaptiveColor.AVERAGE. This method requires RS to draw the color picking area with the GPU during CPU computation and then calculate the average color value of the area. This method is easy to develop and suitable for light-load applications, but it has low performance.
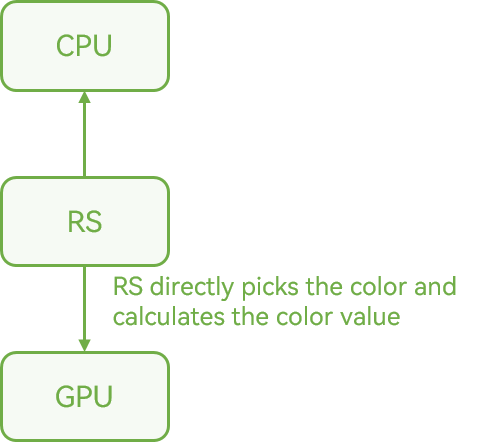
Method 2: Use ColorPicker for color picking. This method involves creating a ColorPicker object using the EffectKit API to pick colors and then assigning the color to the color property of the blur parameters. This method demonstrates better performance since color picking is implemented at the application level. It is suitable for static blur scenarios.
[h2]How to Develop
Method 1: Setting adaptiveColor to AdaptiveColor.AVERAGE
- Call the backgroundEffect API to set the blur effect for the background image.
- Set the value of the adaptiveColor attribute to AdaptiveColor.AVERAGE.
Sample Code
@Component
export struct AdaptiveColorMode {
  @Consume('navPathStack') navPathStack: NavPathStack;

  build() {
    NavDestination() {
      Column() {
        Flex({ alignItems: ItemAlign.Center, justifyContent: FlexAlign.Center }) {
          Text('Background Material Blur').fontColor($r('sys.color.comp_background_list_card'))
        }
        .height('50%')
        .width('70%')
        .backgroundEffect({
          radius: 20,
          saturation: 1.0,
          brightness: 1.0,
          adaptiveColor: AdaptiveColor.AVERAGE
        })
        .position({ x: '15%', y: '30%' })
      }
      .height('100%')
      .width('100%')
      .backgroundImage($r('app.media.test'))
      .backgroundImageSize(ImageSize.Cover)
      .expandSafeArea([SafeAreaType.SYSTEM], [SafeAreaEdge.TOP, SafeAreaEdge.BOTTOM])
    }
    .hideTitleBar(true)
  }
}
Method 2: Using ColorPicker to Pick Colors and Assigning a Value to the color Parameter of the Blur API
- Pass the image resource to create a pixMap.
- Create a ColorPicker based on the pixMap.
- Call the getAverageColor() method of ColorPicker to obtain the color, convert the color to the format for the backgroundEffect API parameter color, and replace the color with the obtained blurColor when calling the API.
Sample Code
import { image } from '@kit.ImageKit';
import { effectKit } from '@kit.ArkGraphics2D';

@Component
export struct ColorPickerMode {
  @Consume('navPathStack') navPathStack: NavPathStack;
  @State pixMap: image.PixelMap | null = null
  @State kitColor: effectKit.Color = {
    red: 255,
    green: 255,
    blue: 255,
    alpha: 255
  };
  @State blurColor: string = 'rgba(255,255,255,255)';

  async blurPix(resource: Resource) {
    try {
      const context: Context = this.getUIContext().getHostContext()!;
      const fileData: Uint8Array = await context.resourceManager.getMediaContent(resource.id);
      const buffer: ArrayBufferLike = fileData.buffer
      let imageSource: image.ImageSource = image.createImageSource(buffer as ArrayBuffer)
      this.pixMap = await imageSource.createPixelMap();
      this.kitColor = (await effectKit.createColorPicker(this.pixMap, [0, 0, 1, 1])).getAverageColor();
      this.blurColor = 'rgba(' + this.kitColor.red + ',' + this.kitColor.green + ',' + this.kitColor.blue + ',0)';
    } catch (err) {
    }
  }

  build() {
    NavDestination() {
      Column() {
        Flex({ alignItems: ItemAlign.Center, justifyContent: FlexAlign.Center }) {
          Text('Background Material Blur').fontColor($r('sys.color.comp_background_list_card'))
        }
        .height('50%')
        .width('70%')
        .backgroundEffect({
          radius: 20,
          saturation: 1.0,
          brightness: 1.0,
          color: this.blurColor
        })
        .position({ x: '15%', y: '30%' })
      }
      .height('100%')
      .width('100%')
      .backgroundImage($r('app.media.test'))
      .backgroundImageSize(ImageSize.Cover)
      .onAppear(() => {
        this.blurPix($r('app.media.test'));
      })
      .expandSafeArea([SafeAreaType.SYSTEM], [SafeAreaEdge.TOP, SafeAreaEdge.BOTTOM])
    }
    .hideTitleBar(true)
  }
}
Performance Comparison
The single-frame rendering time for drawing background blur effects using the two color picking methods is tested. The performance differences are captured using the Frame analysis tool in the built-in Profiler of DevEco Studio.
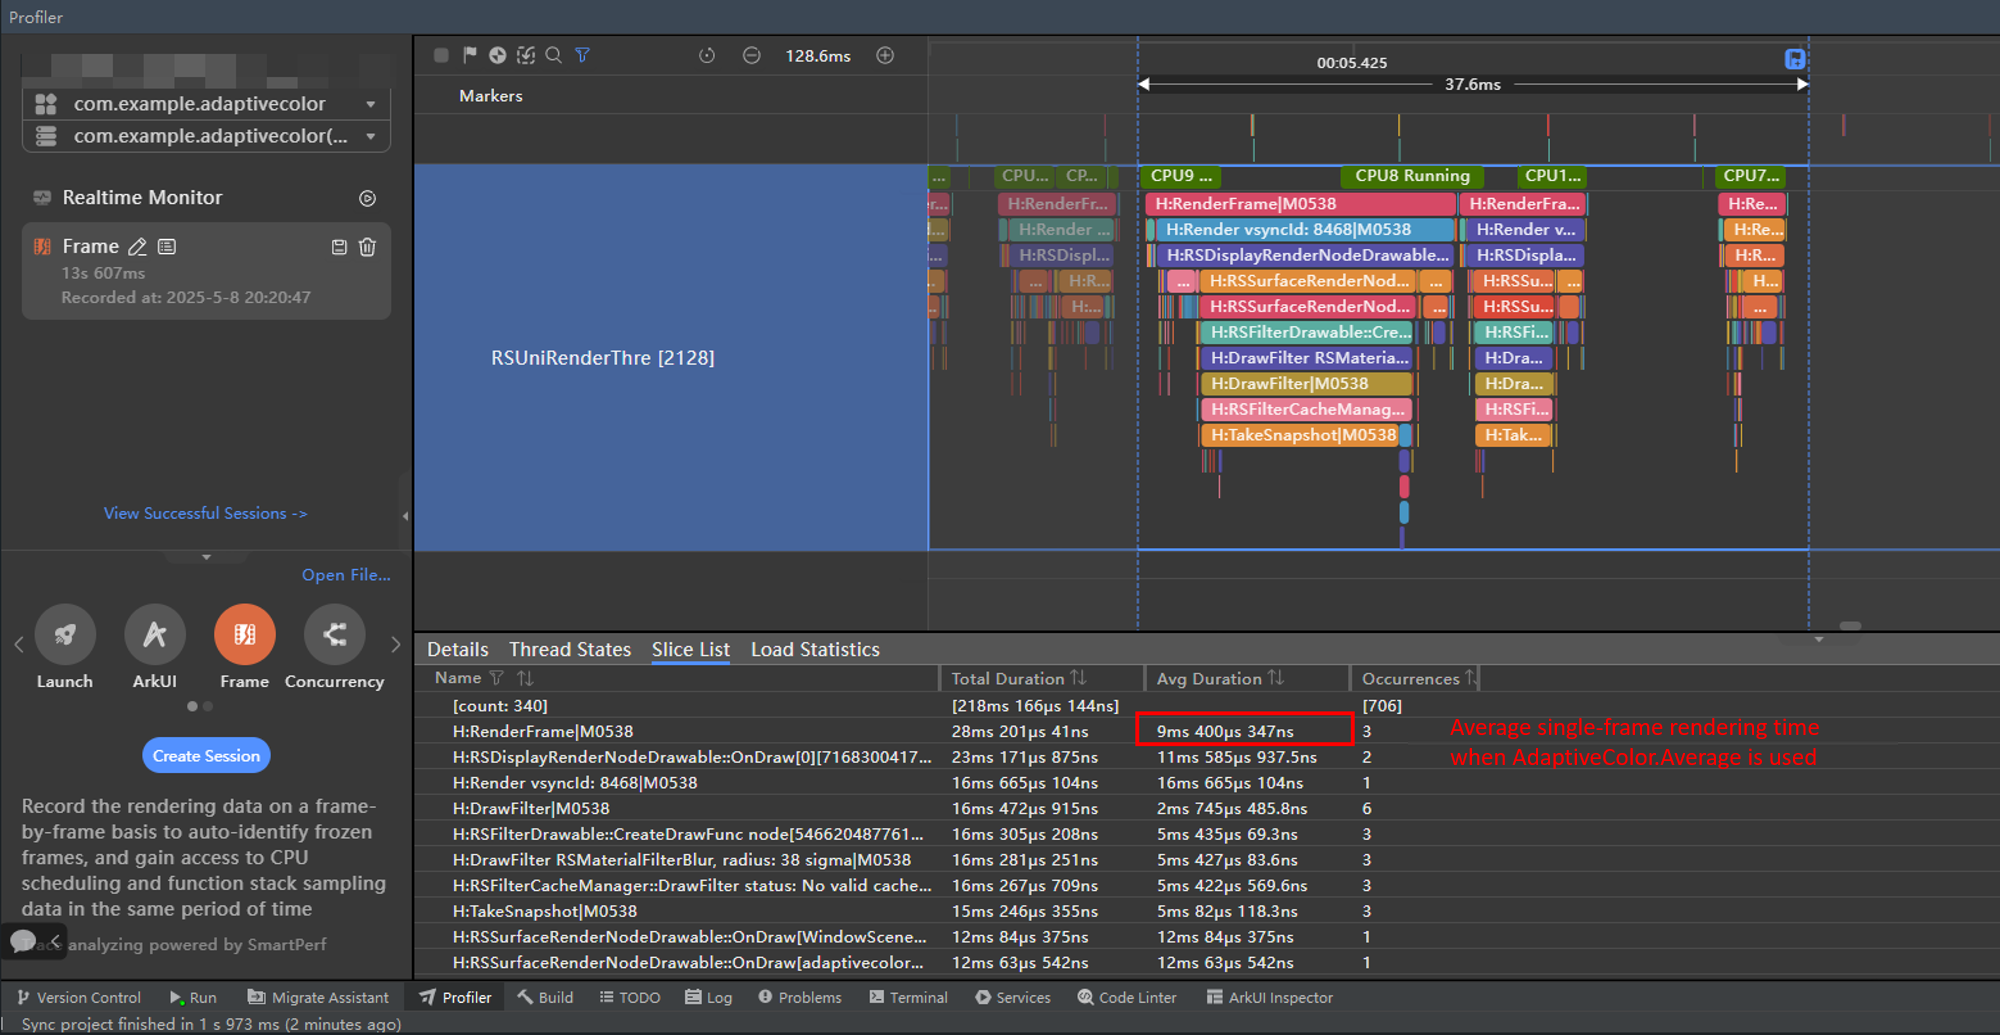
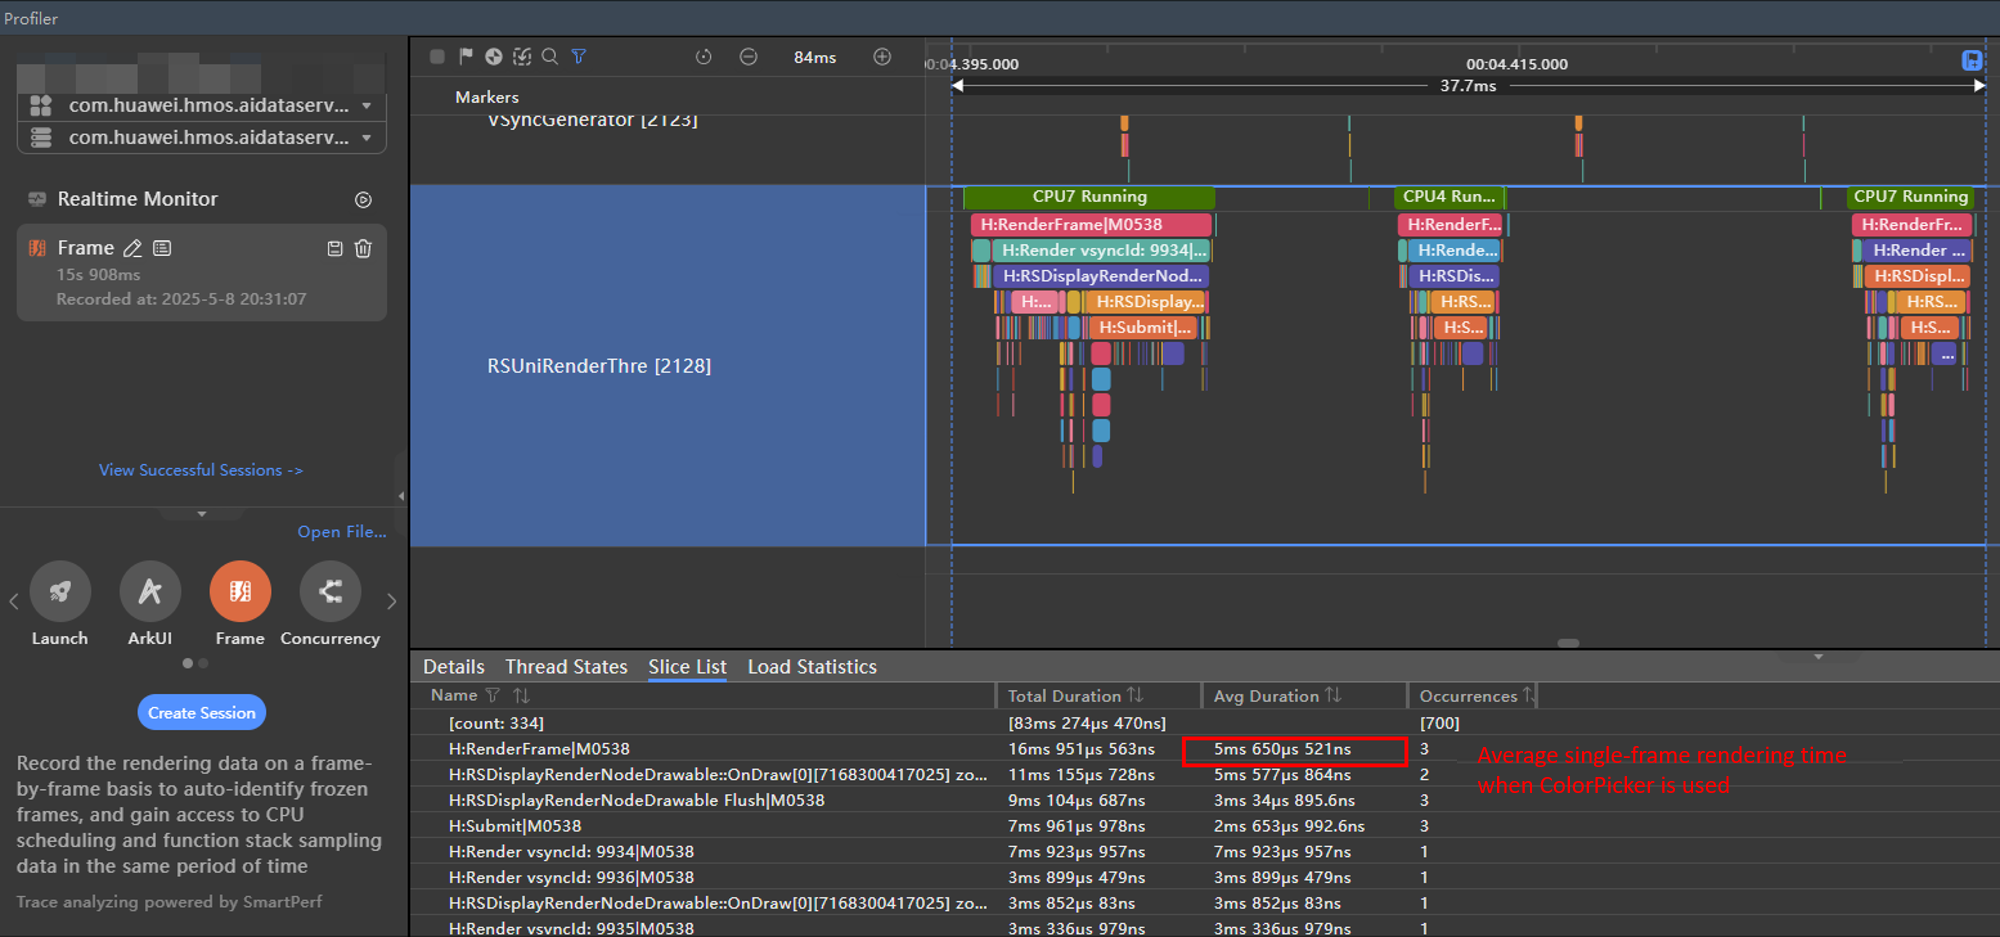
As shown in the figure above, the average single-frame rendering time using method 2 is 5.650 ms, whereas the time using method 1 is 9.400 ms.
[h2]Scenario
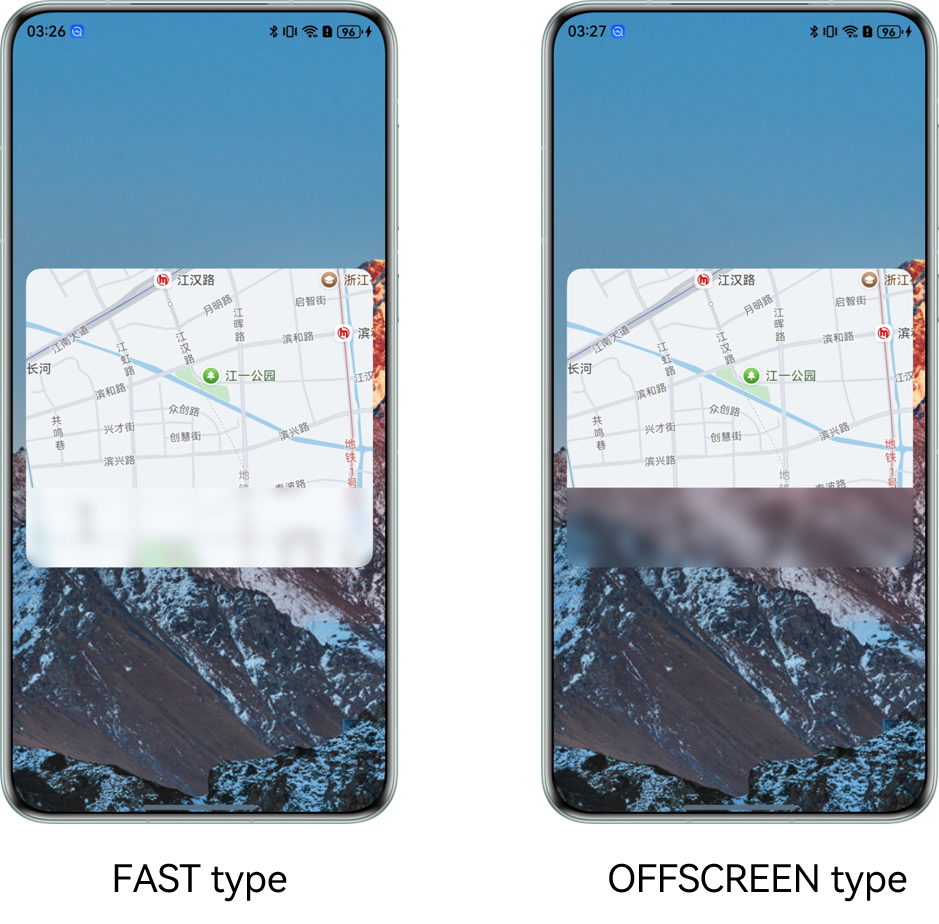
When using blend modes in background blur scenarios, it is crucial to select the appropriate blend mode based on the actual scene to achieve the desired effect. The following figure illustrates the effects achieved using two different modes in the same scenario.
[h2]How to Implement
BlendMode: A graphic processing technology that controls how colors are blended when two or more layers (or graphic elements) are overlaid. It determines the interaction mode between upper-layer and lower-layer pixels, thereby generating different visual effects.
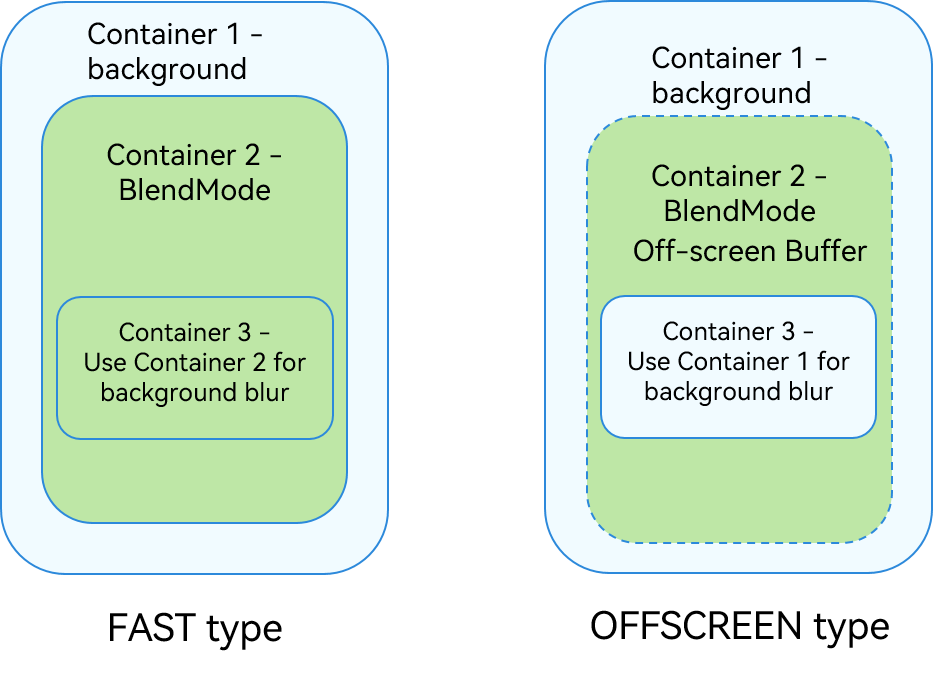
There are two types of blend mode: FAST and OFFSCREEN. The FAST type blends the effects of each layer in sequence, whereas the OFFSCREEN type uses an off-screen canvas where component content is first drawn before being blended as a whole.
Therefore, when both the blend mode and background blur are present in a scene, pay attention to the type of blend mode. When the blend mode is set to OFFSCREEN, an off-screen canvas is used for drawing. The blur process requires a screenshot of the background. If the off-screen canvas rendering is not yet complete, but the blur process has already taken a screenshot of the background and applied the blur effect, an unexpected outcome may occur.
The differences between the two types are shown in the figure below.
[h2]How to Develop
To achieve a background image at the bottom layer, with a map on top, and a blur effect overlaid on the map, the FAST type should be used.
Expected Effect

Set blendMode to FAST to blend the effects of each layer in sequence.
Sample Code
@Component
export struct FastMode {
  @Consume('navPathStack') navPathStack: NavPathStack;

  build() {
    NavDestination() {
      Stack() {
        Stack() {
          Image($r('app.media.map')).width('100%').height('100%').borderRadius(15)
          Flex({ direction: FlexDirection.ColumnReverse }) {
          }
          .height(80)
          .backgroundBlurStyle(BlurStyle.COMPONENT_ULTRA_THIN, { scale: 0.3 })
          .flexShrink(0)
          .width('100%')
          .padding(0)
          .borderRadius({
            topLeft: 0,
            topRight: 0,
            bottomLeft: 15,
            bottomRight: 15
          })
          .position({ x: 0, y: 220 })
        }.margin({ left: '16', right: '16' })
        .height(300)
        .borderRadius(15)
        .blendMode(BlendMode.SRC_OVER, BlendApplyType.FAST)
      }
      .width('100%')
      .height('100%')
      .backgroundImage($r('app.media.img'))
      .backgroundImageSize(ImageSize.Cover)
      .expandSafeArea([SafeAreaType.SYSTEM], [SafeAreaEdge.TOP, SafeAreaEdge.BOTTOM])
    }
    .hideTitleBar(true)
  }
}
Unexpected Effect
If the OFFSCREEN type is used, the background is blurred and then blended with the map layer.
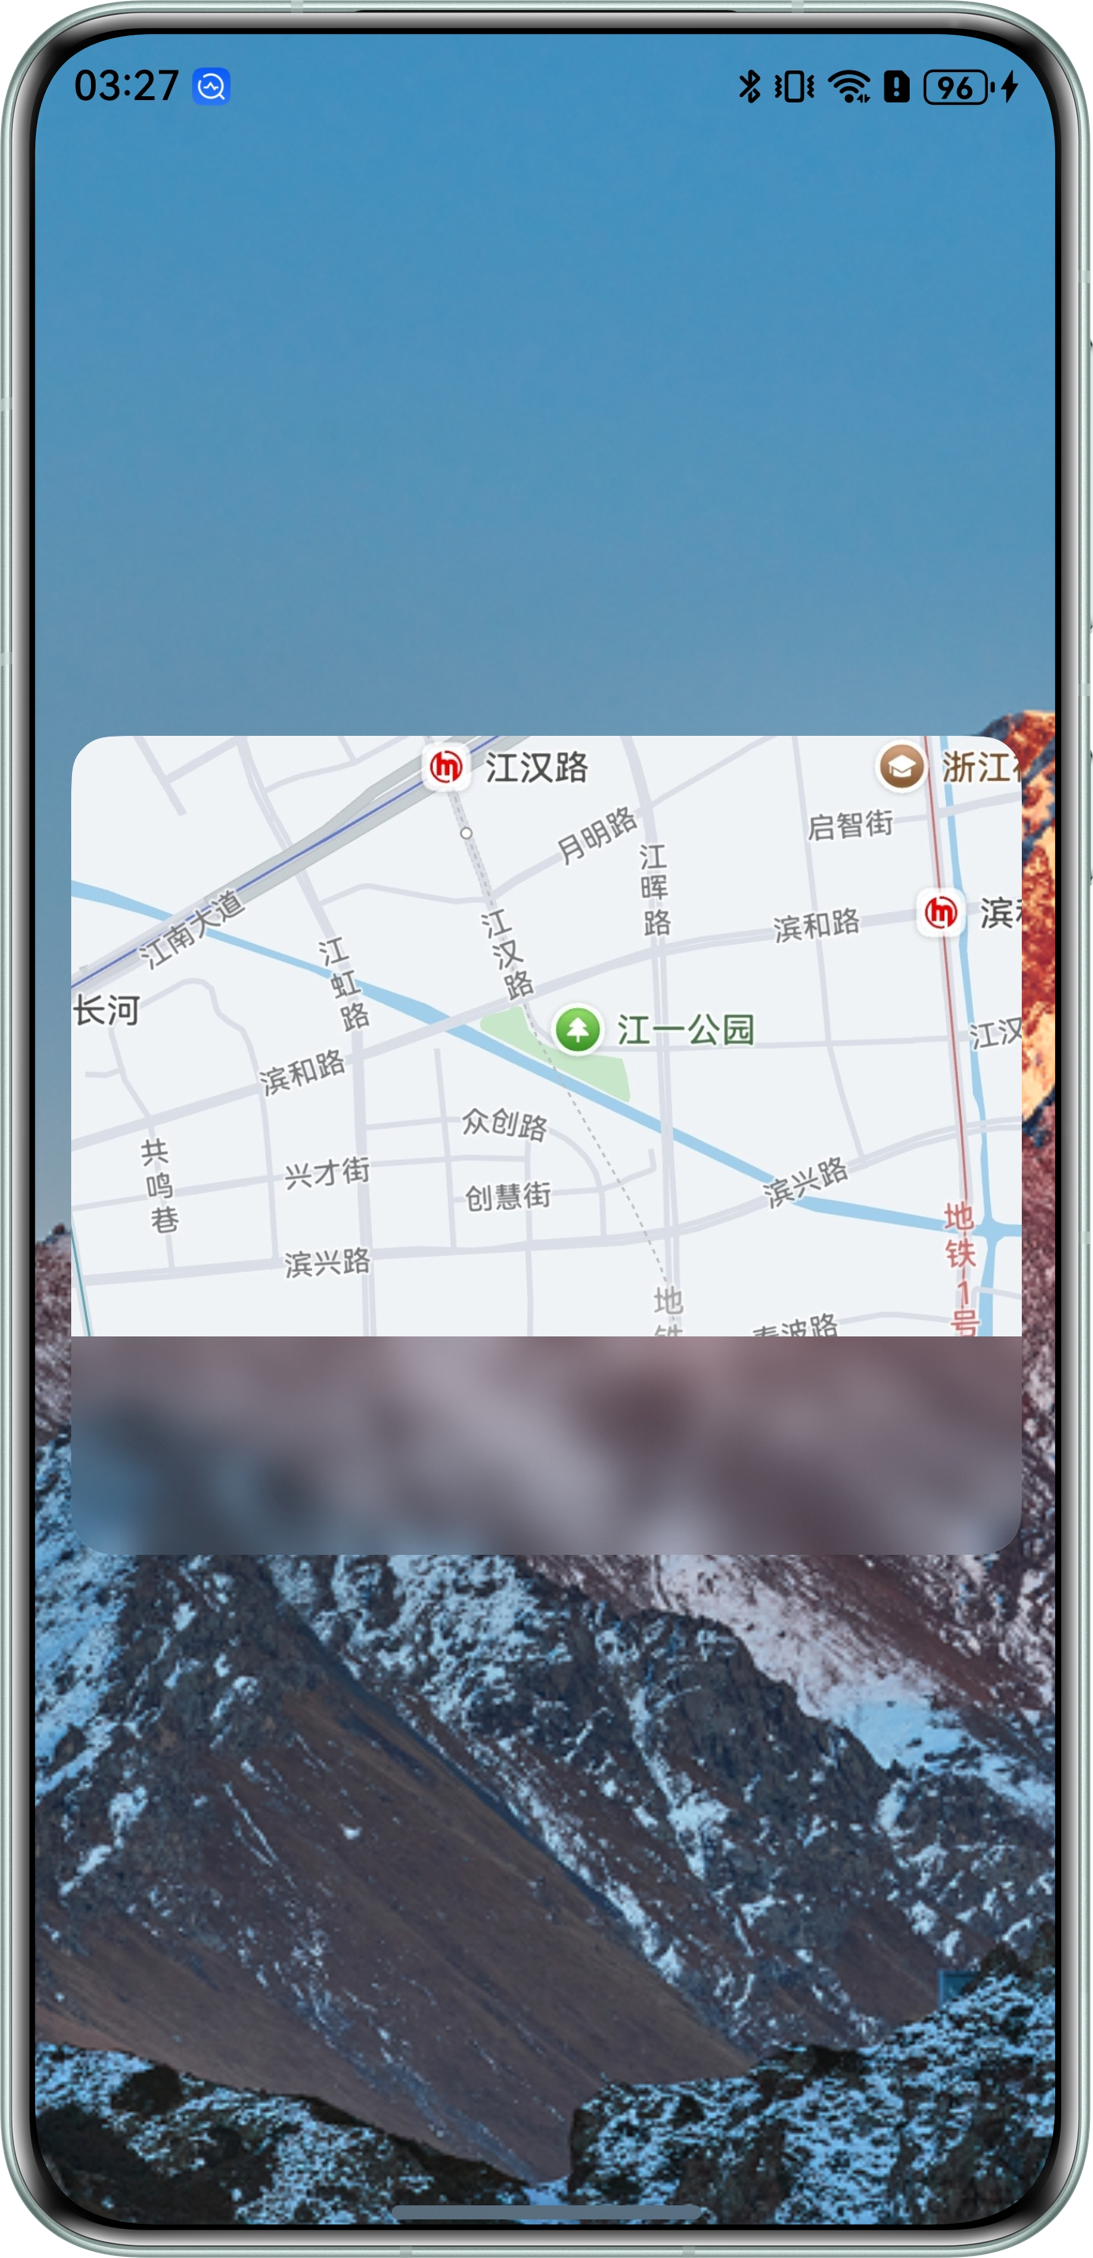
When the blend mode is set to OFFSCREEN, an off-screen canvas is used for drawing. The blur process requires a screenshot of the background. If the off-screen canvas rendering is not yet complete, but the blur process has already taken a screenshot of the background and applied the blur effect, an unexpected outcome may occur.
Sample Code
@Component
export struct OffscreenMode {
  @Consume('navPathStack') navPathStack: NavPathStack;

  build() {
    NavDestination() {
      Stack() {
        Stack() {
          Image($r('app.media.map')).width('100%').height('100%').borderRadius(15)
          Flex({ direction: FlexDirection.ColumnReverse }) {
          }
          .height(80)
          .backgroundBlurStyle(BlurStyle.COMPONENT_ULTRA_THIN, { scale: 0.3 })
          .flexShrink(0)
          .width('100%')
          .padding(0)
          .borderRadius({
            topLeft: 0,
            topRight: 0,
            bottomLeft: 15,
            bottomRight: 15
          })
          .position({ x: 0, y: 220 })
        }
        .margin({ left: '16', right: '16' })
        .height(300)
        .borderRadius(15)
        .blendMode(BlendMode.SRC_OVER, BlendApplyType.OFFSCREEN)
      }
      .width('100%')
      .height('100%')
      .backgroundImage($r('app.media.img'))
      .backgroundImageSize(ImageSize.Cover)
      .expandSafeArea([SafeAreaType.SYSTEM], [SafeAreaEdge.TOP, SafeAreaEdge.BOTTOM])
    }
    .hideTitleBar(true)
  }
}
Summary
This section provides an in-depth analysis of the technical principles and implementation mechanisms of the background blur feature. It proposes efficient implementation methods based on different use cases. In scenarios that involve color picking, you are advised to choose the optimal implementation based on a quantitative assessment of performance costs and visual effects. In scenarios that require the use of blend modes to mix upper and lower layers, you should select the appropriate blend mode type based on the working principles of blend modes and background blur.