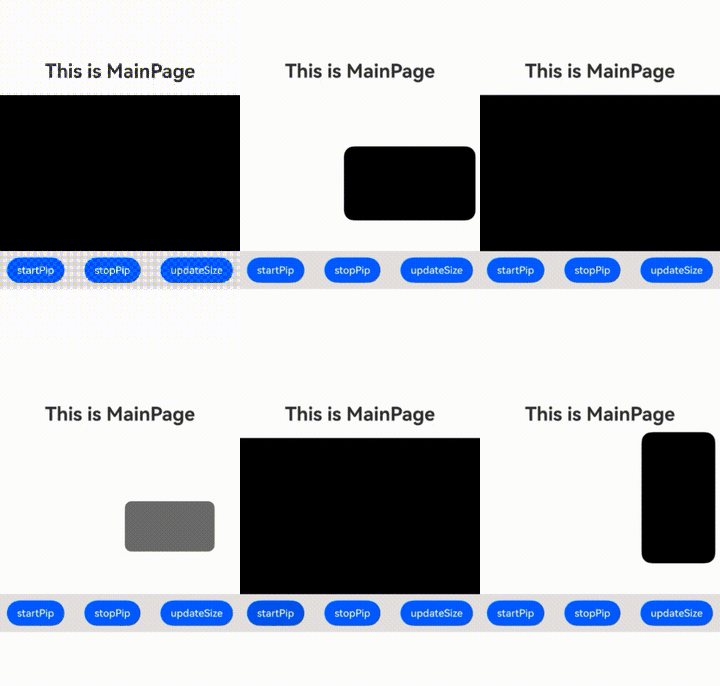
This topic uses video playback as an example to describe how to develop the PiP feature using the XComponent.
Constraints
In versions earlier than HarmonyOS 6.0.0, XComponent can be used to develop the PiP feature on phones and tablets. Since HarmonyOS 6.0.0, phones, PCs/2-in-1 devices, and tablets supports PiP development using XComponent.
Only the UI that uses XComponent as the media stream playback component can enter the PiP mode. The type of XComponent must be set to XComponentType.SURFACE.
When the UIAbility uses the Navigation component to manage pages, you must set an ID for the component and pass the ID to the PiP controller. This ensures that the original page can be restored from the PiP window.
If the main window of the application is not in the foreground, you are advised not to perform UI operations, for example, pushing or popping pages, in the PiP lifecycle callbacks. These operations are deferred and may lead to unpredictable outcomes.
When PiP is stopped, check whether the custom component nodes are released to avoid memory leaks.
How to Develop
Create a PiP controller, and register the lifecycle event callback and control event callback.
Add a PiPControlGroup array to PiPConfiguration to configure a controller for the current PiP.
function getControlGroups(templateType: PiPWindow.PiPTemplateType): PiPControlGroups {
  switch (templateType) {
    case PiPWindow.PiPTemplateType.VIDEO_PLAY:
      return [PiPWindow.VideoPlayControlGroup.VIDEO_PREVIOUS_NEXT];
    case PiPWindow.PiPTemplateType.VIDEO_CALL:
      return [PiPWindow.VideoCallControlGroup.MICROPHONE_SWITCH,
        PiPWindow.VideoCallControlGroup.HANG_UP_BUTTON, PiPWindow.VideoCallControlGroup.CAMERA_SWITCH];
    case PiPWindow.PiPTemplateType.VIDEO_MEETING:
      return [PiPWindow.VideoMeetingControlGroup.MICROPHONE_SWITCH,
        PiPWindow.VideoMeetingControlGroup.HANG_UP_BUTTON, PiPWindow.VideoMeetingControlGroup.CAMERA_SWITCH];
    case PiPWindow.PiPTemplateType.VIDEO_LIVE:
      return [PiPWindow.VideoLiveControlGroup.VIDEO_PLAY_PAUSE,
        PiPWindow.VideoLiveControlGroup.MUTE_SWITCH];
    default:
      return [];
  }
}

// ...

@Component
export struct Page1 {
  // ...
  @State currentTemplateType: PiPWindow.PiPTemplateType = PiPWindow.PiPTemplateType.VIDEO_PLAY;
  // ...
  startPip() {
    // ...
    let config: PiPWindow.PiPConfiguration = {
      context: this.getUIContext().getHostContext() as Context,
      componentController: this.mXComponentController,
      // ID of the Navigation component on the current page.
      // 1. When the UIAbility uses the Navigation component to manage pages, you must set an ID for the component and pass the ID to the PiP controller. This ensures that the original page can be restored from the PiP window.
      // 2. When the UIAbility uses the Router module for page management (not recommended), you do not need to set the ID of the Navigation component. In this mode, do not switch between pages after PiP is started. Otherwise, an exception may occur.
      // 3. If the UIAbility has only one page, there is no need to set the ID of the Navigation component. The original page can be restored from the PiP window.
      navigationId: this.navId,
      // Used in video calls and video meetings. The corresponding template is required.
      templateType: this.currentTemplateType,
      // Optional. When creating a PiP controller, the system can set the PiP window ratio based on the XComponent size.
      contentWidth: 1920,
      // Optional. When creating a PiP controller, the system can set the PiP window ratio based on the XComponent size.
      contentHeight: 1080,
      // Optional. In video call, video meeting, and live scenarios, this attribute can be used to select the components to be displayed under the corresponding template.
      controlGroups: getControlGroups(this.currentTemplateType),
      // Optional. Set this parameter if you want to display the custom UI at the top of PiP.
      customUIController: this.nodeController,
    };
    // Step 1: Create a PiP controller instance by calling the create API.
    PiPWindow.create(config).then((controller: PiPWindow.PiPController) => {
      // ...
    }).catch((err: BusinessError) => {
      Logger.error(`Failed to create pip controller. Cause:${err.code}, message:${err.message}`);
    });
  }

  // ...
}
Pass customUIController to PiPConfiguration to display the custom UI.
- Create a custom NodeController, implement the makeNode method, and create a custom UI layout in the method.
// You can extend NodeController to customize the UI controller. class TextNodeController extends NodeController { private message: string; private textNode: BuilderNode<[Params]> | null = null; constructor(message: string) { super(); this.message = message; } // Use BuilderNode to load the custom layouts. makeNode(context: UIContext): FrameNode | null { this.textNode = new BuilderNode(context); this.textNode.build(wrapBuilder<[Params]>(buildText), new Params(this.message)); return this.textNode.getFrameNode(); } // You can customize this method to update layouts. update(message: string) { Logger.info(`update message: ${message}`); if (this.textNode !== null) { this.textNode.update(new Params(message)); } } // You need to define this method to unregister the layout to avoid memory leaks. dispose() { Logger.info('dispose message: execute node dispose'); if (this.textNode !== null) { this.textNode.dispose(); } } } - Use BuilderNode to load the custom layouts.
class Params { public text: string = ''; constructor(text: string) { this.text = text; } } // You can use the @Builder decorator to construct layouts. @Builder function buildText(params: Params) { Column() { Text(params.text) .fontSize(20) .fontColor(Color.Red) } .width('100%') // Full width of the PiP window. .height('100%') // Full height of the PiP window. } - When creating a PiP controller, pass the customUIController parameter to PiPConfiguration.
@Component
export struct Page1 {
  // ...
  private nodeController: TextNodeController = new TextNodeController('this is custom UI');
  // ...
  startPip() {
    if (!PiPWindow.isPiPEnabled()) {
      Logger.error(`picture in picture disabled for current OS`);
      return;
    }
    let config: PiPWindow.PiPConfiguration = {
      context: this.getUIContext().getHostContext() as Context,
      componentController: this.mXComponentController,
      // ID of the Navigation component on the current page.
      // 1. When the UIAbility uses the Navigation component to manage pages, you must set an ID for the component and pass the ID to the PiP controller. This ensures that the original page can be restored from the PiP window.
      // 2. When the UIAbility uses the Router module for page management (not recommended), you do not need to set the ID of the Navigation component. In this mode, do not switch between pages after PiP is started. Otherwise, an exception may occur.
      // 3. If the UIAbility has only one page, there is no need to set the ID of the Navigation component. The original page can be restored from the PiP window.
      navigationId: this.navId,
      // Used in video calls and video meetings. The corresponding template is required.
      templateType: this.currentTemplateType,
      // Optional. When creating a PiP controller, the system can set the PiP window ratio based on the XComponent size.
      contentWidth: 1920,
      // Optional. When creating a PiP controller, the system can set the PiP window ratio based on the XComponent size.
      contentHeight: 1080,
      // Optional. In video call, video meeting, and live scenarios, this attribute can be used to select the components to be displayed under the corresponding template.
      controlGroups: getControlGroups(this.currentTemplateType),
      // Optional. Set this parameter if you want to display the custom UI at the top of PiP.
      customUIController: this.nodeController,
    };
    // Step 1: Create a PiP controller instance by calling the create API.
    PiPWindow.create(config).then((controller: PiPWindow.PiPController) => {
      // ...
    }).catch((err: BusinessError) => {
      Logger.error(`Failed to create pip controller. Cause:${err.code}, message:${err.message}`);
    });
  }

  // ...
}
- Create a custom NodeController, implement the makeNode method, and create a custom UI layout in the method.
Use create(config: PiPConfiguration) to create a PiP controller instance.
startPip() {
  // ...
  PiPWindow.create(config).then((controller: PiPWindow.PiPController) => {
    this.pipController = controller;
    // ...
  }).catch((err: BusinessError) => {
    Logger.error(`Failed to create pip controller. Cause:${err.code}, message:${err.message}`);
  });
}
Create a PiP controller instance, and register the lifecycle event callback and control event callback.
Use on('stateChange') to register the lifecycle event callback.
this.pipController.on('stateChange', (state: PiPWindow.PiPState, reason: string) => {
  this.onStateChange(state, reason);
});
Use on('controlPanelActionEvent') to register the control event callback.
this.pipController.on('controlPanelActionEvent', (event: PiPWindow.PiPActionEventType, status?: number) => {
  this.onActionEvent(event, status);
});
Start PiP.
Use startPiP to start a PiP window.
startPip() {
  if (!PiPWindow.isPiPEnabled()) {
    Logger.error(`picture in picture disabled for current OS`);
    return;
  }
  let config: PiPWindow.PiPConfiguration = {
    context: this.getUIContext().getHostContext() as Context,
    componentController: this.mXComponentController,
    // ID of the Navigation component on the current page.
    // 1. When the UIAbility uses the Navigation component to manage pages, you must set an ID for the component and pass the ID to the PiP controller. This ensures that the original page can be restored from the PiP window.
    // 2. When the UIAbility uses the Router module for page management (not recommended), you do not need to set the ID of the Navigation component. In this mode, do not switch between pages after PiP is started. Otherwise, an exception may occur.
    // 3. If the UIAbility has only one page, there is no need to set the ID of the Navigation component. The original page can be restored from the PiP window.
    navigationId: this.navId,
    // Used in video calls and video meetings. The corresponding template is required.
    templateType: this.currentTemplateType,
    // Optional. When creating a PiP controller, the system can set the PiP window ratio based on the XComponent size.
    contentWidth: 1920,
    // Optional. When creating a PiP controller, the system can set the PiP window ratio based on the XComponent size.
    contentHeight: 1080,
    // Optional. In video call, video meeting, and live scenarios, this attribute can be used to select the components to be displayed under the corresponding template.
    controlGroups: getControlGroups(this.currentTemplateType),
    // Optional. Set this parameter if you want to display the custom UI at the top of PiP.
    customUIController: this.nodeController,
  };
  // Step 1: Create a PiP controller instance by calling the create API.
  PiPWindow.create(config).then((controller: PiPWindow.PiPController) => {
    this.pipController = controller;
    // Step 1: Initialize the PiP controller.
    this.initPipController();
    // Step 2: Call the startPiP API to start PiP.
    this.pipController.startPiP().then(() => {
      Logger.info(`Succeeded in starting pip.`);
    }).catch((err: BusinessError) => {
      Logger.error(`Failed to start pip. Cause:${err.code}, message:${err.message}`);
    });
  }).catch((err: BusinessError) => {
    Logger.error(`Failed to create pip controller. Cause:${err.code}, message:${err.message}`);
  });
}
You can use the setAutoStartEnabled method of the PiP controller instance to set whether to automatically start PiP when the application's main window that starts the PiP moves to the background. By default, the PiP is not automatically started. When PiP auto-start is enabled, if the application's main window is in the multi-window floating window state and is moved to the sidebar, PiP will not be automatically started even though the main window has moved to the background. If the XComponent approach is used to implement PiP and the Navigation component is used for route management, the system caches the top stack information with the specified navigation ID upon the first call of setAutoStartEnabled(true).
this.pipController.setAutoStartEnabled(false /* or true if necessary */); // false by default.
Update the media content size.
The interaction modes provided by the PiP window allow you to resize the PiP window by double-clicking or dragging its four edges and four corners. Besides, after the PiP media source is updated (for example, the video is switched), call the updateContentSize method of the PiP controller instance to adjust the PiP ratio.
Button('updateSize') // Update the video size.
  .onClick(() => {
    // The width and height set here must be those of the media content and be obtained through media-related APIs or callbacks.
    // For example, when the AVPlayer is used to play a video, the videoSizeChange callback can be used to obtain the updated media content size.
    this.updateContentSize(900, 1600);
  })
  .stateStyles({
    pressed: {
      .backgroundColor(Color.Red);
    },
    normal: {
      .backgroundColor(Color.Blue);
    }
  })
Stop the PiP window.
When there is no need to display the PiP window, you can stop the PiP window by calling stopPiP of the PiP controller instance.
// Step 4: Call the stopPiP API to stop PiP when it is not required.
stopPip() {
  if (this.pipController) {
    this.pipController.stopPiP()
    .then(() => {
      Logger.info(`Succeeded in stopping pip.`);
      this.pipController?.off('stateChange'); // If the stateChange callback function has been registered, unregister the callback function when stopping the PiP window.
      this.pipController?.off('controlPanelActionEvent'); // If the controlPanelActionEvent callback function has been registered, unregister the callback function when stopping the PiP window.
    }).catch((err: BusinessError) => {
      Logger.error(`Failed to stop pip. Cause:${err.code}, message:${err.message}`);
    });
  }
}
The AVPlayer is required for video playback in this example. For details, see Video Playback.
The following figure shows the schematic diagram of the preceding sample code.