Integrating IAP Kit
IAP Kit can be easily integrated into your atomic services to deliver a convenient in-app payment experience. With the system-level payment APIs provided by IAP Kit, your atomic services can quickly show the IAP checkout screen for users to pay for various virtual products sold within it. For details, please refer to the IAP Kit Development Guide.
The table below lists the digital products (virtual products) that users can purchase within the atomic services.
Product Type | Definition | Validity Period | Benefit Maintenance by Your Side | Example |
|---|---|---|---|---|
Consumables | Depleted as they are used and requiring another purchase. | No limit | The user benefit will not be maintained once it is delivered. | In-game currencies and items |
Non-consumables | Purchased once and owned permanently. | Permanent | The user benefit will be permanently maintained. | Extra game levels in a game or permanent membership of an app |
Auto-renewable subscriptions | Value-added functions or content available to users in a specified period of time after purchase. The subscriptions automatically renew on a recurring basis until users cancel the subscriptions. | Recurring cycles | The user benefit will be periodically maintained. | Time-limited memberships that are automatically renewed, for example, auto-renewal monthly video membership |
Non-renewable subscriptions | Value-added functions or content available to users in a specified period of time after purchase. Users cannot access the functions or content after the period ends unless they make another purchase (auto-renewable subscription or non-renewable subscription). | One cycle | The user benefit will be maintained within a cycle. | Time-limited memberships, such as a one-month video membership |
has.createIap({
  // Replace it with the actual product ID.
  productId: 'product_id',
  productType: 0,
  developerPayload: '',
  reservedInfo: '{"key1":"value1"}',
  promotionalOfferId: '',
  applicationUserName: '',
  jwsRepresentation: '',
  success: (res) => {
    console.info('createIap success', res);
  },
  fail: (err) => {
    console.error('createIap fail', err);
  },
  complete: (res) => {
    console.info('createIap complete', res);
  }
});
Using Unified Checkout for External Payment
After a user selects a product in your atomic service and taps to place an order, ASCF provides an API to launch the unified checkout screen. The user then selects a third-party payment method to complete payment for the order.
[h2]Integration Process
The table below describes how to implement external payment via unified checkout.
Step | Description |
|---|---|
(Optional) Register a merchant account. | The third-party payment will be completed directly on the third-party payment platform. Therefore, you may need to register or create a merchant account on this platform. (You are advised to use a new merchant account for distinguishing from existing ones.) |
Request to enable third-party payment and configure related payment modes. | |
Integrate unified checkout. | Integrate unified checkout according to the development procedure for external payment. |
The service process is described in the figure below:
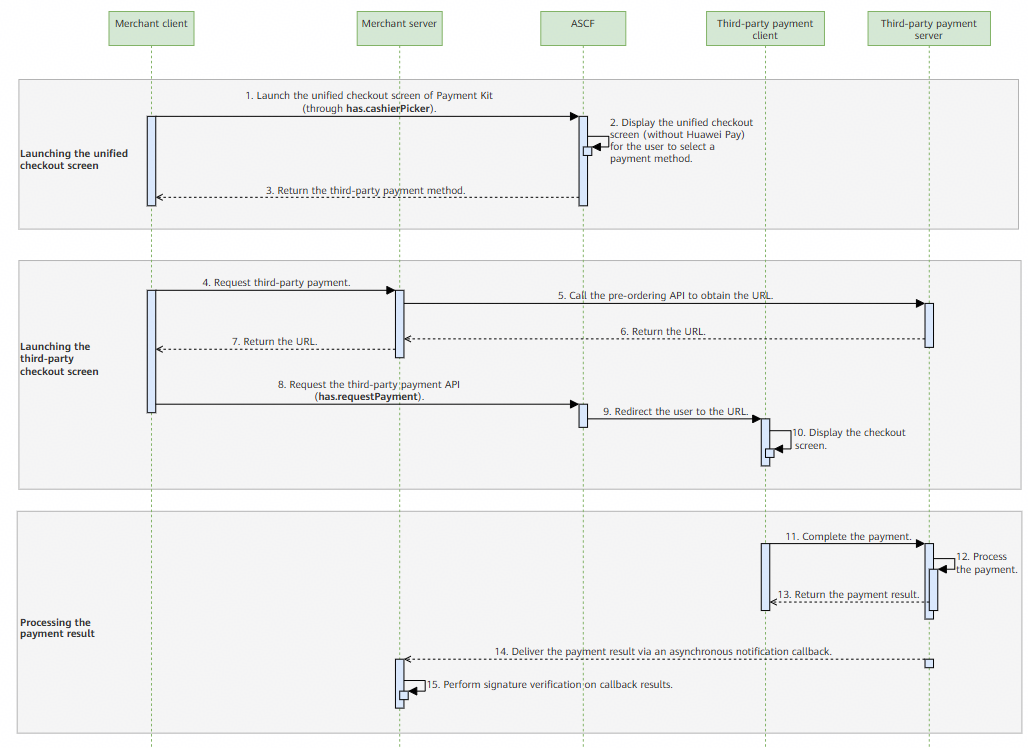
The client calls the cashierPicker API to launch the unified checkout screen of Payment Kit based on the payment modes enabled by the merchant. For details about the API, please refer to the payment API reference. After the user selects a payment method, the client calls the requestPayment API to redirect the user to the third-party payment screen.
Example
has.cashierPicker({
  tradeSummary: '',
  amount: 100,
  currency: 'CNY',
  extraInfo: '',
  success: (res) => {
    console.info('cashierPicker success', res.clientToken);
    setTimeout(() => {
      has.requestPayment({
        orderStr: `{"nextAction":"L","linkUrl":"https://www.***.pay.com/h5pay?prepay_id=***&sign=***","scheme":"","clientToken":"${res.clientToken}"}`,
        payload: 'AP',
        success: (res) => {
          console.info('requestPayment success', res);
        },
        fail: (err) => {
          console.error('requestPayment fail', err);
        },
        complete: (res) => {
          console.info('requestPayment complete', res);
        }
      });
    }, 1000);
  },
  fail: (err) => {
    console.error('cashierPicker fail', err);
  },
  complete: (res) => {
    console.info('cashierPicker complete', res);
  }
});