Use Cases
With the app link capability of App Linking, the system redirects users to specific content in the target app based on the passed URI (HTTPS link). Unlike Deep Linking, App Linking allows users to smoothly access the content whether or not the target app is installed.
For example, once you have integrated the scan-to-access service by using the app link capability of App Linking, users can scan the QR code or barcode of your app through system-level scanning entry points such as the scan button on the control panel. This takes them directly to the corresponding service page of your app, providing a seamless, one-step experience.

This capability applies only to HarmonyOS apps with API version 5.0.0(12) or later. If you are developing an atomic service, please refer to Using an Atomic Service Link for Atomic Service Redirection.
Mechanisms
App Linking adopts domain verification, which is unavailable in Deep Linking. Domain verification helps identify valid apps, making links more secure and reliable.
App Linking ensures that an HTTPS address can be used to access both the in-app content and its web version. When the app is installed, the app is preferentially opened to present the content. When the app is not installed, a web page is opened to present the content in a browser.
Constraints
Phones, PCs/2-in-1 devices, and tablets are supported. Starting from version 5.1.1(19), this capability is also supported on TVs.
Development Process
| Party | Procedure |
|---|---|
| Cloud-side development | Enable App Linking. |
| Cloud-side development | Associate a domain name with your app. |
| Cloud-side development | Create an associated website domain name for your app in AppGallery Connect. |
| App-side development | Configure the associated website domain name in the module.json5 file. |
| App-side development | Process the passed link. |
| Front-end development | Develop the HTML5 web page corresponding to the passed link. If the app is not installed, this web page will be displayed when the link is tapped. Note: This document focuses on the development of HarmonyOS apps and will not detail web page development. |
| App-side development | Verify the app launch effect. |
[h2]Associating a Domain Name with Your App
Perform the following operations on the domain name server (DNS) of your website. When you create an associated website domain name for your app in AppGallery Connect, AppGallery Connect will use the following file to identify apps belonging to the domain name, making the links more secure and reliable.
Create a domain name configuration file applinking.json as follows:
{
 "applinking": {
   "apps": [
     {
       "appIdentifier": "1234567",
       "index": 1
     },
     {
       "appIdentifier": "7654321",
       "index": 2
     }
   ]
 }
}
A website domain name can be associated with multiple apps if you add multiple appIdentifier elements to the apps list. Each appIdentifier element corresponds to an app.
Parameter Mandatory Type Description appIdentifier Yes String App ID generated during app creation. For details about how to obtain the app ID, please refer to Viewing App Information. index No Integer If multiple apps match based on App Linking, you can configure the index field to specify which app to launch.
The value range of index is [-100,100]. Values can be duplicate but cannot be empty. A larger value indicates a higher priority.
- If multiple apps match but none of them is configured with the index field, the system launches all the matched apps and displays a dialog box asking the user to select one.
- If multiple apps match and the index field is configured for some or all of them, the system launches the app with the highest index value. If more than one app shares the highest index value, the system launches these apps simultaneously and displays a dialog box asking the user to select one.
Since: 6.1.0(23)
Place the applinking.json configuration file in the following directory on the DNS: https://domain.name/.well-known/applinking.json. For example, if the domain name of your server is www.example.com, place the applinking.json file in the following directory:
https://www.example.com/.well-known/applinking.json
[h2]Creating an Associated Website Domain Name for Your App in AppGallery Connect
To use the app link capability of HarmonyOS, you need to create an associated website domain name for your HarmonyOS app.
Sign in to AppGallery Connect and click Development and services.
Click the project to which your HarmonyOS app belongs.
In the navigation tree, choose Grow > App Linking > App Link, and on the page displayed, click New.

Enter the domain name you have associated with your app, for example, https://www.example.com. An exact domain name without special characters shall be used.

Do not add a slash (/) to the end of the domain name. For example, https://www.example.com/ is not supported.

After the setting is complete, click Release. AppGallery Connect will check whether the apps contained in the configuration file of the website domain name overlap with the apps in the project.

After an app link is released, AppGallery Connect will obtain the configuration file from the DNS every 24 hours and check whether the file contains any apps in the project.
For example, if you create an app link at 17:21 on April 7, AppGallery Connect may obtain the new configuration file from the DNS at 17:30 on April 8, check whether the file contains any apps in the project, and update the release status.

If the configuration file of the domain name contains any app in the project, the release is successful. You can click View to view the information about the apps associated with the domain name.
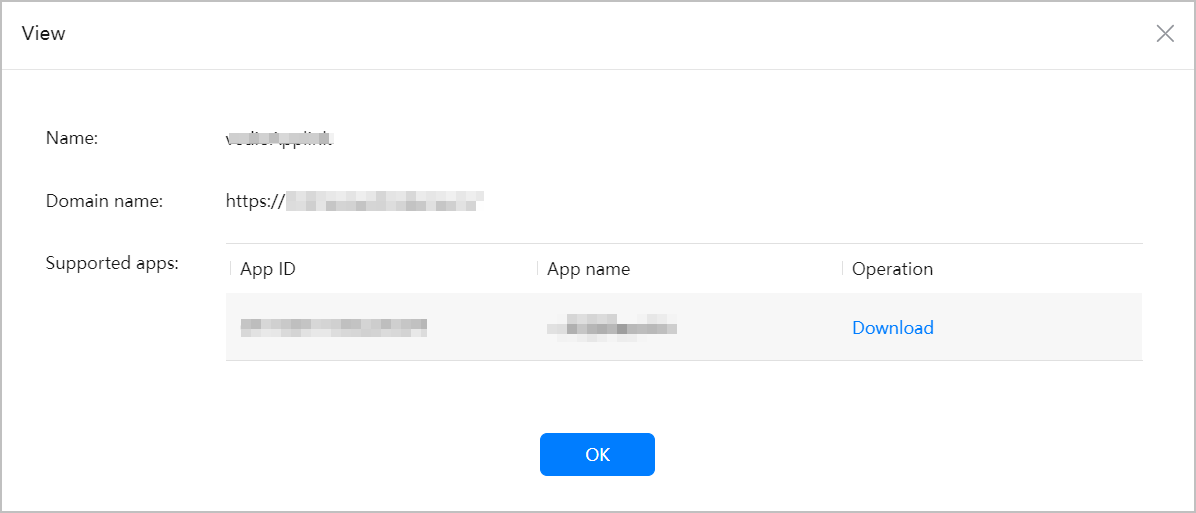
If the verification is in progress, the status is Publishing.
If the configuration file does not contain any app in the project, the release fails. You can click View to check the release failure cause.

[h2]Configuring the Associated Website Domain Name in the module.json5 File
Configure the following information in the module.json5 file of your app to declare the domain name associated with the app and enable domain verification. If the URL matches the host and path rules defined in the module.json5 file, your app can be launched.
The "entities" list must contain "entity.system.browsable".
The "actions" list must contain "ohos.want.action.viewData".
The "uris" list must contain an element whose "scheme" is "https" and "host" is the associated domain name. The optional properties include "path", "pathStartWith", and "pathRegex". For details, please refer to Description of uris.
"domainVerify" must be set to true, indicating that the domain verification is enabled.

By default, the skills field contains a skill object, which is used to identify the app entry. App redirection links cannot be configured in the skill object. Instead, you need to create a separate skill object.
If multiple redirection scenarios are involved, create different skill objects under skills. Otherwise, the configuration will not take effect.
For example, the configuration below declares that the app is associated with the domain name www.example.com.
{
  "module": {
    "abilities": [
      {
        "name": "EntryAbility",
        "srcEntry": "./ets/entryability/EntryAbility.ets",
        "icon": "$media:icon",
        "label": "$string:EntryAbility_label",
        // Set exported to true. If exported is set to false, only authorized system apps can start the target app.
        "exported": true,
        "startWindowIcon": "$media:icon",
        "startWindowBackground": "$color:start_window_background",
        "skills": [
          {
            "entities": [
              "entity.system.home"
            ],
            "actions": [
              // Since version 5.1.1(19), "actions" must be set to "ohos.want.action.home". For 5.1.0(18) and earlier versions, "actions" should be set to "action.system.home".
              "ohos.want.action.home"
            ]
          },
          {
            "entities": [
              // entities must contain "entity.system.browsable".
              "entity.system.browsable"
            ],
            "actions": [
              // actions must contain "ohos.want.action.viewData".
              "ohos.want.action.viewData"
            ],
            "uris": [
              {
                // scheme must be set to https.
                "scheme": "https",
                // host must be set to the associated website domain name.
                "host": "www.example.com",
                // path is optional, which indicates the directory on the DNS, such as path1 in www.example.com/path1.
                // If the app supports only specific paths, provide those paths here to prevent unsupported paths from triggering the app.
                "path": "path1"
              }
            ],
            // domainVerify must be set to true.
            "domainVerify": true
          }
          // If other redirection capabilities are involved, such as push message– and NFC-based redirection, add a skill object to prevent conflicts with App Linking.
        ]
      }
    ]
  }
}
[h2]Processing the Passed Link
Add the following code to the onCreate() or onNewWant() lifecycle callback of the app's ability (such as EntryAbility) to process the passed link.
import { AbilityConstant, UIAbility, Want } from '@kit.AbilityKit';
import { hilog } from '@kit.PerformanceAnalysisKit';
import { url } from '@kit.ArkTS';
// ...

export default class EntryAbility extends UIAbility {
  onCreate(want: Want, launchParam: AbilityConstant.LaunchParam): void {
    // ...
    // Obtain the passed link information from want.
    // For example, if the passed URL is https://example.drcn.agconnect.link/AIYx?action=showall, you can perform subsequent processing based on your service requirements.
    let uri = want?.uri;
    if (uri) {
      // Parse the query parameter from the link. You can perform subsequent processing based on your service requirements.
      try {
        let urlObject = url.URL.parseURL(uri);
        let action = urlObject.params.get('action');
        // For example, if action is set to showall, all programs are displayed.
        if (action === 'showall') {
          // ...
        }
        // ...
      } catch (error) {
        hilog.error(0x0000, 'testTag', 'Failed to parse url.');
      }
      // ...
    }
  }
  // ...
}
To start a specified UIAbility page component based on link parameters, please refer to Starting a Specified Page of UIAbility.
Verifying the App Launch Effect
Manually sign your app.
Do not use the automatic signing function of DevEco Studio. Otherwise, the app cannot be started.
Compile, package, and install the app to the debugging device.
Verify the effect of app launch using the app link capability of App Linking.
[h2]Tapping the Link to Start the App
Save the app link of App Linking to the memo and tap the link to check whether the app can be started.
[h2]Starting the App by Calling the UIAbilityContext.openLink() API
The caller app passes the link of the target app through the UIAbilityContext.openLink() API to start the target app.
The UIAbilityContext.openLink() API provides two methods for starting the target app.
Method 1: Open the app only in App Linking mode.
In this method, appLinkingOnly is set to true. If a matching app is found, that app is directly opened. If no app matches, an exception is thrown.
This method applies to scenarios where you have made configurations to handle target app launch failure. For example, if the caller app integrates ArkWeb, the link can be opened through ArkWeb when the target app is unavailable.
Method 2: Preferentially open the app in App Linking mode.
In this method, appLinkingOnly is set to false or not set. If a matching app is found, that app is directly opened. If no app matches, the system attempts to open the app in a browser.
This method applies to scenarios where you have made no configurations to handle target app launch failure. If the target app is unavailable, the link is opened through the system browser.
This section describes method 1, in order to check whether the App Linking configuration is correct. The following is an example.
Add the GlobalContext.ets file to the entry/src/main/ets/common directory to implement the APIs for initializing and obtaining the app context.
import { common } from '@kit.AbilityKit';

export class GlobalContext {
  private static context: common.UIAbilityContext;

  public static initContext(context: common.UIAbilityContext): void {
    GlobalContext.context = context;
  }

  public static getContext(): common.UIAbilityContext {
    return GlobalContext.context;
  }
}
Import GlobalContext to the entry/src/main/ets/entryability/EntryAbility.ets file and use GlobalContext.initContext(this.context) in the onCreate() method to initialize the global app context.
In the entry/src/main/ets/pages/Index.ets file, use the UIAbilityContext.openLink() API to open the app.
import { BusinessError } from '@kit.BasicServicesKit';
import { hilog } from '@kit.PerformanceAnalysisKit';
import { GlobalContext } from '../common/GlobalContext';
// ...

@Entry
@Component
struct Index {
  // ...

  build() {
    // ...

      Button('start link', { type: ButtonType.Capsule, stateEffect: true })
        .width('100%')
        .height(40)
        .margin({ top: '20vp' })
        .onClick(() => {
          let context = GlobalContext.getContext();
          let link: string = 'https://www.example.com/programs?action=showall';
          // Open the app only in App Linking mode.
          context.openLink(link, { appLinkingOnly: true })
            .then(() => {
              hilog.info(0x0000, 'testTag', `Succeeded in opening link.`);
            })
            .catch((error: BusinessError) => {
              hilog.error(0x0000, 'testTag', `Failed to open link, code: ${error.code}, message: ${error.message}`);
            })
        })
      // ...
  }

  // ...
}
[h2]Starting the App Through the System Browser or ArkWeb
ArkWeb deeply integrates App Linking. When a user taps a link in the system browser or on an embedded web page in an app that integrates ArkWeb, the system preferentially starts the target app through App Linking, and displays the corresponding content in the app. However, there are certain restrictions:
If the domain name of the web page that the user browses is the same as that of the link tapped, the system will open the link in the system browser or the ArkWeb component to maintain a consistent browsing experience.
If the domain name of the web page is different from that of the link (for example, one is example.com while the other is app.example.com), the system will preferentially start the target app using App Linking and display the corresponding content in the app.
[h2]What should I do if the value of skills in the module.json5 file of the app is incorrect?
Check whether the domain name of the app in the "host" field is the same as that configured in AppGallery Connect.
[h2]What should I do if the server of my website is incorrectly configured?
Follow the instructions below:
Check the JSON configuration file of the server and ensure that the value of appIdentifier is correct.
Check whether the applinking.json file is stored in the correct directory (.well-known). Use a browser or other ways to access the JSON file at https://your.domain.name/.well-known/applinking.json and ensure that the file is accessible.
[h2]What should I do if the system has not completed domain verification?
Follow the instructions below:
After installing the app on the device, wait at least 20 seconds to ensure that the system completes domain verification.
If the network is disconnected or weak, the domain verification may fail, and the system will conduct the verification again within 24 hours.
[h2]How do I check whether domain verification is successful?
To view the app domain name verification result, click Terminal in DevEco Studio and run the following command to query the result:
hdc shell hidumper -s AppDomainVerifyManager
If the verification is successful, you will see the success message like the output below.
BundleName:
  appIdentifier:123456789
   domain verify status:
    https://www.example.com:success
If the client-error message is displayed, troubleshoot as follows:
- Check whether the value of appIdentifier in the returned message is the same as the app ID in AppGallery Connect.
- Check whether the domain name configured in AppGallery Connect is successfully released.
If the http_unknown message is displayed, make sure that the device has access to the Internet, and reinstall the app.
If other messages are displayed, seek technical support.
[h2]What should I do if I cannot use App Linking to open a pre-installed app when I start my device for the first time?
The system verifies the domain name of a pre-installed app within 20 minutes after the device is started for the first time. If the device cannot access the Internet in this period, the domain verification may fail. In this case, restart your device or try again after 24 hours. The system will verify the domain name of the pre-installed app again after you restart the device or after 24 hours.
[h2]What should I do if the content is not updated in a timely manner when I access the content delivery network (CDN)?
The CDN cache duration is 10 minutes. Wait for a while and access the CDN again.
[h2]How are apps and domain names mapped?
They are in a many-to-many relationship. An app can be associated with multiple domain names, and a domain name can be associated with multiple apps.
[h2]If a domain name is associated with multiple apps, which app will be started when a link containing that domain name is tapped?
You can configure the applinking.json file to associate a domain name with multiple apps. If the uris field in the module.json5 file of each app is set to the same value, the system displays a dialog box for users to select the app to start. You can also use the path field to distinguish the apps to start. For example, use https://www.example.com/path1 to start target app 1 and use https://www.example.com/path2 to start target app 2.
[h2]What should I do if an error message indicating that the download source JSON file is denied and the security policy needs to be verified is displayed during app link configuration based on App Linking?
The domain name configuration file should be placed in the designated directory on the DNS:
https://domain.name/.well-known/applinking.json
For example, if the domain name of your server is <idp:inline displayname="code" id="code1819121514513">www.example.com, place the applinking.json file in the following directory:
https://www.example.com/.well-known/applinking.json