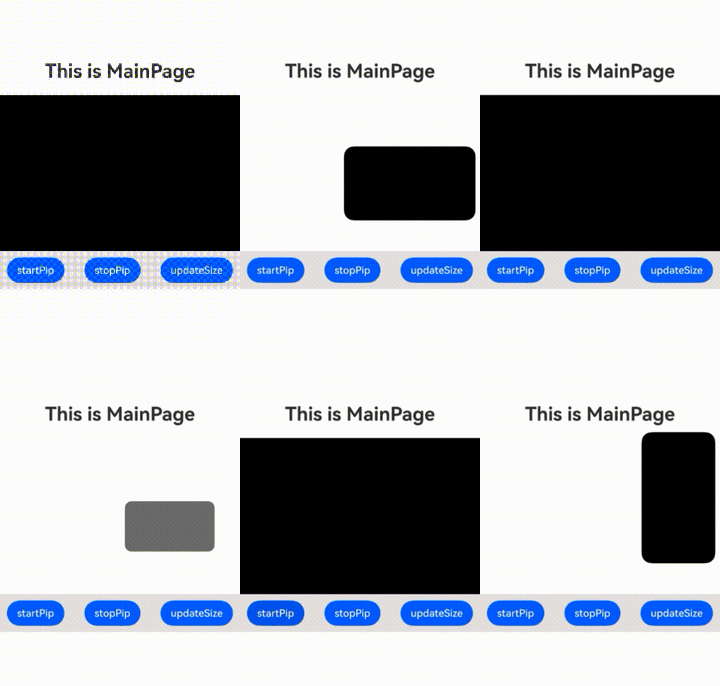
- Since API version 12, typeNode can be used to develop the PiP feature.
This method applies to any scenario where the PiP feature needs to be integrated. The following describes the implementation steps in different scenarios and the methods for managing typeNode and pages in related scenarios through examples.
Constraints
When constructing the PiP configuration parameters, you are advised to pass in the contentWidth and contentHeight parameters to calculate the initial PiP aspect ratio. Otherwise, the default aspect ratio 16:9 is used.
contentNode supports the XComponentType.SURFACE type, and the XComponent type must be specified when the typeNode is created.
When PiP is stopped, check whether the custom component nodes are released to avoid memory leaks.
Device restrictions: The typeNode can be used to implement the PiP feature on phones, tablets, PCs/2-in-1 devices, TVs, and cars.
How to Develop
This topic uses video playback as an example to describe how to develop the PiP feature using typeNode.
For a simple implementation of the video player in the example, refer to the following:
// model/AVPlayer.ets
// Simple player implementation.
import { BusinessError } from '@kit.BasicServicesKit';
import { common } from '@kit.AbilityKit';
import { media } from '@kit.MediaKit';
import { Logger } from '../util/LogUtil';

export class AVPlayer {
  private avPlayer?: media.AVPlayer;
  public surfaceID: string = '';

  setAVPlayerCallback() {
    this.avPlayer?.on('seekDone', (seekDoneTime: number) => {
      Logger.info(`AVPlayer seek succeeded, seek time is ${seekDoneTime}`);
    })
    this.avPlayer?.on('stateChange', async (state, reason) => {
      if (!this.avPlayer) {
        return;
      }
      switch (state) {
        case 'idle':
          this.avPlayer.release();
          break;
        case 'initialized':
          this.avPlayer.surfaceId = this.surfaceID;
          this.avPlayer.prepare().then(() => {
            Logger.info('AVPlayer prepare succeeded.');
          }, (err: BusinessError) => {
            Logger.error(`Invoke prepare failed, code is ${err.code}, message is ${err.message}`);
          });
          break;
        case 'prepared':
          this.avPlayer.play();
          break;
        case 'stopped':
          this.avPlayer.reset();
          break;
        default:
          break;
      }
    })
  }

  async avPlayerFdSrc() {

    try {
      this.avPlayer = await media.createAVPlayer();
    } catch(err) {
      Logger.error(`create AVPlayer failed`);
    };
    this.setAVPlayerCallback();
    let uiContext = AppStorage.get('UIContext') as UIContext;
    let context = uiContext.getHostContext() as common.UIAbilityContext;
    try {
      let fileDescriptor = await context.resourceManager.getRawFd('xxx.mp4');
      if (this.avPlayer) {
        this.avPlayer.fdSrc = fileDescriptor;
      }
    } catch (err) {
      console.error(`AVPlayer error: ${JSON.stringify(err)}`)
    }
  }
}
export class CustomXComponentController extends XComponentController {
onSurfaceCreated(surfaceId: string): void {
Logger.info(TAG, `onSurfaceCreated surfaceId: ${surfaceId}`);
if (PipManager.getInstance().player.surfaceID === surfaceId) {
return;
}
// Use the XComponent to create a surface and obtain the surface ID through the onSurfaceCreated callback.
// Set the surface ID for the AVPlayer to establish the association between the XComponent and AVPlayer.
// The AVPlayer will render the video frames to the surface of the XComponent.
PipManager.getInstance().player.surfaceID = surfaceId;
PipManager.getInstance().player.avPlayerFdSrc();
}
onSurfaceDestroyed(surfaceId: string): void {
Logger.info(TAG, `onSurfaceDestroyed surfaceId: ${surfaceId}`);
}
}
export class PipManager {
// ...
private mXComponentController: XComponentController;
// ...
constructor() {
this.xcNodeController = new XCNodeController();
this.player = new AVPlayer();
this.mXComponentController = new CustomXComponentController();
}
// ...
} As shown above, associate XComponentController with the video for subsequent parameter configuration.
Create a typeNode. You can choose whether to add it to the layout.
As a free node, the typeNode is not added to the layout. This method is applicable to simple PiPs where nodes are displayed only in the PiP window and do not require additional management.
Obtain the UIContext from the main window and use the typeNode.createNode API to create a typeNode.
export default class EntryAbility extends UIAbility {
  // ...
  onWindowStageCreate(windowStage: window.WindowStage): void {
    // ...
    windowStage.getMainWindow().then((window) => {
      // ...
      let ctx = window.getUIContext();
      AppStorage.setOrCreate('UIContext', ctx);
      // Create a typeNode through the UIContext in the main window.
      PipManager.getInstance().makeTypeNode(ctx);
makeTypeNode(ctx: UIContext): void { if (this.xComponent === null || this.xComponent === undefined) { this.xComponent = typeNode.createNode(ctx, 'XComponent', { type: XComponentType.SURFACE, controller: this.getXComponentController(), }); } }Add the typeNode to the layout. This method is applicable to the scenario where a video is previewed on the home page and then switched to the PiP mode. You need to manage the addition and removal of video nodes based on the PiP lifecycle and handle page redirection based on the navigation mode used by the application (single-UI ability, Router-based navigation, or Navigation-based navigation) to implement flexible switching between the home page and PiP.
Create a custom NodeController and implement the makeNode method. In this method, create a typeNode.
export class XCNodeController extends NodeController {
  public xComponent: typeNode.XComponent | null = null;
  private node: FrameNode | null = null;
  private canAddNode: boolean = true;

  setCanAddNode(canAddNode: boolean): void {
    this.canAddNode = canAddNode;
  }

  makeNode(context: UIContext): FrameNode | null {
    Logger.info(TAG, 'makeNode');
    this.node = new FrameNode(context);
    if (this.xComponent === null || this.xComponent === undefined) {
      this.xComponent = typeNode.createNode(context, 'XComponent', {
        type: XComponentType.SURFACE,
        controller: PipManager.getInstance().getXComponentController(),
      });
    }
    if (this.canAddNode) {
      try {
        this.xComponent.getParent()?.removeChild(this.xComponent);
      } catch (error) {
        Logger.error(TAG, 'Failed to removeChild');
      }
      try {
        this.node.appendChild(this.xComponent);
      } catch (error) {
        Logger.error(TAG, 'Failed to appendChild');
      }
    }
    return this.node;
  }
Add the typeNode to the page layout via NodeContainer.
@Component
export struct Page1 {
  build() {
    NavDestination() {
      Column() {
        // ...
        // Add typeNode to the page layout.
        NodeContainer(PipManager.getInstance().getNodeController())
          .size({ width: '100%', height: '800px' })
        // ...
      }
      // ...
    }
    // ...
  }
}
Set the PiP configuration parameters.
Add a PiPControlGroup array to PiPConfiguration to configure a controller for the current PiP.
function getControlGroups(templateType: PiPWindow.PiPTemplateType): PiPControlGroups {
  switch (templateType) {
    case PiPWindow.PiPTemplateType.VIDEO_PLAY:
      return [PiPWindow.VideoPlayControlGroup.VIDEO_PREVIOUS_NEXT];
    case PiPWindow.PiPTemplateType.VIDEO_CALL:
      return [PiPWindow.VideoCallControlGroup.MICROPHONE_SWITCH,
        PiPWindow.VideoCallControlGroup.HANG_UP_BUTTON, PiPWindow.VideoCallControlGroup.CAMERA_SWITCH];
    case PiPWindow.PiPTemplateType.VIDEO_MEETING:
      return [PiPWindow.VideoMeetingControlGroup.MICROPHONE_SWITCH,
        PiPWindow.VideoMeetingControlGroup.HANG_UP_BUTTON, PiPWindow.VideoMeetingControlGroup.CAMERA_SWITCH];
    case PiPWindow.PiPTemplateType.VIDEO_LIVE:
      return [PiPWindow.VideoLiveControlGroup.VIDEO_PLAY_PAUSE,
        PiPWindow.VideoLiveControlGroup.MUTE_SWITCH];
    default:
      return [];
  }
}

// ...

@Component
export struct Page1 {
  // ...
  @State currentTemplateType: PiPWindow.PiPTemplateType = PiPWindow.PiPTemplateType.VIDEO_PLAY;
  // ...
  startPip() {
    // ...
    let config: PiPWindow.PiPConfiguration = {
      // ...
      // Used in video calls and video meetings. Set the corresponding template.
      templateType: this.currentTemplateType,
      // Optional. In video call, video meeting, and live scenarios, this attribute can be used to select the components to be displayed under the corresponding template.
      controlGroups: getControlGroups(this.currentTemplateType),
      // ...
    };
    // ...
  }

  // ...
}
(Optional) Pass customUIController to PiPConfiguration to display the custom UI.
- Create a custom NodeController and implement the makeNode method to load the custom UI layout.
// You can extend NodeController to customize the UI controller. class TextNodeController extends NodeController { private message: string; private textNode: BuilderNode<[Params]> | null = null; constructor(message: string) { super(); this.message = message; } // Use BuilderNode to load the custom layouts. makeNode(context: UIContext): FrameNode | null { this.textNode = new BuilderNode(context); this.textNode.build(wrapBuilder<[Params]>(buildText), new Params(this.message)); return this.textNode.getFrameNode(); } // You can customize this method to update layouts. update(message: string) { Logger.info(`update message: ${message}`); if (this.textNode !== null) { this.textNode.update(new Params(message)); } } // You need to define this method to unregister the layout to avoid memory leaks. dispose() { Logger.info('dispose message: execute node dispose'); if (this.textNode !== null) { this.textNode.dispose(); } } } - Use decorators to construct layouts.
class Params { public text: string = ''; constructor(text: string) { this.text = text; } } // You can use the @Builder decorator to construct layouts. @Builder function buildText(params: Params) { Column() { Text(params.text) .fontSize(20) .fontColor(Color.Red) } .width('100%') // Full width of the PiP window. .height('100%') // Full height of the PiP window. } - When creating a PiP controller, pass the customUIController parameter to PiPConfiguration.
@Component
export struct Page1 {
  // ...
  private nodeController: TextNodeController = new TextNodeController('this is custom UI');
  // ...
  startPip() {
    // ...
    let config: PiPWindow.PiPConfiguration = {
      // ...
      // Optional. Set this parameter if you want to display the custom UI at the top of PiP.
      customUIController: this.nodeController,
    };
    // ...
  }

  // ...
}
- Create a custom NodeController and implement the makeNode method to load the custom UI layout.
To create a PiP controller, you need to configure the PiP context, XComponent controller (associated with the surfaceId of the video), PiP template type, and the width and height of the original content.
Create a PiP controller instance through the create(config: PiPConfiguration, contentNode: typeNode.XComponent) API.
init(ctx: Context): void {
  this.createPipController(ctx, this.getNode());
}

private createPipController(ctx: Context, node: typeNode.XComponent | null): void {
  if (this.pipController !== null && this.pipController !== undefined) {
    return;
  }
  Logger.info(`${TAG} onPageShow`);
  if (!PiPWindow.isPiPEnabled()) {
    Logger.error(TAG, `picture in picture disabled for current OS`);
    return;
  }
  const config: PiPWindow.PiPConfiguration = {
    context: ctx,
    componentController: this.getXComponentController(),
    templateType: PiPWindow.PiPTemplateType.VIDEO_PLAY,
    contentWidth: 1920,
    contentHeight: 1080,
  };

  PiPWindow.create(config, node).then((controller: PiPWindow.PiPController) => {
    // ...
  }).catch((err: BusinessError) => {
    Logger.error(TAG, `Failed to create pip controller. Cause:${err.code}, message:${err.message}`);
  });
}
Register callbacks for the lifecycle and control events.
Use the on('stateChange') API to register the lifecycle event callback. Use the on('controlEvent') API of the PiP controller instance to register the control event callback.
PiPWindow.create(config, node).then((controller: PiPWindow.PiPController) => {
  this.pipController = controller;
  // ...
  this.pipController.on('stateChange', (state: PiPWindow.PiPState, reason: string) => {
    this.onStateChange(state, reason);
  });
  this.pipController.on('controlEvent', (control: PiPWindow.ControlEventParam) => {
    this.onActionEvent(control);
  });
}).catch((err: BusinessError) => {
  Logger.error(TAG, `Failed to create pip controller. Cause:${err.code}, message:${err.message}`);
});
The typeNode added to the layout needs to be managed by the application. The processing varies depending on the scenario, mainly in the handling of lifecycle event callbacks.
The application uses a single-UI UIAbility.
Remove the typeNode from the layout in the ABOUT_TO_START lifecycle callback of PiP.
onStateChange(state: PiPWindow.PiPState, reason: string): void {
  let curState: string = '';
  this.xcNodeController.setCanAddNode(
    state === PiPWindow.PiPState.ABOUT_TO_STOP || state === PiPWindow.PiPState.STOPPED);
  this.lifeCycleCallback.forEach((fun) => {
    fun(state);
  });
  switch (state) {
    case PiPWindow.PiPState.ABOUT_TO_START:
      curState = 'ABOUT_TO_START';
      this.xcNodeController.removeNode();
      break;
    // ...
  }
  Logger.info(`[${TAG}] onStateChange: ${curState}, reason: ${reason}`);
}
You can add the typeNode to the layout again during the ABOUT_TO_STOP lifecycle of PiP based on service requirements.
@Entry
@Component
struct AbilityImplementPage {
  private callback: Function = (state: PiPWindow.PiPState) => {
    if (state === PiPWindow.PiPState.ABOUT_TO_STOP) {
      // The **ABOUT_TO_STOP** lifecycle is triggered when PiP is stopped or restored, and you need to add the node again at this time.
      Logger.info(`${TAG}, ABOUT_TO_STOP`)
      PipManager.getInstance().addNode();
    }
  };

  build() {
    Column() {
      Text('This is MainPage')
        .fontSize(30)
        .fontWeight(FontWeight.Bold)
        .margin({ bottom: 20 })

      // Add typeNode to the page layout.
      NodeContainer(PipManager.getInstance().getNodeController())
        .size({ width: '100%', height: '800px' })

      Row({ space: 20 }) {
        Button('startPip') // Start PiP.
          .onClick(() => {
            PipManager.getInstance().startPip();
          })

        Button('stopPip') // Stop PiP.
          .onClick(() => {
            PipManager.getInstance().stopPip();
          })

        Button('updateSize') // Update the video size.
          .onClick(() => {
            // The width and height set here must be those of the media content and be obtained through media-related APIs or callbacks.
            // For example, when the AVPlayer is used to play a video, the videoSizeChange callback can be used to obtain the updated media content size.
            PipManager.getInstance().updateContentSize(900, 1600);
          })
      }
      .backgroundColor('#4da99797')
      .size({ width: '100%', height: 60 })
      .justifyContent(FlexAlign.SpaceAround)
    }
    .justifyContent(FlexAlign.Center)
    .width('100%')
    .height('100%')
  }

  aboutToAppear(): void {
    PipManager.getInstance().registerLifecycleCallback(this.callback);
  }

  // ...
}
The application uses Router for navigation.
Remove the typeNode from the layout in the ABOUT_TO_START lifecycle callback of PiP.
onStateChange(state: PiPWindow.PiPState, reason: string): void {
  let curState: string = '';
  this.xcNodeController.setCanAddNode(
    state === PiPWindow.PiPState.ABOUT_TO_STOP || state === PiPWindow.PiPState.STOPPED);
  this.lifeCycleCallback.forEach((fun) => {
    fun(state);
  });
  switch (state) {
    case PiPWindow.PiPState.ABOUT_TO_START:
      curState = 'ABOUT_TO_START';
      this.xcNodeController.removeNode();
      break;
    // ...
  }
  Logger.info(`[${TAG}] onStateChange: ${curState}, reason: ${reason}`);
}
(Optional) Return to the upper-level page in the PiP ABOUT_TO_START lifecycle callback. If returning to the upper-level page is enabled, you also need to redirect to the original page in the ABOUT_TO_RESTORE callback (during restoration).
@Entry
@Component
struct RouterImplementPage {
  private page1: string = 'route/Page1';
  private pageRouter: Router | null = null;

  // Listen for the PiP lifecycle event, which is used for page and node operations.
  private callback: Function = (state: PiPWindow.PiPState) => {
    Logger.info(TAG, `pipStateChange: state ${state}`);
    if (state === PiPWindow.PiPState.ABOUT_TO_START) {
      // (Optional) Return to the upper-level page.
      this.pageRouter?.back();
    } else if (state === PiPWindow.PiPState.ABOUT_TO_STOP) {
      // The ABOUT_TO_STOP lifecycle is triggered when PiP is stopped or restored, and you need to add the typeNode to the layout again.
      PipManager.getInstance().addNode();
    } else if (state === PiPWindow.PiPState.ABOUT_TO_RESTORE) {
      // If the upper-level page is returned in the ABOUT_TO_START callback, push the original page during the restoration.
      this.jumpNext();
    }
  };

  aboutToAppear(): void {
    this.pageRouter = this.getUIContext().getRouter();
    PipManager.getInstance().registerLifecycleCallback(this.callback);
  }

  // ...

  jumpNext(): void {
    let topPage = this.pageRouter?.getState();
    if (topPage !== undefined && (this.page1.toString() === topPage.path + topPage.name)) {
      Logger.info(TAG, `page1 already at top`)
      return;
    }
    this.pageRouter?.pushUrl({
      url: this.page1 // Target URL.
    }, router.RouterMode.Standard, (err) => {
      if (err) {
        Logger.error(TAG, `Invoke pushUrl failed, code is ${err.code}: ${err.message}`);
        return;
      }
      Logger.info(TAG, 'Invoke pushUrl succeeded.');
    });
  }

  // ...
}
The application uses Navigation for navigation.
Remove the typeNode from the layout in the ABOUT_TO_START lifecycle callback of PiP.
onStateChange(state: PiPWindow.PiPState, reason: string): void {
  let curState: string = '';
  this.xcNodeController.setCanAddNode(
    state === PiPWindow.PiPState.ABOUT_TO_STOP || state === PiPWindow.PiPState.STOPPED);
  this.lifeCycleCallback.forEach((fun) => {
    fun(state);
  });
  switch (state) {
    case PiPWindow.PiPState.ABOUT_TO_START:
      curState = 'ABOUT_TO_START';
      this.xcNodeController.removeNode();
      break;
    // ...
  }
  Logger.info(`[${TAG}] onStateChange: ${curState}, reason: ${reason}`);
}
(Optional) Return to the upper-level page in the PiP ABOUT_TO_START lifecycle callback. If returning to the upper-level page is enabled, you also need to redirect to the original page in the ABOUT_TO_RESTORE callback (during restoration).
@Entry
@Component
struct NavigationImplementPage {
  @Provide('pageInfos') pageInfos: NavPathStack = new NavPathStack();

  // Listen for the PiP lifecycle event, which is used for page and node operations.
  private callback: Function = (state: PiPWindow.PiPState) => {
    Logger.info(TAG, `pipStateChange: state ${state}`);
    if (state === PiPWindow.PiPState.ABOUT_TO_START) {
      // (Optional) Return to the upper-level page.
      this.pageInfos.pop();
    } else if (state === PiPWindow.PiPState.ABOUT_TO_STOP) {
      // The ABOUT_TO_STOP lifecycle is triggered when PiP is stopped or restored, and you need to add the typeNode to the layout again.
      PipManager.getInstance().addNode();
    } else if (state === PiPWindow.PiPState.ABOUT_TO_RESTORE) {
      // If the upper-level page is returned in the ABOUT_TO_START callback, push the original page during the restoration.
      this.jumpNext();
    }
  };

  jumpNext() {
    if (this.pageInfos.getAllPathName()[0] === 'Page1') {
      Logger.info(TAG, 'Page1 already at top');
      return;
    }
    this.pageInfos.pushPath({ name: 'Page1' });
  }

  aboutToAppear(): void {
    PipManager.getInstance().registerLifecycleCallback(this.callback);
  }

  // ...

  @Builder
  PageMap(name: string) {
    if (name === 'Page1') {
      Page1();
    }
  }


  build() {
    Navigation(this.pageInfos) {
      // ...
    }
    .title('MainTitle')
    .navDestination(this.PageMap)
  }
}
Start PiP.
After creating a PiP controller instance, call startPiP to start the PiP.
startPip(): void {
  this.pipController?.startPiP().then(() => {
    Logger.info(TAG, `Succeeded in starting pip.`);
  }).catch((err: BusinessError) => {
    Logger.error(TAG, `Failed to start pip. Cause:${err.code}, message:${err.message}`);
  });
}
You can use the setAutoStartEnabled method of the PiP controller instance to set whether to automatically start PiP when the application's main window that starts the PiP moves to the background. By default, the PiP is not automatically started. When PiP auto-start is enabled, if the application's main window is in the multi-window floating window state and is moved to the sidebar, PiP will not be automatically started even though the main window has moved to the background.
PiPWindow.create(config, node).then((controller: PiPWindow.PiPController) => {
  this.pipController = controller;
  this.pipController.setAutoStartEnabled(true);
  // ...
}).catch((err: BusinessError) => {
  Logger.error(TAG, `Failed to create pip controller. Cause:${err.code}, message:${err.message}`);
});
Update the media content size.
After the PiP media source is updated (for example, the video is switched), call the updateContentSize method of the PiP controller instance to adjust the PiP ratio.
updateContentSize(width: number, height: number): void {
  if (this.pipController) {
    this.pipController.updateContentSize(width, height);
  }
}
Stop PiP.
When PiP is no longer needed, you can call the stopPiP method of the PiP controller instance to stop it.
stopPip(): void {
  if (this.pipController === null || this.pipController === undefined) {
    return;
  }
  this.pipController.stopPiP()
    .then(() => {
      Logger.info(TAG, `Succeeded in stopping pip.`);
    }).catch((err: BusinessError) => {
      Logger.error(TAG, `Failed to stop pip. Cause:${err.code}, message:${err.message}`);
    });
}
The following figure shows the sample code for using free typeNode (not added to the layout) to develop PiP.

The following figure shows the sample code for adding a typeNode to the layout (using the Router-based navigation, Navigation-based navigation, or single-UI ability) to develop PiP.