The system provides two solutions for video playback development:
-
AVPlayer: provides ArkTS and JS APIs to implement audio and video playback. It also supports parsing streaming media and local assets, decapsulating media assets, decoding video, and rendering video. It is applicable to end-to-end playback of media assets and can be used to play video files in MP4 and MKV formats.
-
Video component: encapsulates basic video playback capabilities. It can be used to play video files after the data source and basic information are set. However, its scalability is poor. This component is provided by ArkUI. For details about how to use this component for video playback development, see Video Component.
This section describes how to use AVPlayer to implement video playback. It uses a complete video playback workflow as an example to demonstrate end-to-end playback of media resources.
The full playback process includes creating an AVPlayer instance, setting the media asset to play and the window to display the video, setting playback parameters (volume, speed, and scale type), controlling playback (play, pause, seek, and stop), resetting the playback configuration, and releasing the instance. During application development, you can use the state property of AVPlayer to obtain its state or call on('stateChange') to listen for state changes. If the application performs an operation when the AVPlayer is not in the given state, the system may throw an exception or generate other undefined behavior.
Figure 1 Playback state transition
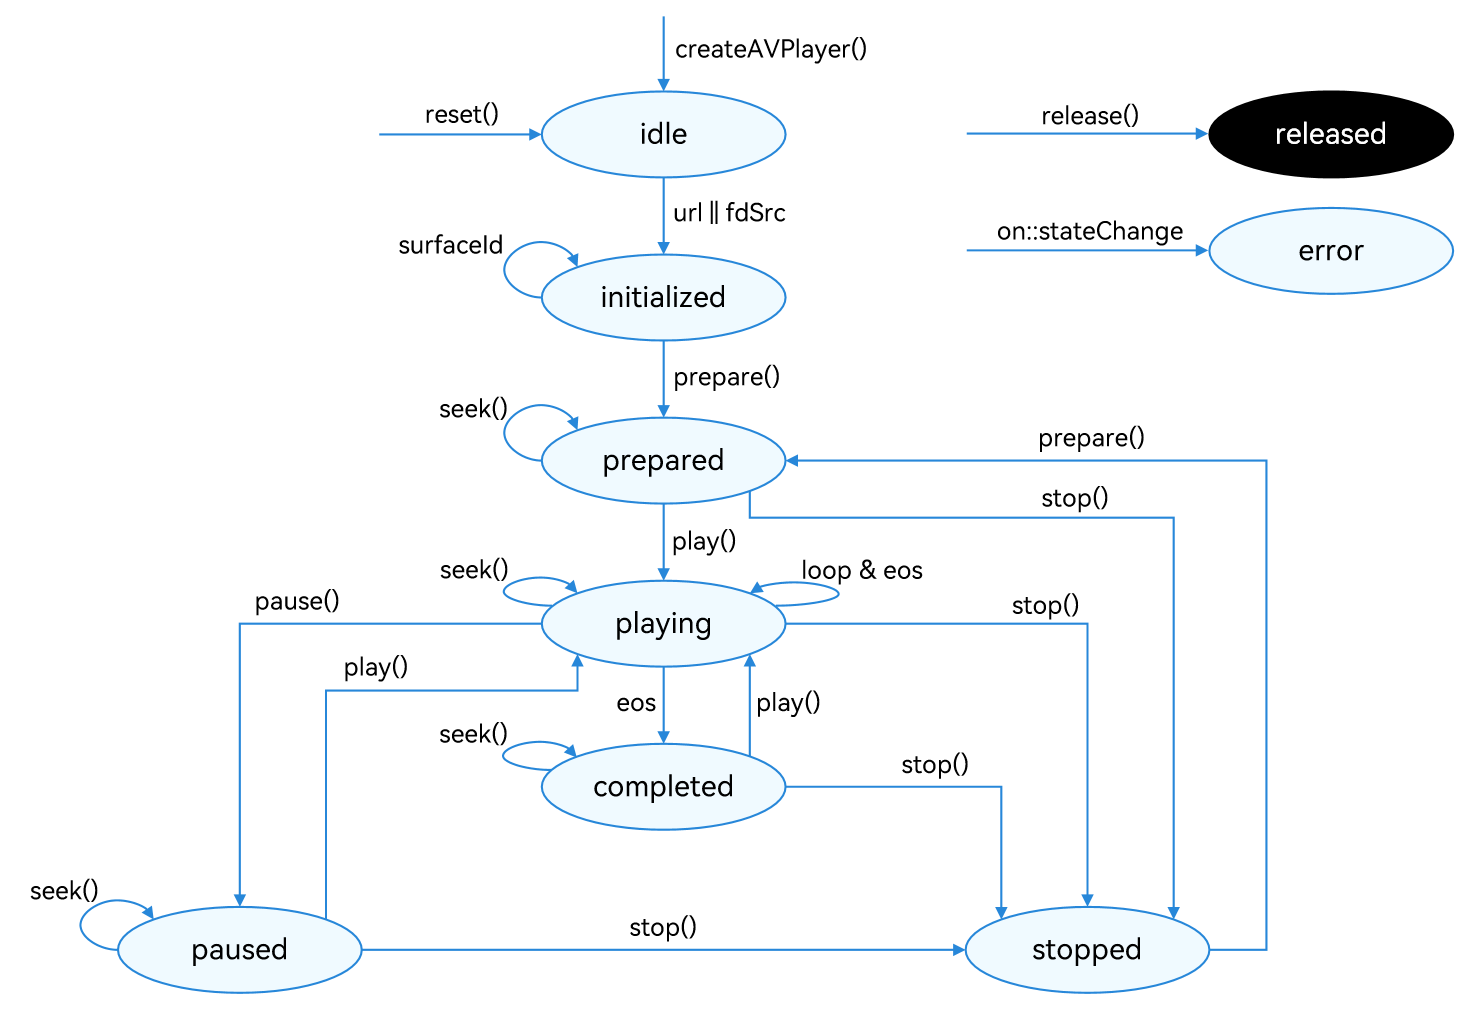
For details about the states, see AVPlayerState. When the AVPlayer is in the prepared, playing, paused, or completed state, the playback engine is working and a large amount of RAM is occupied. If your application does not need to use the AVPlayer, call reset() or release() to release the instance.
Developer's Tips
This topic describes only how to implement the playback of a media asset. In practice, background playback and playback conflicts may be involved. You can refer to the following description to handle the situation based on your service requirements.
- If you want the application to continue playing the media asset in the background or when the screen is off, use the AVSession and continuous task to prevent the playback from being forcibly interrupted by the system.
- If the media asset being played involves audio, the playback may be interrupted by other applications based on the system audio management policy. (For details, see Processing Audio Interruption Events.) It is recommended that the player application proactively listen for audio interruption events and handle the events accordingly to avoid the inconsistency between the application status and the expected effect.
- When a device is connected to multiple audio output devices, the application can listen for audio output device changes through on('audioOutputDeviceChangeWithInfo') and handle them accordingly.
- To access online media resources, you must request the ohos.permission.INTERNET permission.
How to Develop
For details about the APIs, see AVPlayer.
-
Call createAVPlayer() to create an AVPlayer instance. The AVPlayer is the idle state.
import { media } from '@kit.MediaKit'; // Create an AVPlayer instance. let avPlayer = await media.createAVPlayer(); -
Set the events to listen for, which will be used in the full-process scenario. The table below lists the supported events.
Event Type Description stateChange Mandatory; used to listen for changes of the state property of the AVPlayer.
To ensure proper functionality, the listener must be configured when the AVPlayer is in the idle state and before the resource setting API is called. If the listener is set after the resource setting API is called, the stateChange event reported during resource setting may fail to be received.
error Mandatory; used to listen for AVPlayer errors.
To ensure proper functionality, the listener must be configured when the AVPlayer is in the idle state and before the resource setting API is called. If the listener is set after the resource setting API is called, the error event reported during resource setting may fail to be received.
durationUpdate Used to listen for progress bar updates to refresh the media asset duration. timeUpdate Used to listen for the current position of the progress bar to refresh the current time. seekDone Used to listen for the completion status of the seek() request.
This event is reported when the AVPlayer seeks to the playback position specified in seek().
speedDone Used to listen for the completion status of the setSpeed() request.
This event is reported when the AVPlayer plays videos at the speed specified in setSpeed().
volumeChange Used to listen for the completion status of the setVolume() request.
This event is reported when the AVPlayer plays videos at the volume specified in setVolume().
bitrateDone Used to listen for the completion status of the setBitrate() request, which is used for HTTP Live Streaming (HLS) streams.
This event is reported when the AVPlayer plays videos at the bit rate specified in setBitrate().
availableBitrates Used to listen for available bit rates of HLS resources. The available bit rates are provided for setBitrate(). bufferingUpdate Used to listen for network playback buffer information. startRenderFrame Used to listen for the rendering time of the first frame during video playback.
This event is reported when the AVPlayer enters the playing state and the first frame of the video image is rendered to the display. Generally, the application can use this event to remove the video cover, achieving smooth connection between the cover and the video image.
videoSizeChange Used to listen for the width and height of video playback and adjust the window size and ratio. audioInterrupt Used to listen for audio interruption. This event is used together with the audioInterruptMode property.
This event is reported when the current audio playback is interrupted by another (for example, when a call is coming), so the application can process the event in time.
// This is only an example. You can set the events to listen for as required. import { BusinessError } from '@kit.BasicServicesKit'; import { audio } from '@kit.AudioKit'; avPlayer.on('stateChange', async (state: string, reason: media.StateChangeReason) => { // Add your service logic as required. }); avPlayer.on('error', (error: BusinessError) => { // Add your service logic as required. }); avPlayer.on('durationUpdate', (duration: number) => { // Add your service logic as required. }); avPlayer.on('timeUpdate', (time:number) => { // Add your service logic as required. }); avPlayer.on('seekDone', (seekDoneTime:number) => { // Add your service logic as required. }); avPlayer.on('speedDone', (speed:number) => { // Add your service logic as required. }); avPlayer.on('volumeChange', (vol: number) => { // Add your service logic as required. }); avPlayer.on('bitrateDone', (bitrate:number) => { // Add your service logic as required. }); avPlayer.on('availableBitrates', (bitrates: Array<number>) => { // Add your service logic as required. }); avPlayer.on('bufferingUpdate', (infoType: media.BufferingInfoType, value: number) => { // Add your service logic as required. }); avPlayer.on('startRenderFrame', () => { // Add your service logic as required. }); avPlayer.on('videoSizeChange', (width: number, height: number) => { // Add your service logic as required. }); avPlayer.on('audioInterrupt', (info: audio.InterruptEvent) => { // Add your service logic as required. }); -
Set the media asset URL. The AVPlayer enters the initialized state.

The URL in the code snippet below is for reference only. You need to check the media asset validity and set the URL based on service requirements.
-
If local files are used for playback, ensure that the files are available and the application sandbox path is used for access. For details about how to obtain the application sandbox path, see Obtaining Application File Paths. For details about the application sandbox and how to push files to the application sandbox directory, see File Management.
-
If a network playback path is used, you must declare the ohos.permission.INTERNET permission.
-
You can use ResourceManager.getRawFd to open the HAP resource file descriptor.
-
The playback formats and protocols in use must be those supported by the system.
let url = 'https://xxx.xxx.xxx.mp4'; if (avPlayer == null) { return; } avPlayer.url = url; -
-
Obtain and set the surface ID of the window to display the video.
The application obtains the surface ID from the XComponent. For details about the process, see getXComponentSurfaceId.
// Obtain the surface ID by calling getXComponentSurfaceId. let surfaceId = ''; if (avPlayer == null) { return; } if (surfaceId === '') { return; } avPlayer.surfaceId = surfaceId; -
Call prepare() to switch the AVPlayer to the prepared state. In this state, you can obtain the duration of the media asset to play and set the scale type and volume.
import { BusinessError } from '@kit.BasicServicesKit'; avPlayer.prepare((err: BusinessError) => { if (err) { console.error('Failed to prepare,error message is :' + err.message); } else { console.info('Succeeded in preparing'); } }); -
Call play(), pause(), seek(), and stop() to perform video playback control as required.
import { BusinessError } from '@kit.BasicServicesKit'; // Playback operation. avPlayer.play().then(() => { console.info('Succeeded in playing'); }, (err: BusinessError) => { console.error('Failed to play,error message is :' + err.message); }); // Pause operation. avPlayer.pause((err: BusinessError) => { if (err) { console.error('Failed to pause,error message is :' + err.message); } else { console.info('Succeeded in pausing'); } }); // Seek operation. let seekTime: number = 1000; avPlayer.seek(seekTime, media.SeekMode.SEEK_PREV_SYNC); // Stop operation. avPlayer.stop((err: BusinessError) => { if (err) { console.error('Failed to stop,error message is :' + err.message); } else { console.info('Succeeded in stopping'); } }); -
(Optional) Call reset() to reset the AVPlayer. The AVPlayer enters the idle state again and you can change the media asset URL.
import { BusinessError } from '@kit.BasicServicesKit'; avPlayer.reset((err: BusinessError) => { avPlayer.url = url; if (err) { console.error('Failed to reset,error message is :' + err.message); } else { console.info('Succeeded in resetting'); } }); // Change the URL. let url = 'https://xxx.xxx.xxx.mp4'; if (avPlayer == null) { return; } avPlayer.url = url; -
Call release() to switch the AVPlayer to the released state. Now your application exits the playback.
import { BusinessError } from '@kit.BasicServicesKit';

avPlayer.release((err: BusinessError) => {
    if (err) {
        console.error('Failed to release,error message is :' + err.message);
    } else {
        console.info('Succeeded in releasing');
    }
});
Running the Sample Project
- Create a project, download the sample project, and copy its resources to the corresponding directories.
AVPlayerArkTSVideo entry/src/main/ets/ └── pages └── Index.ets (playback UI) entry/src/main/resources/ ├── base │ ├── element │ │ ├── color.json │ │ ├── float.json │ │ └── string.json │ └── media │ ├── ic_video_play.svg (play button image resource) │ └── ic_video_pause.svg (pause button image resource) └── rawfile └── test1.mp4 (video resource) - Compile and run the project.